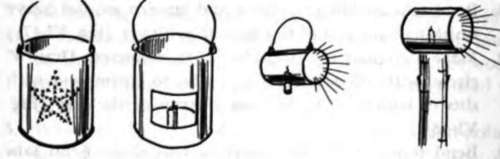
Projects. Candle Sconce From Tin Can
Description
This section is from the book "Creative Crafts For Campers", by Catherine T. Hammett and Carol M. Horrocks. Also available from Amazon: Creative Crafts For Campers.
Projects. Candle Sconce From Tin Can
This project may be made from any size can; #10 cans make good footlights for dramatic presentations, and #5 cans are a good size for sconces by fireplaces.
Equipment needed: rawhide mallet; vise; file; pliers; tin snips; decorating tools.
Materials needed: clean cans of desired size; paper, scissors, etc., for pattern; small nail to hold candle.
Steps
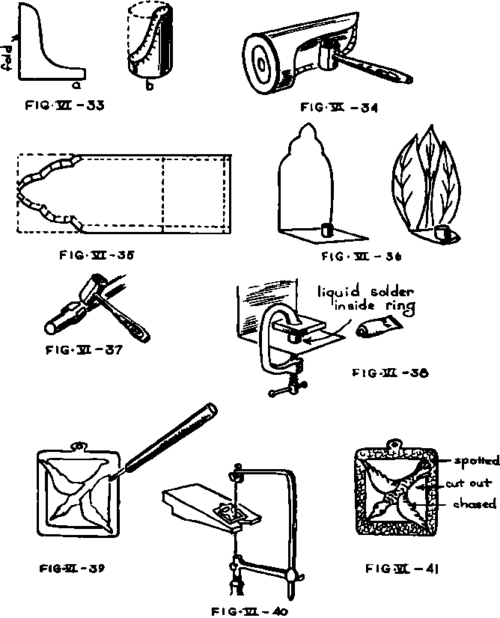
1. Make a paper pattern by wrapping paper around can to get size. Fold in half, and draw shape of sides as desired. Cut both sides out at same time (Fig. VI-33 a). Draw shape on can.
2. Cut can to pattern (Fig. VI-33 b), leaving 14" edge to turn under (see Techniques for turning edge, Fig. VI-5). Flatten with hammer (Fig. VI-34).
3. Hammer nail through bottom, from outside, so point of nail will hold candle in place; or make a collar as in Figure VI-37.
4. Decorate as desired (see Techniques).
Candle Sconce With Cutout Design
This is a good project to use in cabin or dining hall where candles are used; the background protects the wall or post from the smoke of the candle. A strip of tin from a #10 can (see Techniques, Figs. VI-7 and 8) will be good material for this sconce.
Equipment needed; tin snips; work gloves; stick or pipe for bending; rawhide mallet; egg-beater drill; liquid solder; fine steel wool.
Materials needed: #10 tin can-clean and rust free; paper, etc., for pattern.
Steps
1. Make paper pattern, deciding on shape, size, etc. Make design and trace on the metal (Fig. VI-35).
2. Cut metal i/2" wider than design on each side. Turn this i/2" edge under (see Techniques, Figs. VI-2, 3, 5), and hammer flat.
3. Cut design (see Techniques, Fig. VI-9 b) as desired (Fig. VI-36).
4. To make holder for candle, make a strip about 1x 3/4". Turn back 14" on long edges. Roll strip around stick or pipe the thickness of a candle, overlapping ends for seam (Fig. VI-37).
5. Bend bottom of sconce as desired (Fig. VI-36).
6. Fasten seam and attach candle holder with liquid solder (Figs. VI-18 and 38).
7. Drill hole at top for hanging on wall or post.
8. Rub with steel wool.
Simple Saw Piercing-A Tent Or Cabin Symbol
This is a good beginning project in metal crafts. Each member of the group may make his own design, or there may be a symbol already in use which can be modified by each camper. Copper and German silver are less expensive metals than silver, and they make good first project materials.
The following project may be a pin, or a small flat symbol to wear on a thong or chain.
Equipment needed: jeweler's saw and frame; egg-beater drill; bench pin; rawhide mallet; files; polishing equipment.
Materials needed: pieces of copper or other metal of desired size; paper, etc., for design.
Steps
1. Make a design the exact size of finished project. Transfer it to the metal by tracing over carbon paper with hard pencil, then scratching with a sharp point, such as a needle placed in a stick for a handle (Fig. VI-39).
2. Drill holes in which to place saw blade. Cut out (see Techniques, Fig. VI-29) parts of design (Fig. VI-40).
3. File edges (see Techniques, Figs. VI-13-17), outside and inside (Fig. VI-41).
4. Polish and add pin, if desired (see Techniques, Fig. VI-18).
Variations: Use ball-peen hammer for spotting or tapping frame of design, or any part. Use chisel or filed nails to add to design (Fig. VI-41).
Etch design (see Techniques).
Raising A Shallow Bowl Or Dish
This project is included here because the making of the mold in a stump is a good correlation with woodworking. A shallow dish or bowl may be used in camp dining hall for a dish garden, or in tent or cabin groups for a table utensil. The project may be as simple as the shaping of the dish, or may be extended to include some type of design that is saw pierced, chased, embossed, or spotted on the edges.
Equipment needed: wood gouges and sandpaper; rawhide mallet; ball-peen hammer; pencil and dividers; decorating tools, as desired; polishing equipment.
Materials needed; stump or wooden block; circular disc of metal-copper, aluminum, etc.-6" to 8" in diameter is a good starting size.
Steps
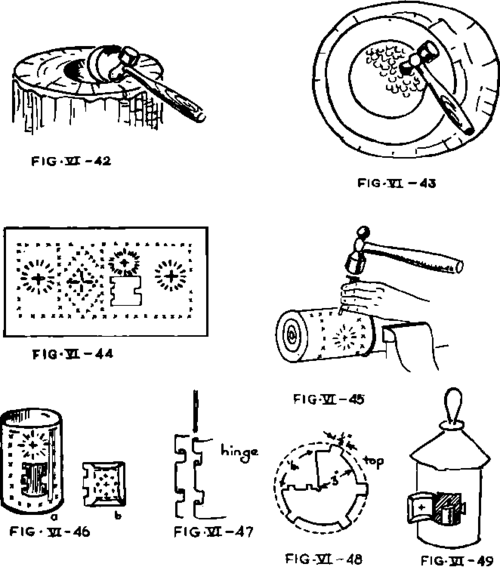
1. Make a mold (Fig. VI-42) the desired size and depth by scooping out the stump or block (see Techniques in Chap. X). Sand smooth.
2. With pencil and divider, mark rim of dish.
3. With the ball end of the hammer, begin to pound the center of the disc into depression, rotating disc while hammering in same area, avoiding the rim (Fig. VI-43.) .
4. If the metal becomes hard, and difficult to work, it must be annealed or softened. Heat the metal in a hot wood fire, and plunge into a pail of water. This may need to be repeated several times.
5. When the dish is the desired shape, file edges, and polish as in Techniques, above.
A Colonial Lantern (Nail Pierced)
This is a more advanced project, included to show decorating with nail piercing, and also slit and tab construction. Materials may be tin carts or sheet tin.
Equipment needed: vise; 10-penny nails; file; hammer; pliers; tape; cold chisel; log (size of can); tin shears; work gloves; long finishing nail.
Materials needed: #5 juice can and strip end from #10 can, or sheet tin; coat hanger or wire; thin cardboard for pattern.
Steps
1. Make a cardboard pattern of all parts; fit together, adjusting as needed. Draw design for piercing on pattern (Fig. VI-44).
2. Place log in vise horizontally, and slip can over end (Fig. VI-45).
3. Fasten paper on can with tape.
4. File nails to shapes desired, and follow design, pounding nail through pattern and through can. Log keeps can in shape through piercing (Fig. VI-45).
5. Cut out hole for door, using chisel and tin shears. Leave two 1/2" tabs on left for hinges (Fig. VI-46 a).
6. Make 4 slits for top along top edge-1/2" slits just below rim (Fig. VI-46 a).
7. From another piece of tin, cut a door 1" higher and wider than hole, with tabs to correspond to hinges (Fig. VI-46 b). Bend edges of three other sides 14", and hammer flat.
8. Bend tabs on hinges of door and lantern around heavy finishing nail, so they fit together as hinges (Fig. VI-47).
9. Make a circular top from disc 7" in diameter. Draw 6" circle, with allowance for 1/2" tabs, to correspond with slits in lantern. Cut out one quarter of the disc (Fig. VI-48).
10. Bend top around, and insert tabs in slots. Bend tabs inside lantern, to fasten top (Fig. VI-49).
11. Make handle from wire or coat hanger. Cut a 3" disc to put at top of lantern, to keep heat from hand (Fig. VI-49).
12. Put small nail in bottom to hold candle.
SUGGESTIONS FOR ADDITIONAL PROJECTS
Trail Signs
Signs using metal on wood
Lantens

Continue to:
My Books

