Accumulators. Storage Or Secondary Batteries. Continued
Description
This section is from the book "Electricity For Boys. The "How-To-Do-It" Books", by J. S. Zerbe. Also available from Amazon: Electricity for Boys.
Accumulators. Storage Or Secondary Batteries. Continued
The Negative Plate
The negative plate is filled, in like manner, with precipitated lead. This lead is made by putting a strip of zinc into a standard solution of acetate of lead, and crystals will then form on the zinc. These will be very thin, and will adhere together, firmly, forming a porous mass. This, when saturated and kept under water for a short time, may be put into the openings of the negative plate.
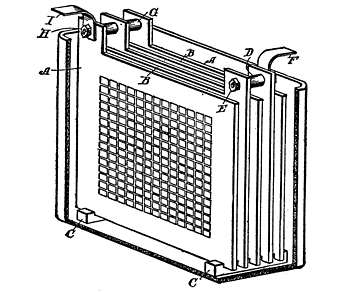 Fig. 63. Assemblage of Accumulator Plates
Connecting Up The Plates
The next step is to put these plates in position to form a battery. In Fig. 63 is shown a collection of plates connected together
For simplicity in illustrating, the cell is made up of glass, porcelain, or hard rubber, with five plates (A), A, A representing the negative and B, B the positive plates. A base of grooved strips (C, C) is placed in the batteries of the cell to receive the lower ends of the plates. The positive plates are held apart by means of a short section of tubing (D), which is clamped and held within the plates by a bolt (E), this bolt also being designed to hold the terminal strip (F).
In like manner, the negative plates are held apart by the two tubular sections (G), each of which is of the same length as the section D of the positives. The bolt (H) holds the negatives together as well as the terminal (I). The terminals should be lead strips, and it would be well, owing to the acid fumes which are formed, to coat all brass work, screws, etc., with paraffine wax.
The electrolyte or acid used in the cell, for working purposes, is a pure sulphuric acid, which should be diluted with about four times its weight in water. Remember, you should always add the strong acid to the water, and never pour the water into the acid, as the latter method causes a dangerous ebullition, and does not produce a good mixture
Put enough of this solution into the cell to cover the tops of the plates, and the cell is ready.
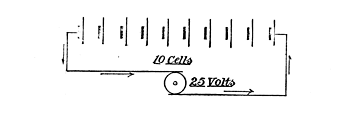 Fig. 64. Connecting Up Storage Battery in Series
Charging The Cells
The charge of the current must never be less than 2.5 volts. Each cell has an output, in voltage, of about 2 volts, hence if we have, say, 10 cells, we must have at least 25 volts charging capacity. We may arrange these in one line, or in series, as it is called, so far as the connections are concerned, and charge them with a dynamo, or other electrical source, which shows a pressure of 25 volts, as illustrated in Fig. 64, or, instead of this, we may put them into two parallel sets of 5 cells each, as shown in Fig. 65, and use 12.5 volts to charge with. In this case it will take double the time because we are charging with only one-half the voltage used in the first case.
The positive pole of the dynamo should be connected with the positive pole of the accumulator cell, and negative with negative. When this has been done run up the machine until it slightly exceeds the voltage of the cells. Thus, if we have 50 cells in parallel, like in Fig. 64, at least 125 volts will be required, and the excess necessary should bring up the voltage in the dynamo to 135 or 140 volts.
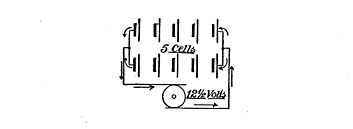 Fig. 65. Parallel Series
 Fig. 66. Charging Circuit
The Initial Charge
It is usual initially to charge the battery from periods ranging from 36 to 40 hours, and to let it stand for 12 or 15 hours, after which to re-charge, until the positive plates have turned to a chocolate color, and the negative plates to a slate or gray color, and both plates give off large bubbles of gas.
In charging, the temperature of the electrolyte should not exceed 100° Fahrenheit.
When using the accumulators they should never be fully discharged.
The Charging Circuit
The diagram (Fig. 66) shows how a charging circuit is formed. The lamps are connected up in parallel, as illustrated. Each 16-candle-power 105-volt lamp will carry ½ ampere, so that, supposing we have a dynamo which gives 110 volts, and we want to charge a 4-volt accumulator, there will be 5-volt surplus to go to the accumulator. If, for instance, you want the cell to have a charge of 2 amperes, four of these lamps should be connected up in parallel. If 3 amperes are required, use 6 lamps, and so on.
Continue to:
My Books

