Articles On Book Binding, Tooling, And Designing. Part 3
Description
This section is from the book "Arts & Crafts Magazine Vol1-2", by Hutchinson & Company.
Articles On Book Binding, Tooling, And Designing. Part 3
Having finished our comparison between the old and new methods, we will proceed to give instructions in several forms of binding founded upon the principles of the early bindings. Our directions will comprise bindings for every class of book, from the elaborately decorated volume suitable for rare, unique works, to the simple library binding.

Fig. 9.
It will be advisable, first, to give the sizes in which books are made.
A book is printed in sheets, which when folded - Once, make a folio-sized volume. Twice, make a quarto-sized volume (usually written " 4to "). Three times, make an octavo-sized volume
(usually written " 8vo "). Four times, make a 16mo-sized volume. Five times, make a 32mo-sized volume. A book is said to be " crown 8vo " or " demy 8vo " when sheets of crown or demy paper have been respectively folded to octavo size.
The following are the more generally used sizes of printing papers:-
Foolscap 17 x 13 1/2, Crown 20 x 15 Post 19 1/4 x 15 1/2
Demy 22 1/2 x 17.V
Medium 24 x [9
Royal 25 x 20
Super Royal 27 x 21
Imperial 30 x 22 the bottom edge the "tail," and the third edge the "foredge."
When folded, each sheet is called a "section, and consists of the number of leaves into which the sheet has been folded, each leaf consisting of two pages.
The top edge of a book is termed the " head,"

Fig. 10. - In the diagram, the guard is extended, to show the method more clearly.
To simplify instruction and to avoid confusing the reader by references to a number of methods at the same time, we shall proceed to describe the binding of a book according to definite specifications.
Our volume will be 8vo size. There will be single-page plates, a double-page plate, and a frontispiece, an etching on thick plate paper. The end papers will be of grey, hand-made paper. The book will be sewn on five cords, the edges will be cut and gilded, and the book will be covered in green morocco, and gold tooled.
Tools required for the work described in the present article are: large hammer, bone folder, small knife, and dividers (see Fig. 13), also eight tins (11x7 inches) and two pressing boards (11 x.7 inches) made of 3/4 inch beechwood are needed.
If our book is received in sheets, it will first have to be folded. It will be noticed that every sheet is lettered alphabetically in one of the corners. These letters are termed "signatures." Usually the letters J W V are omitted.
Place the sheets in alphabetical order, with the signature in each case in the bottom right-hand corner (Fig. 5). Turn the first sheet over so that the signature A comes face downward on the left-hand bottom corner (Fig. 6). Fold now in half, from right to left, taking great care that the printing corresponds. This can best be done by holding the sheet to the light. With the folder, now crease the paper down the centre, starting from the middle, and folding upwards and then downwards. Pages 2 and 3 will now face. Fold, in the same manner, the top right-hand corner to the bottom right-hand corner. Pages 12 and 13 will face (Fig. 7). Fold again in half, so that 8 and 9 face. This will complete the folding of our first section (Fig. 8). The remainder of the sheets should be folded the same way. Put the front pages in the following order: - Half-title, frontispiece, title, contents, list of illustrations, and introduction. If our book is already bound it will be necessary to collate it. Collating may be briefly described as the examination of the book, page by page, in order to ensure that no pages are missing, and that they are in their proper order. It is most important that this examination take place before the book is "pulled." If the copy be found imperfect, it can be returned to the publisher and exchanged. Should the discovery, however, be made after it has been "pulled," it may be difficult to do this. After collating, remove the old cover, cut away the tapes or cords on which the book has been previously sewn, and remove as much of the glue and paper as possible from the back with a blunt knife. Great care must be taken or the sections will be damaged. The old endpapers should not be removed, as they are useful to protect the book until the new ones are made.
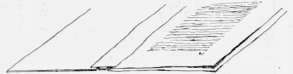
Fig. 11.
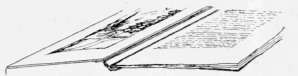
Fig. 12.
Turn over the leaves until the centre of the first section is found; cut and remove the thread, find the end of the section and pull oh. As an assistance in finding the end of the section, look for the signature which denotes the beginning of the next section.

Fig. 13.
If the section be difficult to remove, on account of the glue on the back, the glue may be soaked off with warm water. This should be done in the following manner: Put the book into the old cover, with the back just left exposed; place it in a press and moisten the back with warm water by means of a sponge. After a few minutes the glue and paper can be removed with a folder. The book should be left to dry and then the sections can easily be detached. After having separated all the sections, the plates and single leaves should be carefully taken out. These can usually be peeled off. The joint or ridge formed by the previous binding has next to be hammered out. Two or three sections at a time are taken and beaten out, a large-faced hammer being used on a hard flat surface, such as the knocking clown iron. This should be covered with paper, to protect the sheets. In taking the sections apart, some of the leaves may be damaged at the back, and these and the plates will have to be guarded, to enable them to be sewn in with the rest of the book. Thin Whatman, being very durable, is the best paper for this purpose; it should be cut into strips about a quarter of an inch wide and about one inch longer than the book. To guard two leaves together, place them side by side on a clean piece of paper. Then paste a guard and, holding it at each end, lay it down so as to join them together (Fig. 9). Place a piece of blotting-paper over the guard and rub down with a folder. If they are the outside leaves of a section, the guard must be placed on the inside, so that when the leaves are folded together the guard is inside; but if they are the inside leaves, the guard must be on the outside, so that when the book is sewn the needle cannot catch in the guard. Care must be taken to hold the guard only at the ends, as pasted paper is easily marked. The guards have been purposely made larger to enable this to be clone.
Impressions of the Tools used on the Peacock binding shown on the opposite page. The gouges and straight line tools are not included.

We find two of our plates can be guarded together, and this is done in the same manner as with single leaves. Another plate is inserted in the centre of a section; lav the plate down on the page it should face and place the guard so that half lies on the plate and half on the adjoining page. Our next plate faces the last page of a section: open the section and lay it face downwards, lay the plate in its right position, place the guard as before. The remaining plate faces the second page of a section: open the section at this place, remove the remaining leaves, and la\ the plate down and guard as described above.
Our double page plate has now to be guarded. So that the illustration may open correctly and lie flat with the book, this must be guarded in a different manner. Cut a guard of cartridge paper 3/4 in. wide; divide this width into three equal portions, and fold as in Fig. 10. Paste one-third of the guard on to the back of plate; the other end is inserted in the section, and this will enable us to sew in the plate when sewing the section. (To be continued.)
Continue to:
My Books

