Home-Made Camera
Description
This section is from the book "American Library Edition Of Workshop Receipts", by Ernest Spon. Also available from Amazon: American Library Edition Of Workshop Receipts.
Home-Made Camera
The camera described below is a "best double cxten-sioh," and has reversing back, swing back, rising, falling, and swinging front, conical bellows, focusing screen with double-jointed hinges. The 15 x 12 extends forwards by rack and pinion to about 30 in. The front is attached to brass supports which, while giving every useful motion, are light; rigid, and handsome in appearance. The camera is of the best design, and, while very portable, is also very firm.
Estimated Cost:- | |||
Bellows | £0 | 18 | 0 |
Brass .............. | 1 | 2 | 0 |
Wood............... | 0 | 6 | 6 |
0 | 2 | 0 | |
£2 | 8 | 6 |
Beside this, there will be a trifle for glue, screws, and French polish. Procure the undernoted of well seasoned mahogany: -
4 pieces | 17 1/2 | x | 2 1/2 | x | 1/2 | Mark them | A | ||
1 | ,, | 17 1/2 | x | 17 1/2 | x | 1/2 | ,, | ,, | B |
2 | ,, | 17 1/2 | x | 1 1/2 | x | 1/2 | ,, | ,, | B2 |
2 | ,, | 17 1/2 | x | 1 1/2 | x | 1/2 | ,, | ,, | F |
2 | ,, | 15 | x | 1 1/2 | x | 1/2 | ,, | ,, | F2 |
2 | ,, | 17 | x | 2 3/8 | x | 3/8 | ,, | ,, | R |
2 | ,, | 17 | x | 3/4 | x | 3/8 | ,, | ,, | R2 |
2 | ,, | 17 | x | 2 | x | 3/8 | ,, | ,, | R3 |
1 | ,, | 17 1/2 | x | 3/4 | x | 3/8 | ,, | ,, | R4 |
2 | ,, | 17 | x | 1 1/4 | x | 3/8 | ,, | ,, | FS |
2 | ,, | 14 | x | 1 1/2 | x | 3/8 | „ | ,, | FE |
This is for the camera focusing frame. For the dark slide will be needed -
3 pieces | 31 | x | 2 1/2 | x | 1/2 | Mark them | M | ||
4 | ,, | 13 | x | 1 1/4 | x | 1/4 | ,, | ,, | S1 |
2 | ,, | 13 | x | 4 1/3 | x | 1/4 | ,, | ,, | S2 |
2 | ,, | 10 | x | 13 | x | 1/2 | ,, | ,, | S3 |
2 | ,, | 13 | x | 1/2 | x | 3/8 | ,, | ,, | SH |
1 | ,, | 14 | x | 1 | x | 3/8 | ,, | ,, | E |
In the piece marked S2 the grain must run the abort way of the wood. Take (he four pieces A, and having carefully planed them down to measure exactly i in. thick, dovetail them, and make a bottomless box measuring 16 5/6 in square inside, and 2 1/2 in. deep. The dovetailing must be neatly done, and the box must be exactly square when finished, else the reversing back will not fit accurately. This is important. Those who are not well up to dovetailing had better make a rabbet joint (Fig. 54). and fix it with thin | in. screws, three in each corner. In putting in the screws, leave the heads projecting very slightly, then file them off flush. This applies to all screws used in the work, as it makes a much more finished-lonking job. Next take four pieces 3/8 in. deal and make a square frame to fit tightly inside the box already made. The inside measurement of this frame is 15 in. square. This frame is for fixing the bellows to. Do not fix it in place till reversing back is made.

Fig.55.

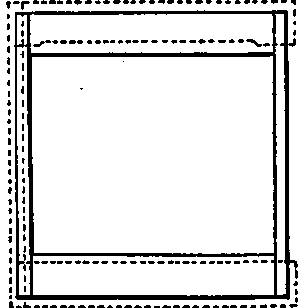
In order to make the reversing frame, take the pieces marked R and R 2, make them into a square frame with an ordinary tenon joint, such as the frames of school slates are made with. It must fit rather easily into the body box already made. The inside measurement is 15 by 12 in. (see black lines, Fig. 57). Now take the pieces marked R 3 and dress them, then with an ordinary plough plane that will have about 1/8 in. feather, run a groove along one side of each (Fig. 55). The groove should be 1/8 in. deep; if the plough cuts it deeper, plane off the surplus. Should a plough of the exact size not be at hand, a slip of wood can be temporarily glued inside one that is larger to reduce it to the size required (1/8 in.) Cut away the feather from one of these pieces, except 1 1/2 in. at each end (Fig. 56). These two pieces must now be screwed down on the frame already made, as shown by the dotted lines in Fig, 57, the distance between them measuring from the top of the feather is 13 1/2 in. The feather is outwards, so as to form a groove with the piece below. R 4 must also be placed as shown (Fig. 57). Do not use glue yet, as they may have to be removed, and do not drive the screws quite home. This finishes the reversing frame except smoothing off, which had better be left till later on.
In Fig. 57 the black lines represent the frame made from R and R 2, the dotted lines R 3 and R 4:
Fig. 56.

Fig. 57.
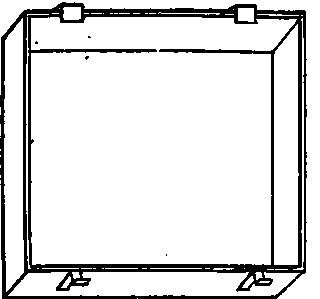
In order to attach it to the body of camera, two pieces of brass (Fig. 58) and two clip hinges (Fig. 59) are fixed to the body box as shown in Fig. 60. The edge of the reversing frame is laid into the hooks at the bottom, and the clips at top being shut down hold it fast, at the same time allowing easy removal when required.
Fig. 58.
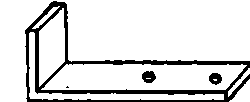
Fig. 59.
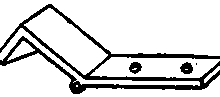
Fig. 60.
Now, with the reversing frame in its place, put the deal frame already made into the body box close up against the reversing frame, and fix it there with screws from the outside. In addition to the wood mentioned, there will be required four pieces 12 by 3 1/2 by 1/2 in., one piece 7 by 7 by 1/4 in.; mark them SF. (J. Thomson.)
Continue to:
My Books

