Buttonholes
Description
This section is from the book "Sewing - Handicraft For Girls", by Idabelle McGlauflin. Also available from Amazon: Sewing Handicraft For Girls.
Buttonholes
A buttonhole is a slit cut and worked to admit a button for fastening purposes. It is much easier for beginners to commence on the blind buttonhole. This is made by working around a line instead of cutting the hole. The stitch, the fan, and the finishing can thus be learned without the care of the raw edge. The directions for making the buttonhole are as follows:
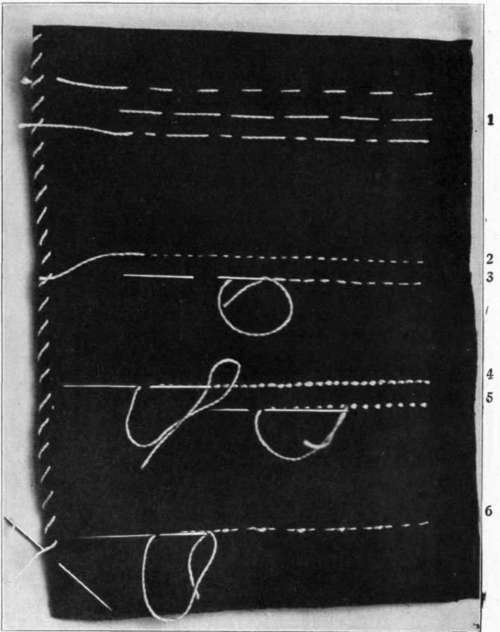
Stitches Used On Plain Sewing.
1 - Three styles of basting.
2 - The running stirch.
3 - The gathering. 4 - The backstitch.
5 - The half-back stitch.
6 - The combination stitch.
7 - The overcasting.
A. Preparation Of The Hole
a. Cutting - With the buttonhole scissors cut the hole one-fourth of an inch from the folded edge and straight with the threads of the cloth.
b. Stranding - The strand consists of carrying the thread along the edge of the buttonhole near enough to be easily covered by the buttonhole stitch, for the purpose of adding strength to the buttonhole. Thread two needles, one with fine thread or sewing silk and the other with coarser thread or twist, depending upon the kind of buttonhole to be made. Place a knot in the coarse thread or twist, and with the folded edge of the cloth toward the left hand, bring the needle out just below the lower right hand end of the buttonhole, which is the end farthest from the folded edge. At the other end put the needle into the cloth just below the end of the cut and bring it out just above, which will carry the thread along the edge of the buttonhole. Repeat the same on the other side bringing the thread out at the point of starting. Do not cut this thread, as this is ready to begin the buttonhole stitch after the overcasting.
c. Overcasting - With the fine thread or sewing silk begin at the lower right-hand end. The object of the overcasting is to prevent raveling while working the buttonhole and the fewer stitches which will accomplish this purpose the better. As the overcasting must be covered by the buttonhole stitch do not take over two or three threads deep and just as few stitches on each side as is absolutely necessary to prevent the loosening of the threads. Some materials do not require overcasting.
B. Working The Buttonhole
a. The Stitch - Determine how deep a stitch is necessary so that the threads will not pull out, always keeping in mind that the shorter the stitch the better the buttonhole will look. This depends upon the kind of material in use. The first stitch begins one thread beyond the end of the slit. Holding the buttonhole along the cushion of the left forefinger with the folded edge of the cloth toward the left, place the needle into the slit under the lower edge of the buttonhole and draw the needle half way through. With the needle still pointing toward the chest take up the double thread at the eye of the needle and place it under the point, passing from right to left. Draw the needle and thread out, and from you, so that the purl or twist comes to the edge of the slit. (This makes a firmer edge than when the thread is carried around the needle from left to right.) Each stitch is a repetition of the above. Place the stitches about the width of a thread apart, as this will avoid a crowded appearance and makes a firm, hard edge. Do not jerk the thread, but draw steadily and tight; otherwise the edge will be rough. Avoid stretching the buttonhole; the edges should touch when finished.
b. The Fan - At the end near the folded edge - the round end - spread the stitches like the sticks of a fan, drawing them closer at the top and spreading at the bottom. Five stitches will work nicely around the end, the third stitch being straight with the buttonhole.
C. Method Of Finishing The Buttonhole
a. The simplest manner of finishing is as follows: The buttonhole stitches at this end are at right angles to the slit, and not rounding as at the other end. After finishing the last buttonhole stitch, pass the needle down between the first and second stitch, and bring it out between the last and next to the last stitch. Draw the thread tight so as to bring the edges of the buttonhole together. Put in several stitches in the same place. Pass the needle to the under side and fasten the thread.

Successive Steps In Making The Buttonhole.
b. The Bar - The thread being at the top of the last stitch, pass the needle down between the first and second stitch and out at the bottom of the last stitch. Put in three threads across the width of the buttonhole, bringing the thread out at the bottom of the last buttonhole stitch. Turn the cloth so that the thumb covers the thread and the buttonhole, and work the bar by bringing the needle out each time over the thread, as in the blanket stitch. Draw the purl edge toward the buttonhole. Do not put in too many stitches, as it makes the loop stand away from the buttonhole. Near the middle of the bar take one stitch through the cloth to hold it down.
c. Caution - Be sure that the thread is long enough to work the buttonhole, but not over-long, as the thread wears and is more liable to break. Use care and not break the thread, but in case this happens, take out the last few stitches, thread the needle on this short end, pass through the last purl, and fasten the thread on the under side. With the new thread fasten without a knot on the wrong side, bring through the last purl at the edge of the buttonhole and continue.
On cloth that ravels badly put in two parallel rows of running stitches and then cut the buttonhole between the rows.
Continue to:
My Books

