Kites Of Many Kinds And How To Make Them
Description
This section is from the book "The Boy Mechanic Vol. 1", by Popular Mechanics Co.. Also available from Amazon: 700 Things for Boys to Do.
Kites Of Many Kinds And How To Make Them
One of the prettiest of all is the butterfly kite. To make this get two thin kite sticks of equal length. Bend each in an are, tying one end of a strong string to one end of each stick and the other end of the string to a point about 3 in. from the other end of the stick. This leaves one end of each stick free, hooking over the hemisphere described by the thread and the stick. Now tie another thread to each of these free ends and tie the other end of the thread to a point near the other end of the stick, corresponding with the distance from the end at which the first strings were tied on the opposite side. This done, you should have two arched frames, each an exact counterpart of the other in size, curvature and weight. Now fasten the two frames together so that the arcs will overlap each other as shown in the sketch. Bind the intersecting points securely with thread. To make the butterfly's head, secure two heavy broom straws or two short wires, and
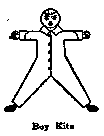
Illustration: Boy Kite attach to the top part of the wing frames near where the sticks intersect, so that the straws or wires will cross. These form the antennae, or the "smellers." Then select the color of paper you want, yellow, brown, blue, white or any other color; lay it on a flat surface and place the frame on top of it, holding the frame down securely with a weight. Then with a pair of scissors cut the paper around the frame, leaving about a 1/2-in. margin for pasting. Cut slits in the paper about 2 in. apart around the curves and at all angles to keep the paper from wrinkling when it is pasted. Distribute the paste with a small brush and make the overlaps a little more than 1/4 in. wide and press them
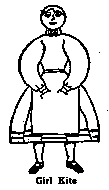
Illustration: Girl Kite together with a soft cloth. When the kite is dry decorate it with paint or strips of colored paper in any design you may fancy. The best effects are produced by pasting pieces of colored paper on top of the other paper. Black paper decorations show up to fine advantage when the kite is in flight. Attach the "belly-band" to the
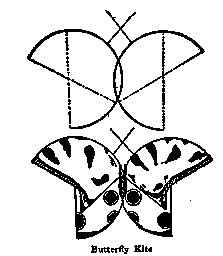
Illustration: Butterfly Kite curved sticks by punching a hole in the paper in the same manner as it is attached to the common hexagonal or coffin-shaped kite. With a tail, your kite is ready to fly. Another interesting design is the boy kite. With light colored coat and vest and gay striped trousers, the kite standing high in the air always attracts attention and affords splendid sport for the American youth in springtime.
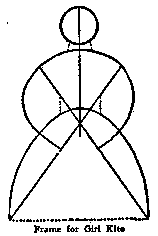
Illustration: Frame for Girl Kite
In making a boy kite it should be remembered that the larger the boy is the better he will fly. To construct the frame, two straight sticks, say 3-1/2 ft. long, should serve for the legs and body; another straight stick forms the spine and should be about 2 ft. 4 in. long. For the arms, get a fourth straight stick about 3 ft. 3 in. long. Make the frame for the head by bending a light tough stick in a circle about 7 in. in diameter. Bind it tightly with a strong thread and through its center run the spine. Then tack on the arm stick 3 in. under the circle so that the spinal column crosses the arm stick exactly in the center. Wrap tightly with strong thread and tack on the two sticks that are to serve for the legs and body. The leg sticks should be fastened to the arm stick about 6 in. on either side of the spinal column, and crossed so that the other ends are 3 ft. apart. Tack and the arm stick together at the point where they intersect. Small hoops and cross stick of the same material as the head frame should be fastened to both extremities of the arm stick and the lower ends of the leg stick for the hands and feet. See that both hand frames are exactly alike and exercise equal caution regarding the foot frames; also see that the arm stick is at exact right angles with the spine stick and that the kite joints are all firmly tied and the kite evenly balanced; otherwise it may be lopsided. Fasten on the strings of the frame, beginning at the neck at equal distances from the spine, as indicated by the dotted lines in the diagram. Extend a string slantingly from the arms tick to the head on both sides of the spinal column, and run all the other strings as shown in the cut, being careful that both sides of the frame correspond in measurements.
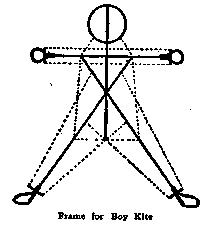
Illustration: Frame for Boy Kite
To cover the kite, select different colors of paper to suit your taste, and after pasting together, lay the paper on the floor and placing the frame on it, cut out the pattern. Leave an edge of 1/2 in. all around and make a slit in this edge every 6 in. and at each angle; make the slits 2 in. apart around the head. After the kite is pasted and dry, paint the buttons, hair, eyes, hands, feet, etc., as you desire. Arrange the "belly band" and tail band and attach the kite string in the same manner as in the ordinary coffin-shaped kite.
The "lady kite" is made on the same principle as the boy kite. The frame may be made exactly as the boy kite and then "dressed" with tissue paper to represent a girl, or it may be made on the special frame, page 81. Remember the dotted lines represent the strings or thread, and the other lines indicate the kite sticks. Be careful with your measurements so that each side of the kite corresponds exactly and is well balanced. Also see that every point where the sticks intersect is firmly tacked and bound.
To cover the kite, first paste together pieces of tissue paper of different color to suit your taste. The paste should be made of flour and water and boiled. Make the seams or overlaps not quite 3/8 in. wide. Lay the paper on the floor, using weights to hold it down, and place the frame of the kite upon it. Then cut out the paper around the frame, leaving an edge of 1/2 in. Don't forget to make a slit in the edge every 6 or 7 in. and at each angle. Around the head the slits are cut 2 in. apart, as in the case of the boy kite. After the kite is dry, paint the paper as your fancy dictates.
To make the breast band, punch holes through the paper, one upon each side of the leg sticks, just above the bottom, and one upon each side of the arm sticks at the shoulder. Run one end of the string through the hole at the bottom of the left limb and tie it to the leg stick; tie the other end at the right shoulder. Fasten one end of another string of the same length at the bottom of the right leg; pass the string up across the first band and tie the other end at the left shoulder. Attach the kite string to the breast band at the point where the two strings intersect. Tie the knot so that you can slide the kite string up or down until it is properly adjusted. The tail band is made by tying a string to the leg sticks at the bottom of the breast band. Let the string hang slack below the skirt and attach the tail to the center. The same general rules apply in attaching the string and tail to the boy kite.
You can make the lady look as if dancing and kicking in the clouds by making the feet of stiff pasteboard and allowing to hang loose from the line which forms the bottom of the skirt. The feet will move and sway with each motion of the kite.
Continue to:
More:
- Home-Made Match Safe
- How to Clean Things. Continued
- A Guitar That Is Easy To Make
- How To Make Lantern Slides
- How To Make An Equatorial
- The Norwegian Ski
My Books

