Chapter VII. Toys To Delight The Children
Description
This section is from the book "Things To Make In Your Home Workshop", by Arthur Wakeling. Also available from Amazon: Things to Make in Your Home Workshop.
Chapter VII. Toys To Delight The Children
NO TOYS are equal to those made by Daddy. And here are some that are quite simple for him to make. They are toy tractors and trucks, strongly built of wood and as large as the expensive ones sold in the stores. They "work" too! The fire engine squirts a good stream of water from the hose; the sprinkling truck sprinkles water just like a big one; the dump truck has a hoist that tips up the body; and the tractor, being quite large and heavy, makes a noise like an engine exhaust as it rolls along on the cleats of its bull wheels.1
Sprinkling Truck
Let us begin with the sprinkler shown in Figs. 1, 2, and 3. The chassis is made of a single length of pine or whitewood board 7/8 in. thick, 4½ in. wide, and 17% in. long. This board is cut at an angle underneath at both ends as shown with a chisel and plane. The running boards may be a single piece of ¼- or 3/8-in. stock, 6½ in. wide and 8¼. in. long, glued and screwed or nailed to the bottom of the chassis. All corners of the chassis and running boards should be nicely rounded.
The hood and radiator may be made from a single block of soft pine or white-wood 2½ by 3 by 4 1/16 in., or, as in all the models shown, built of several layers of 7/8-in. boards, glued together bread-and-butter fashion, as ship models are made. This block may be sawed with hand saws or band sawed out, then planed to shape, and the ends finished on a disk sander, if you have one, or with a sandpaper block.
The filler cap is a length of ¼-in. dowel set in a hole bored for it. If a hole is to be bored near the end grain of the wood, as in this case, it is better to bore it before the block is cut off at this end, to avoid splitting. The block forming the hood and radiator is nailed and glued flat on the chassis.
The cab is made of pieces of ¼- or 3/8-in. whitewood or pine or laminated wood (plywood). Two pieces of the same size and shape (4½ in. wide and 4 in. high) are cut for the front and back of the cab. In the one used as a front, an opening is sawed with the coping saw to represent a windshield. A smaller opening is cut in the back for a rear window.
Two sidepieces are next cut out; they are 2 in. wide at the bottom and 2½ at the top, and are 4 in. high. Windows and the front edge of each side are cut as shown.
The seat is a single block, nailed and glued to the floor of the chassis. To it the sides and the back of the cab are nailed and glued. The front of the cab is glued and nailed to the hood block and to the floor. It is a good plan to put the front in position first and then drill a slanting hole to receive the dowel rod used to support the steering wheel.
The steering wheel is a large wooden button mold screwed to the end of the dowel, on which it may be turned. When the wheel is in place, the sides, back, and top of the cab may be put in place. The top, 4 1/8 in. long and 4¾ in. wide, has all its upper edges well rounded over with plane and sandpaper.
1 Larger drawings of these toys are contained in Blueprint No. 101, listed in the- Appendix.

Fig. 1. - A discarded tin can serves as the tank of the sprinkler truck, and fruit jar robbers form the tires on the wooden wheels.
Two dozen fruit jar rubbers will be enough to make tires for the four wheels, five being used for each of the two front wheels and seven for the wider back wheels. As sold now, jar rubbers have a little lip on one side; this may be easily trimmed away with the scissors.
Saw out or turn up four disks of wood, each one being as wide as your tire is to be. These disks should be of the same diameter as the central opening in the jar rubbers. Next saw or turn slightly larger disks of thin wood for the sides which hold the jar rubbers in place. All these disks should have a 5/16- in. hole drilled through the center. If you have a lathe, you may save much time by roughly sawing out these thin wooden disks, slightly large, drilling a hole through each one, and nailing them all together with the holes centered, using two long thin brads. Mount a straight 5/16- in. diameter bolt, with the head cut off, in your lathe chuck, so that a good length of thread projects beyond the chuck. Screw the disks on this, nailed together, and then place a washer on the end of the bolt and screw on the nut to hold the disks in place while you turn them to size. After turning, the disks may be separated with a thin knife blade. All the wheels of the toys shown here were turned on a bolt in this way, and they run very true.
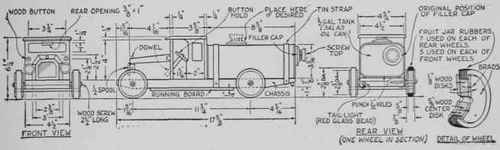
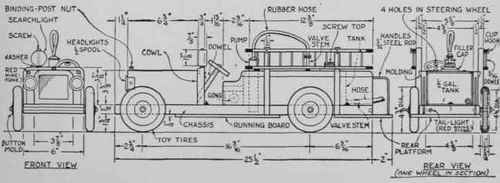
Fig. 2. - Front, side, and rear views of the sprinkler and the fire engine. Compare these dimensioned drawings with the photographs reproduced in Figs. 1, 3, and 7.
After the disks are cut out, glue and nail one thin disk to one side of each thicker disk which is to receive the tires. When the glue is dry, slip the jar rubbers in place and cement them together with rubber cement. When each tire is cemented on, glue and brad the other disk on the outside of each wheel. Use another 5/16- in. bolt to make up each wheel, so as to keep the disks lined up until each wheel was finished. Two small metal washers are placed between each wheel and the chassis and one under each screw head on the outside of each wheel. Round-headed wood screws No. 15, 2½ in. long, were used to fasten each wheel to the chassis. These are ¼ in. in diameter. It is always best to have rather large holes in toy wheels, as should there be any inequalities in the mounting of them, each wheel may drop down a bit, so that they will all roll when the model is pulled.
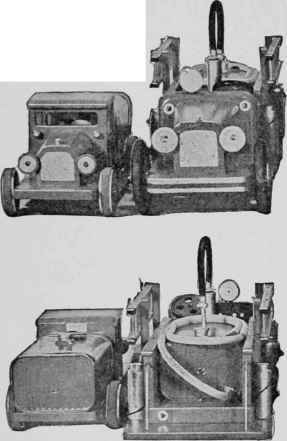
Fig. 3. - The sprinkler truck and the fire engine as viewed from front and rear.
An ordinary spool with flanges about 1 in. in diameter is cut in two to make the headlights. This is slightly flattened on the side where it is fastened to the hood block, a hole having been previously bored for the screw or nail. The side lights on the front of the cab are small round wooden buttons held to the front of the cab with glue and a large tack, the end of the tack being silvered to represent a lens. The tail-light is a round red glass bead taken from a ten-cent necklace; it is screwed under the rear of the chassis with a nickel-plated, round-headed screw, which serves to throw back the light through the bead.
Of course, you should obtain the can for the tank before you make your truck. If you have to buy a new full can, the housewife will know what to do with the cooking oil or other contents! Empty the can through the screw top provided; do not punch holes in to empty it or you will have to solder them up.
In the sprinkler truck tank shown, the filler cap is on top, having been carefully melted off the end of the can with a blowtorch and the hole left in the can covered with a disk of tin. It might be even better to leave the screw top in the original position on the end. Then the truck can be easily stood on end while being filled with water, and when it is put down level the water will run out of the sprinkler holes. After the water has started to run, it may be stopped by screwing down the cap, if this is made air-tight. The sprinkler holes are punched in a row with a sharp ice pick, each hole being about 1/32 in-in diameter, or slightly less.
You may, of course, put any kind of a body on such a simply made chassis. A round can may be used for the tank truck, or a box or crate body made and fastened on the chassis back of the cab.
The entire chassis and the body of the truck are painted a khaki color, first having been primed with thin shellac and then painted with semigloss household paints. Lacquers may be used, if preferred. The wheels are painted Chinese red with silver stripes or rims. The straps that hold the tank to the chassis are made of strips of bright tin. The radiator is represented with silver paint; the ends of the spools used for headlights are silvered, as is the filler cap on the radiator, and the headlights.
An easy way to make an even stripe or rim on each of the red wheels, is to place each wheel back on the bolt in the lathe chuck on which it was turned and hold a small brush, charged with silver paint, against each wheel edge where the stripe is to go, the brush resting on the tool rest. Turn the lathe slowly by hand.
Continue to:
My Books

