Drawer Locks
Description
This section is from the book "Things To Make In Your Home Workshop", by Arthur Wakeling. Also available from Amazon: Things to Make in Your Home Workshop.
Drawer Locks
The first step in fitting an ordinary drawer lock of the type shown in Fig. 42, regardless of the size, is to lay off distance X of the lock from the top edge of the drawer front, adding a trifle, say 1/64 in. - just enough so that the face of the lock will set below the edge of the drawer to allow planing if necessary. Mark this point with an awl, and through the front bore a hole as at A. This may be a ¼-in. hole or smaller, depending upon the size of the lock. Push the projecting key pin of the lock into the hole from the back, center it, and pencil-mark around the front plate of the lock as at B. Lay the drawer front face down on the bench and with a fine saw make triangular cuts as at C.
Cut the wood out to receive the body of the lock as at D. Lay the lock in this space as at E and knife-mark around the faceplate. The back plate is seldom set flush with the inside of the drawer front, but this may be done, if desired.
Cut out for the face plate as at F and finish the keyhole with a pad saw or keyhole saw. If the work has been done accurately, the lock should appear about as at G when it is fastened in place.
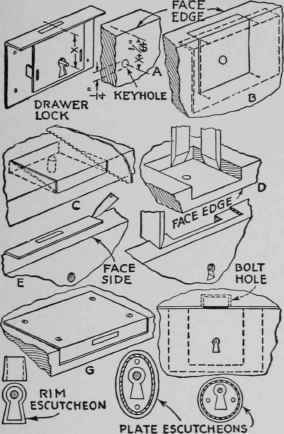
Fig. 42. - By following these steps, the amateur cabinetmaker can fit drawer locks easily and accurately.
Run the drawer partially in its case. With the key turn the bolt out and touch the face with black grease or paint. Close the drawer and turn the key until the bolt stops against the partition, as at H. This will leave a black mark on the wood. Remove the drawer and with a chisel a little wider than the thickness of the bolt, cut out the bolt hole.
Continue to:
My Books

