Turning Candlesticks
Description
This section is from the book "Things To Make In Your Home Workshop", by Arthur Wakeling. Also available from Amazon: Things to Make in Your Home Workshop.
Turning Candlesticks
Faceplate turning, the next phase of the work, is no more difficult than spindle turning; and no set of exercises need be mastered before real work can be attempted.
The tools are the same as those described in the beginning of this chapter, and the methods of using them do not differ materially from the ones employed in spindle turning.
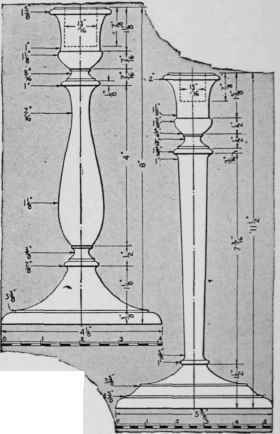
Fig. 43. - Two designs of candlesticks of fine proportions.
By mastering faceplate turning, you can make candlesticks, lamps, smoking stands, frames, rings, boxes, trays, and bowls. These projects can be turned only by the use of chucks and faceplates.
A candlestick (Figs. 43 and 44) consists of two parts, the upright and the base. Let us turn the upright first. One end of it has a round tenon fitting into the base. The other end must be bored for the candle. Bore this hole with an auger bit before putting the stock in the lathe. As candle ends vary in diameter from ¾ to 7/8 in., it is best to bore a hole 13/16 in. in diameter and of about the same depth. A quick boring auger, that is, one with few threads on the spur, is the most satisfactory for end-wood boring.
Turn a plug or short cylinder to fit this hole accurately. It should be about 1 ½ in. long, but in cutting it off be careful not to cut away the end with the hole made by the dead center. The plug should fit so that it can be forced with the hands into the hole in the candlestick. If too tight, it is likely to split the wood when it is turned down to size; if too loose, it may have a piece of paper wrapped around it.
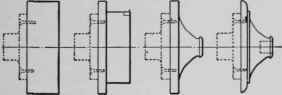
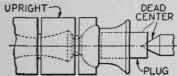
Fig. 44. - Four steps in making the base, and the method used for turning the candlestick upright.
When the plug is placed in the hole, the end having the mark of the dead center should project so that it can run on the dead center of the lathe (Fig. 44). In this manner the hole bored for the candle will be accurately centered when the stock is turned. Turn the upright according to either of the designs given in Fig. 43.
Get out the stock for the base, plane it flat and true on one side, and cut the sharp corners off it. Screw a faceplate to the planed side of the piece, centering the plate as well as possible. The screws should be rather heavy, and their length depends upon where the screw holes in the faceplate are placed; there must be no danger of cutting into them.
If a small enough faceplate is not available, it will be necessary to use a screw chuck, which is merely a small faceplate with a screw in the center. In hardwoods small holes must be bored for the screws, and soap put on the threads of the screws will act as a lubricant and make it easier to drive them.
After the stock has been securely screwed to the faceplate, the live center is removed from the headstock of the lathe, and the faceplate is screwed on the end of the live spindle.
Adjust the T-rest so that it is parallel to the face of the disk (at right angles to the lathe bed), at a height a little below the center of the stock and ¼ in. away from it. See that the work revolves freely and start the lathe at its medium speed.
With the toe of a skew chisel held at right angles to the face of the base, remove enough of the material from the edge to make the base circular (Fig. 45). This will diminish the vibration caused by uneven centering. The cut should be stopped about 1/8 in. from the rear face of the base, for the wood may split if the cut is extended all the way across the edge of the base.
If the face of the base is rough or much material has to be removed, first use a round-nose chisel, holding it flat upon the T-rest and at right angles to the base. Move the chisel across the face of the base from the front to the center and back again. Smooth the face with a square-nose chisel and test for flatness with a try-square as in Fig. 46.
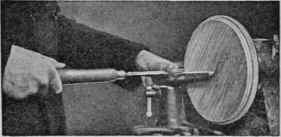
Fig. 45 - Making the base circular by removing wood from the edge with the toe of a skew chisel.
Note the position of the T-rest.
Mark the diameter of the base by setting a pair of dividers to a distance equal to the radius. Place one leg on the center and scribe the circle with the other leg while the stock is revolving.
Another way is to set the dividers to the required diameter. Rest one leg of the dividers on the T-rest and place it in contact with the revolving stock. Bring the other leg of the dividers gradually in contact with the stock. If two circles are marked, shift the dividers so that the points come in contact with the stock halfway between the two circles, when only one circle will be marked (Fig. 47, lower view).
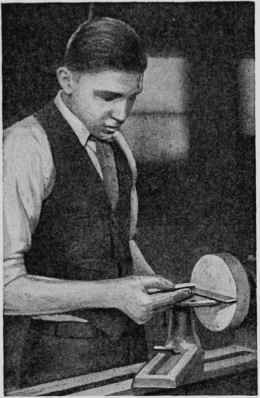
Fig. 46. - After the base has been trued with a round-nosed chisel and smoothed with a square-nosed tool, it should be tested for flatness.
The second method is more exact and is especially useful when the center has been cut away. It is very quickly mastered.
Reduce the base to the required diameter as explained before. Then adjust the T-rest parallel to the lathe bed and to the edges of the base, and with the square-nose chisel remove the thin piece of material left on the rear edge of the base.
Next mark a pencil line all around the base to represent the thickness of the part which is to be of the greatest diameter. To make the explanation simpler to follow, the base of the candlestick shown at the left in Fig. 43 will be used as an example. The line just mentioned will accordingly be % in. from the rear face of the base (see Fig. 44).
Change the T-rest to its first position (parallel to the face of the base); set the calipers to 3% in. and mark another circle with the dividers as described above. Cut down to the pencil line with the skew chisel on this diameter (3% in.). Set the dividers to % in., mark the circle, and cut the concave curve between this circle and the one previously marked (3% in.). To do this, adjust the T-rest at an angle and as near to the surface being turned as possible. Cut the square bead and round off the corners on the 4 1/8 in. part with a skew or square-nose chisel.
With the dividers, mark the diameter of the hole in which the tenon of the upright piece is to fit. Cut on the inside of the line with the toe of a ¼-in. skew chisel and remove the center with the skew chisel or a round-nose chisel (Fig. 47, upper view). Cut the hole so that the tenon fits snugly.
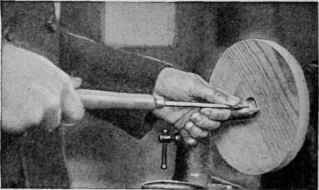
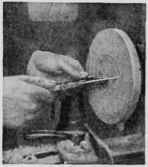
Fig. 47. - Upper view : Using the toe of a keen ¼ in. skew chisel to bore the hole that is to take the tenon of the candlestick upright. Lower view: Marking the diameter of the base with dividers held on the T-rest and centered by trial.
Leave the base as it is in the lathe, put a little thin glue on the tenon and in the hole, and fit the tenon in place. Clamp the base and the upright together in the lathe by pressing the dead center into the plug in the end of the upright. Wipe off any surplus glue with a piece of waste moistened with hot water, and leave the candlestick to dry in the lathe.
Sandpaper and stain the candlestick to the desired color. If a water stain is used, it is well to wet the wood before applying the stain. The water raises the grain, making it feel rough to the touch, and it is therefore necessary to sand the candlestick again when it is dry. It will be found that the wood will dry more rapidly if the lathe is running. A second wetting of the wood with water stain will not raise the grain.
If the wood is very porous, such as oak or Philippine mahogany, it should be filled with paste wood filler thinned with turpentine until of the consistency of cream. Apply it to the candlestick with a brush. After a little while it will lose its luster and become flat. The lathe then should be run at its slowest speed while the filler is rubbed into the pores of the wood with a cloth. Wipe clean with a piece of waste, and allow the filler to dry for twenty-four hours.
A thin coat of shellac as an undercoat for the finish next should be applied with a brush. On relatively close-grained woods, such as birch or Santo Domingo mahogany, the filler coat may be omitted and the shellac coat applied directly after the stain has dried.
The shellac should be allowed to dry for several hours. The lathe then may be started and this coat rubbed down with No. 00 steel wool. Be careful not to rub through the stain on sharp edges and beads.
Next a coat of clear lacquer may be brushed on evenly. Do not brush twice over the same place. The lacquer, which dries very quickly (within an hour), may be rubbed down with No. 5/0 waterproof sandpaper or powdered pumice stone sprinkled on a rag dipped in soapsuds or rubbing oil (crude oil). If a higher gloss is desired, two coats of lacquer may be applied, only the second coat being rubbed. Do not use an oil stain or oil in any form under a lacquer finish.
A thin coat of liquid wax also adds to the luster. This is applied with a piece of cotton waste or a rag and polished with a flannel cloth while the work is revolving in the lathe.
The candlestick is now finished. The plug is removed from its upper end (a pair of gas pliers may be helpful for this purpose), and the faceplate is unscrewed from the base. The holes left by the screws may be plugged by filling them with wood cement or stick shellac. This is sold in all colors; it looks like sealing wax and is melted in the same way.
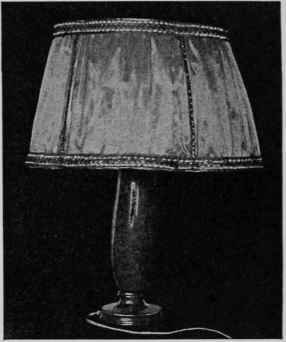
Fig. 48. - Gracefully turned table lamp of a type any home worker can make on a small lathe.
A piece of thin felt may be glued to the base. Apply the glue to the bottom of the base, not to the cloth, press the cloth in place, and set away to dry. The edges of the cloth may be trimmed later with a pair of scissors.
Another method of turning the base, so as to avoid the screw holes, will be explained in the following section.
Continue to:
My Books

