Stitches In Embroidery - VII
Description
This section is from "Every Woman's Encyclopaedia". Also available from Amazon: Every Woman's Encyclopaedia.
Stitches In Embroidery - VII
Interlaced Stitches - Surface Stitches - How to Modify the Tones of Embroidery - The Use of Surface
Stitches - Advantage of Using Contrasting Colours
Besides certain definitely named stitches which have been described in the foregoing articles, a number of patterns may be built up by combining one or more of these stitches, according to the ingenuity of the worker.
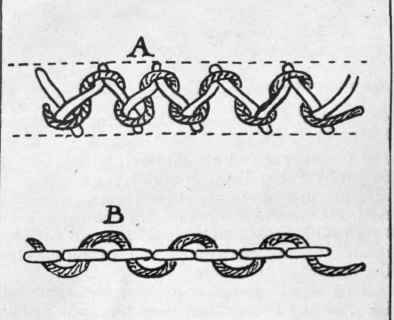
Diagram 1. Interlaced stitches. The ground stitch of A is faggotting. In B backstitches form the ground stitch
Indeed, the number of such interlaced and surface stitches is really endless, and it is only necessary to describe one or two in detail, and to point out other possible combinations.
Interlaced Stitches. - One advantage of interlaced stitches is that variety in colour may be introduced, for the ground stitches are usually worked in one shade, and another colour chosen to thread in and out of these.
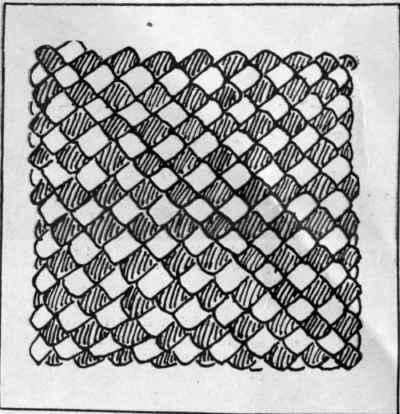
Diagram 2. Surface stitches. A solid filling, worked by carrying lines of silk diagonally over a square, then interlacing them with silk of a contrasting colour
This interplay of colour is often very valu-able in modifying a shade already worked. For instance, a line of stemstitch, or chain stitch, may appear too bright when worked, but can be toned down by throwing a thread of a darker shade over and over it, so that the original shade peeps through.
Two examples of interlaced stitches are given in Diagram I. The ground stitch of the first, A, is faggotting, already described (see page 3588, Vol. 5) as an insertion stitch. Here it is worked on a solid piece of material, but in exactly the same way, Into it a strand of a different colour is threaded in and out, as shown in the drawing. To avoid splitting the silk of the first stitching, the needle should be inserted eye first. It will be understood that here, as in all interlaced stitches, the thread of the second colour only pierces the material at the start and finish ; everywhere else it lies entirely on the surface of the material.
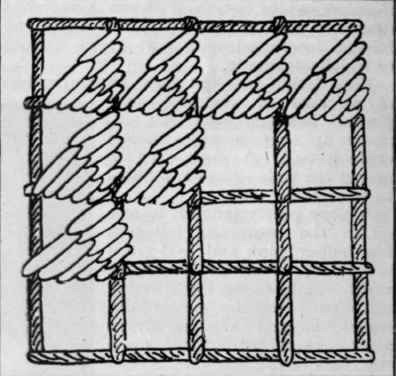
Diagram 3. Surface stitches. Open squares into each of which a weaving stitch is taken across diagonally
In the second example, B, the ground stitch is backstitch (see page 3404, Vol. 5) and the interlaced stitch is carried in and out of each backstitch. It may also be doubly interlaced by taking another thread and running it in and out in the opposite direction, so as to form a series of loops round each backstitch.
The various herringbone stitches also lend themselves very happily to this method of enriching the original stitch.
Surface Stitches. - Under this heading come the lace stitches, many of which are also very valuable in other kinds of embroidery. As the name implies, nearly all the embroidery lies on the top of the material, only sufficient stitches being worked into the material round the edges to hold it in shape. It must be allowed that, in most cases, this kind of stitchery is not very durable, but it has nevertheless the special charm often belonging to ephemeral things.
Buttonhole stitches (see page 3284, Vol. 5) adapt themselves well to surface embroidery. One method has already been described in that article as a way of filling a flower or leaf, and the chequered filling to the fritillary flower can also be carried out as a surface stitch.
Three other surface fillings are illustrated. Diagram 2 shows a very solid filling, which has been worked by throwing lines of silk diagonally over a square, and then interlacing these with silk of a contrasting colour, carried diagonally in the contrary direction. The lines of silk only pierce the material at each end.
Diagram 3 shows a set of open squares, into each of which a weaving stitch is taken across diagonally, starting from the angle, and only filling half of each square. Another way would be to work round and round each of the intersecting lines, where they cross, so as to form a circle round each, rather like a spider's web. This method is often used in drawn-thread work.
An Old Embroidery Stitch
Trellis stitch (Diagram 4) is an old stitch which has been re-discovered, and a very charming one it is when neatly worked. It has a rather intricate appearance, but is not really very difficult to work. It is also a very firm stitch, so that the disadvantage mentioned above in connection with surface stitches cannot be said to apply to it.
To work it, it is necessary first to make a line of chainstitch all round the form to be filled in, as trellis stitch itself has no points of attachment. Into the first chainstitch, to the left-hand side, the needle is brought up from below, as shown at A of the diagram. For the sake of clearness, the thread is next shown working a stitch farther along the line, but in reality each stitch follows the preceding one. As shown, the thread is knotted through itself, and then pulled tight, so as to form a knot slanting sharply from left to right. This is repeated along the row. The next row is worked into the heading of the first, from right to left, and this time the thread is knotted through the opposite side, and the knots pulled from right to left. These alternately slanting directions, taken by the rows of knots, give a kind of lattice, or trelliswork effect, which has given the name to the stitch.
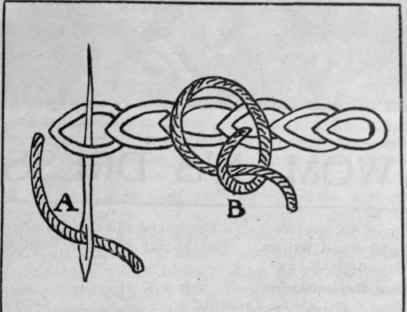
Diagram 4. Surface stitches. Trellis stitch. An old but charming stitch when neatly worked
Diagram 5 shows a heart-shaped form, with a filling of trellis stitch worked across it in bands of different shades. The drawing has been purposely magnified to show the method of working, and it is also advisable in the actual embroidery to use a coarse thread until proficiency in the stitch has been attained. Then a finer thread should be used to give the true character of the stitch, which has a closely woven texture, but with a pleasant sense of pattern given by the varied direction of the rows of stitchery. In taking a new needleful, it is as well to start at the beginning or end of a row, though if the join has to be made in the middle it can be done by threading it into the back of the filling already worked. In working a petal or leaf which decreases towards the point, a stitch must be missed out occasionally, and it is best to do this at the beginning or end of a row.
Variations Of Trellis Stitch
Trellis stitch may be varied in several ways. The knots can be worked so as to all slant the same way ; or a band of several rows may be worked all slanting in one direction, and then another band slanting the opposite way.
The stitch may also be worked round and round, spirally, when, for instance, the centre of a daisy is to be filled. The stitch when worked in this fashion gives a very faithful and somewhat uncommon representation of the "machine-turned " appearance of the centres of these flowers.
To be continued.
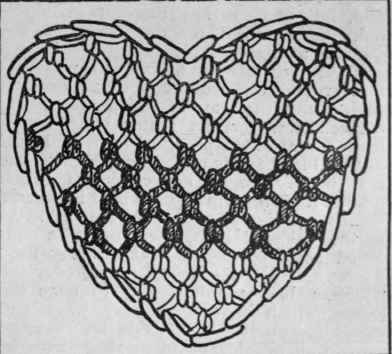
Diagram 5. A filling of trellis stitch worked in different shades, magnified to show method of working
Continue to:
My Books

