Rabbeting
Description
This section is from the book "The Art And Craft Of Cabinet-Making", by David Denning. Also available from Amazon: The Art And Craft Of Cabinet-Making.
Rabbeting
Rabbeting, like much other work in cabinet-making, is simple enough when one knows how, but unless he were shown, the novice would no doubt find a difficulty in using the rabbet plane. The rabbet, or rebate, is simply a hollow or recess, square cornered, run along the edge of any piece of wood, as Fig, 107. To make it, mark its limits with the cutting-gauge, cutting as deep as convenient; then with a chisel cut away a little of the wood to the line. This forms a kind of guide for the plane, with which the rest of the work is done. Hold the plane in the right hand, behind the iron, and use the left as directed for the trying-plane when working an edge. The fingers then act as a further guide to the plane, and many use no other, even when beginning to cut a rabbet. On the other hand, some plough a groove and are guided by it. The rabbet-plane may be used to cut either along the edge or along the flat surface, as may be most convenient.

Fig. 107. - Rabbet.

Fig. 108. - Stopped Rabbet.
Sometimes a rabbet is not required to be run through to the ends, but is stopped short, as in Fig. 108. In this case the ordinary rabbet-plane could not well be used, and the tool specially made for such cases is the 'bull-nosed' plane. In it the iron is close up to the front; it may, however, be dispensed with by working the rabbet as usual, and then filling up the end by gluing a piece of wood in. If done neatly this is quite satisfactory.
Bevelled Edges
The sunk bevelled edges, so often seen on panels and drawer fronts, are also made with a rabbet plane, which is used much as before, the principal difference being that the work must be done from the surface, and after the required depth has been made, the plane is sloped to one side as the bevel is formed. In case any may not recognise these kinds of edges by name, they will do so by looking at the accompanying illustration, Fig. 109, where front and section are seen - both, be it noted, in rather an exaggerated form for the sake of distinctness.
Grooving across the grain of carcase ends to fit shelves in them, or for other purposes, is often necessary, and, like other things, may be managed in more ways than one. In all, however, it is essential to set the places out accurately with the square from the front or trued-up edge. If the square is not long enough to reach across, use a straight edge as well. Scribe across, with the marking chisel preferably, then deepen the cut with an ordinary chisel, slightly round off the edges of the wood to be removed, as in Fig. 110. There is then a slight, straight edge by which to guide the saw. This is used with the whole of its edge flat on the wood, and a kerf of the required depth, which should have been previously gauged on the edges of the wood, is sawn. The waste wood between can then easily be removed with a chisel. If the groove is wide enough, and a perfectly smooth bottom is wanted, a finely set rabbet plane may be used. If too narrow for the plane, all that is required can be done with a chisel, for if the shelf is a fixed one the bottom of the groove does not require great nicety. When it is for a sliding tray the case is different, and it must be finished as well as possible. If there is a difficulty in getting the groove of equal depth throughout, the 'old woman's tooth' may be used. In some cases the preliminary cutting with the chisel is dispensed with, and the saw used directly after marking, either with or without a straight edge to guide it till it has made a passage for itself.
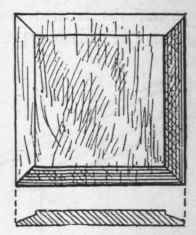
Fig. 109 - Panel with Sunk Bevelled Edges.

Fig. 110. - Section of Board notched for grooving with Saw.
A special plane, called a trencher, is made for cutting cross grooves, but it is not often seen.
When the groove is only part way across, or is stopped an inch or so back from the front, the saw cannot be used altogether, though if the groove is a long one it may be partially. It must not, however, cut through the stop. The chisel must be used, and the 'old woman's tooth' will come in handy, as by the simple expedient of knocking the iron further through as the groove gets deeper a uniformly level bottom can be got at any depth required, and the cutter will work right up to the stop. Now, how about a dovetailed bearer which requires a stopped socket or groove? Well, just groove right across and knock it in from the back, or make a groove not shorter than the length of the dovetail and as thick as the bearer just behind and continuous with the socket. Put the bearer in before the ends are fastened up together, as though it were tenoned, and then push forward. To cut the socket, make a groove of the same width as the thinnest part of the dovetail, and then with the chisel cut away to the necessary slope.
Stop Chamfering
Stop chamfering is a method of ornamenting edges by bevelling them and stopping them at certain distances. It will be recognised from the illustration, Fig. 111. The bevelling, if it were run through from end to end of the wood, would present no difficulty, but the stopping and bevelling of the stop often seem to puzzle the amateur, though really the way or ways, for there is more than one, by which they are managed are exceedingly simple. Mark off the position of the stops across the edges, and see that they are regularly disposed. The chamfering, I suppose it is scarcely necessary to say, should be done before the job is made up.

Continue to:
My Books

