Exercise 6. - Plane Continued, And Marking-Gauge
Description
This section is from the book "Exercises In Wood-Working", by Ivin Sickels. Also available from Amazon: Exercises in Wood Working.
Exercise 6. - Plane Continued, And Marking-Gauge
Material. - Same as before.
Work. - 1. To smooth the two planed surfaces of the block with the smoothmg-plane.
2. To mark with the gauge for the third side.
3. To plane the third and fourth sides of the block.
The smoothing-plane is adjusted the same as the jack-plane, excepting that its iron is drawn back by a blow on the back of the stock. Its iron should just show, as in b, Fig. 3, Ex. 5, and should remove a very thin shaving. Smooth the face and adjacent side of the block, testing with the try-square, and marking over again the face-edge.
Adjust the gauge, holding it in the left hand, thumb on the head; move the bar so that the marking-point is exactly 3 1/2 from the head; fasten the bar with the thumb-screw. In marking, hold the head in the left hand, thumb against the bar near the point (a, Fig. 1). Incline the gauge as shown in the figure, until it makes a faint mark; press the head of the gauge firmly against the face-edge, and mark the entire length of the block. Repeat, making the mark deeper, until it is sufficiently distinct. If the head of the gauge is not pressed against the face-edge, or if the point is forced in deeply at first, it is apt to follow the grain, as shown in Fig. 2, where the gauge makes a fault from a to b. Gauge all around 3 1/2" from the face of the block, as shown in Fig. 3.
Plane the edges of the third side down to the gauge-marks, as in Fig. 4; these beveled surfaces serve as guides. Then plane down the middle, being very careful not to go beyond the gauge-marks.
Fig. 5 shows the manner of truing the edge of a board by using one side of the edge of the plane-iron. In the figure, c is the stock, a the high part of the edge. The fingers of the left hand are used as a guide, and pass along the side of the board at b.
Fig. 6 shows one of the best forms of modern planes; its adjustments are made with screws and levers: a and b fasten the iron, c moves the iron sideways, d regulates the depth of the cut, e is the iron, and its cap.
Ex .6.

Fig. 1
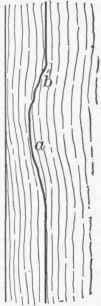
Fig. 2
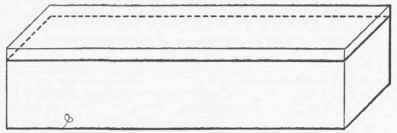
Fig. 3

Fig. 4
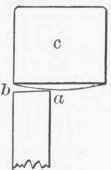
Fig. 5

Fig. 6
Continue to:
My Books

