Dovetailing. Continued
Description
This section is from the book "Our Workshop", by Anonymous. Also available from Amazon: Our Workshop.
Dovetailing. Continued
If the spaces between the dovetails be carefully removed without entirely obliterating the marks which were made by the scriber, the pins and dovetails will be a little too large, and by slightly compressing each other when the work is united, a close and firm joint is insured. Leaving the parts a trifle too large will not remedy any defect in the workmanship, and if much be allowed for compression, the wood will probably split before the pins are driven home.
The three remaining extremities or corners of the side pieces are marked from their corresponding pins, and wrought in the same manner as the first corner just completed.
When the amateur has become tolerably expert he will find it quite as easy to follow some established routine as to conduct the work irregularly. The pins, therefore, should be marked out on both the extremities of the end pieces, and then wrought by the saw and the chisel. When using the chisel, one piece may be laid on the other, the end of the upper piece being set back, so as not to cover the guage-line of its neighbour; both are then fixed by the holdfast. The extremity of each piece being towards the workman, he can use his chisel advantageously; when both pieces have been cut half through, they are turned over and finished from the other side. The opposite extremities are then placed in front, and wrought in the same manner. All the dovetails are next marked from the pins, and the ends and sides must be numbered in the order in which they are scribed. The sides are then fixed and wrought like the ends.
The pins and dovetails must not be made with any considerable angle or bevel, or the connection will be deficient in strength. More bevel, however, may be allowed if hard wood, such as oak or mahogany, be employed, but in deal and other soft or brittle materials, the parts should be only slightly bevilled.
We will now proceed to glue the box together. One of the ends must be fixed vertically in the screw-chops, the pins of one extremity being a little above the level of the bench. The pins and bottoms must be sparingly covered with thin glue; the first side is then held horizontally, and the pins are directed into their corresponding sockets between the dovetails. A small piece of wood which is smooth on the underside must be laid on the dovetails, to save them from being bruised by the hammer which is now used to drive the dovetails home to the bottoms or shoulders of the pins. As the length of the pins exceeds the thickness of the side, the hammer-block must be set back when they become level with the surface, to allow them to rise to their full extent. The first end is now released, the second being fixed in its stead, and the process just described is repeated. Three sides of the square having been united, the work must be removed from the chops and laid on the bench preparatory to attaching the fourth side, which will complete the square and form the carcase.
The first side is now supported upon two strips of wood of equal thickness, which are placed one under each extremity, and just within the projecting ends of the pins, in order to keep them clear of the bench, and afford the work a steady base. The pins corresponding to the dovetails of the second side are next glued; the side is carefully adjusted, so that all the pins may fairly enter into their respective sockets, and is then driven home. The hammer and block are used at each end alternately, and at short intervals, in order to drive the side down as evenly as possible.
Although this form of dovetail, if well made, is a neat and useful joint for plain works, it is not suitable for cabinet-work and fancy articles unless the end grain of the pins and dovetails is hidden by veneer. Small boxes, writing desks, etc, are generally made of mahogany, rosewood, or some other ornamental wood; and as veneer is not then employed, the joint must be so formed that the end wood may be concealed.
The lap-dovetail, which is seen complete in fig. 92, is used for the description of work last named. Fig. 91 represents the formation of this attachment. The end grain of the pins and dovetails is effectually enclosed, but a narrow strip of the cross-grain end of the piece, P, is observable at E: this, however, is disguised by rounding the corner after the work is put together. The gauge-lines g, g, which denote how far the pins and dovetails must extend inwards, are marked as in fig. 89. It will be seen, by inspecting fig. 91, that neither the pins nor the dovetails extend quite through the wood in which they are respectively formed; hence the concealment of their end grain; and it is immaterial in which piece the pins or the dovetails are made. The depth of the dovetails is generallly about one-eighth inch less than the thickness of the piece containing them, and the pins are of corresponding length. If the ends of the pins were made level with the end of the piece P, in which they are cut, the pins would reach the bottoms of the dovetails before the piece P had entirely covered the end wood of D, and the bottoms of the dovetails would remain in sight. A hollow angular corner would result, and a strip of wood called a corner line, must be glued into it to finish the joint;. this is sometimes called a secret dovetail. In the "lap dovetail" however, the pins are set back one-eighth inch from the end E, of the side P, or the amount the dovetails are shallower than the thickness of the piece D. By this means the depth l, l, of the lap is made to equal or slightly exceed the thickness of the piece D, consequently the end of D is covered by it, as seen in fig. 92.
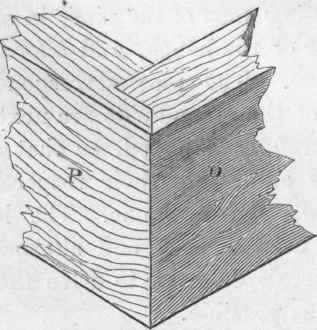
Fig. 90.
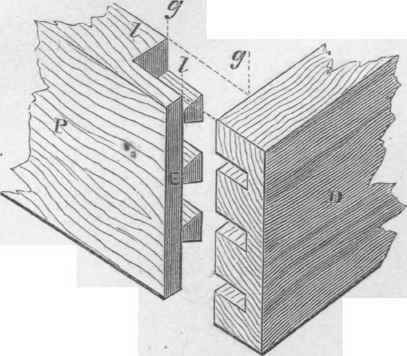
Fig. 91.
Sometimes the lap is not formed on the piece containing the pins as in fig. 91, and the extremities of the pins are then level or flush with the end E. In this case the lap must be worked in the piece in which the dovetails are cut.
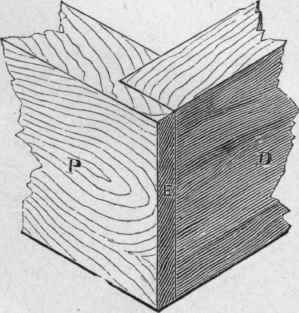
Fig. 92.
Before the sides and ends are cut to their lengths, the workman must decide in which pair he will form the laps, as this pair must be cut to the external dimensions of the work, but the other pair being placed between the laps, the thickness of the latter must be deducted.
The half-lap dovetail is a modification of the last-named, and is much used for the fronts of drawers. The pins are cut in the front piece, represented by P, fig. 91, but their extremities are level with the end E. The dovetails are cut quite through the side pieces, which are only about half the thickness of the front. If the front is to be veneered, the dovetails are made as in figs. 88 and 89.
The mitre dovetail, figs. 92 and 93, is the neatest and most difficult to make of the group. The four pieces must be cut to the external dimensions of the work, and then rebated at each end. This rebate should be about an eighth of an inch square, and similar to the lap E, in the piece P, fig. 91, in which E is about an eighth of an inch thick, and projects the same amount beyond the ends of the pins. After cutting and fitting the pins and dovetails, the rebates or laps must be mitred by a rebate plane. The bevel (fig. 52, page 120), if set to an angle of 45 degrees, will greatly facilitate the process. When finished, no portion of the end grain is seen, and the box has the appearance of being simply mitred.

Fig. 93.
When the pins and dovetails do not extend quite through the work, the saw can only be applied obliquely, and not to the full depth; the work is then completed by the chisel.
If the cover of a box consist simply of a flat piece, like the bottom, it is apt to warp, and will not then fit closely. When the cover is formed with a dovetailed rim, it has the appearance of a shallow box or tray, and the box to which it is attached is said to have a tea-chest top. If the box and its cover were made separately, it would be difficult to ensure their exact agreement, and the labour, of dovetailing, etc, would also be increased.
The required truth may be obtained by constructing the box and cover as one piece, and dividing them afterwards by the saw. The four pieces, which must be wide or deep enough to form the box and its cover, are dovetailed together in either of the ways already described. On adding the two pieces which respectively represent the top and bottom of the box, the work resembles a square block, or a cube, if all the sides be equal. These pieces may be simply glued upon the edges of the box, although the neater and most usual way is to rebate the four sides and the top in order to allow the latter to sink, so that less than half its actual thickness is seen. If the box be constructed with a mitre dovetail, and the top and bottom be rebated and mitred, no end wood will be visible, as all the joints occur on the angles of the work. This is the neatest method of attaching the six pieces, but as the workmanship must be exceedingly good, it is seldom employed, and then only in works of the best quality.
Whenever the box and cover are made together, one of the dovetail pins in each of the side and end pieces must occur on the line of di-vision. This line, which represents the depth of the cover, must be gauged all round on the outside, and should fall exactly on the centre of the pins, which must be at least as large again as the others, so that when cut in half they may equal them in size. The joint pins and dovetails must be pared away to a mitre, for if they be left square like the others, rectangular lines will be seen on cutting open the carcase - that is, separating the cover and box by the carcase saw.
Continue to:
My Books

