204. Ashlar. - Laying Out
Description
This section is from the book "Building Construction And Superintendence", by F. E. Kidder. Also available from Amazon: Building Construction And Superintendence.
204. Ashlar. - Laying Out
After the kind and size of ashlar to be used has been determined upon the draughtsman should show each piece of ashlar on the elevation drawings if coursed ashlar with plumb bond is to be used, and stones of particular lengths desired. If there are piers on the outside of the building a section drawing should be made showing how the stone in the pier is to be bonded with the rest of the wall.
For all public buildings and most office and business blocks it is generally best to show every stone on the plans unless broken ashlar is to be used, when the labor would be wasted. As a rule, in ordinary stone dwellings and in fact most stone buildings, either broken ashlar is used or coursed ashlar of irregular lengths, in which case it is not necessary to indicate the ashlar on the elevation drawings, except to show the height of the courses, if coursed ashlar is used. When broken ashlar is used only the quoins and jambs need be shown, and a small piece of ashlar indicating the kind of work desired, as it would be almost impossible for the masons to carefully follow a drawing of broken ashlar.
Thickness of Ashlar. - Broken ashlar, and coursed ashlar not exceeding 12 inches in height, generally varies from 4 to 8 inches in thickness, and averages 6 inches. The different courses should vary in thickness, as shown in Fig. 117, it being better to have one course 4 inches thick and the next 8 inches than to have all 6 inches. No ashlar, however, should be less than 4 inches in thickness, even if of marble. Ashlar laid in alternating high and low courses, as 6 inches and 14 or 20 inches, should be cut so that the low courses will be at least 8 inches thick and the high courses 4 inches thick, and each stone in the latter courses, when 18 inches or more in height, should have at least one iron anchor extending through the wall.
Fig. 113.
Fig. 114 shows the form of anchor generally used. The high courses, when of sandstone or limestone, are generally-sawed of a uniform thickness. Joints. - It is important that the surface of each stone shall be "out of wind," that is, a true plane, and square to the bed and end joints.
The bed joints should be full and square to the face and not worked hollow, as in Fig. 115, as with hollow joints the least settlement in the mortar will throw the whole pressure on to the edge of the stone at C, and cause a "spall" or pieces to splinter off, which ruins the appearance of the building, and, moreover, causes a suspicion as to its safety. Stonecutters are very apt to work the joints hollow and the back of the joint slack, as in Fig. 116, as it requires.
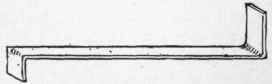
Fig. 114.

Fig. 115.

Fig. 116.
much less labor than to dress the joint evenly, and, unless carefully looked after, will cut the stone that way in nearly nine cases out of ten. If the back of the joint is left slack and underpinned, as in Fig. 116, the stone is then supported only at the front and back, and liable to break in the middle, as shown. Of course, in a wall not exceeding 20 feet in height, the danger arising from imperfect joints is not as great as in a wall of six or more stories. The higher the wall the more carefully should the joints be cut. It is also desirable that the joints should not be convex.
For very heavy masonry, as in the basement or first story of tall buildings, it is desirable to use rusticated joints (see Fig. 90), as with such joints there is less chance for the face to spall.
The thickness of ashlar joints varies from 3/16 to ½ inch. A ¼-inch joint, when pointed, makes very good-looking work. A ½-inch joint is too wide for anything but rock-face ashlar, and nothing over a ¼-inch joint should be used for heavy work.
Continue to:
My Books

