Enlarging
Description
This section is from the book "The Fundamentals of Photography", by C. E. K. Mees,. Also available from Amazon: The Fundamentals Of Photography.
Enlarging
While contact prints are satisfactory to show one's friends, a time comes when we want to attempt something more ambitious and to make photographs which we can hang on our walls or submit for exhibition, and then we feel that we want something more than an ordinary print and something more than an enlarged print; we want to make a picture. The difference between a picture and a print is of course, not a matter of size; it is a matter of composition and balance, of judgment in the choice of subject and of the moment of exposure, and of finish and quality in the result.
The possibility of using a very great degree of enlargement is shown in Fig. 85, where the small image in the corner represents a contact print from the original negative.

Fig. 85. Extreme Enlargement. Original in lower right hand corner.
In this case the negative was a portion of a motion picture film which was taken to get the utmost sharpness of definition and was then enlarged to about a thousand times its original size, the definition in the finished enlargement being still quite good. Such work as this is rarely wanted, but the great value of enlarging is that parts can be chosen from a negative and enlarged to make very pleasing pictures, where the whole negative if printed as a contact print would be by no means satisfactory. The print shown in Fig. 86, for instance, is an enlargement of a film negative. This negative was taken at the seashore as a snapshot exposure, the figures being very small and in the corner of the negative so that if the negative were printed as a whole it would be very unsatisfactory. While a contact print trimmed as is shown in the enlargement was not much larger than a postage stamp, an enlargement of the figures in it, however, made a pleasing picture.
Another illustration of what can be done in enlarging is shown in Fig. 87, where two negatives have been enlarged together to make a combined picture. The lower half of the original scene, of which the church and trees form the upper half, consisted of a plowed field, so that the foreground in the original negative was very unsatisfactory. By taking another foreground, however, taking care, of course, that the lighting was the same, and shading the foreground of the first negative so that it did not print in enlarging, then changing the negative in enlarging and substituting the foreground negative, the two have been printed into one another with the result shown. Some photoghraphers are very clever at making these combined enlargements.
There are two practical methods of mak-ing enlargements; those involving working in a dark-room, and those in which no dark-room is employed for the enlarging itself. For the latter purpose the Brownie Enlarging Camera is suitable, this being simply a cone-shaped box with a holder for the paper at the large end and a negative holder at the small end. The lens is fitted inside the cone, at just the right distance to insure a sharp focus so that the camera is always focused, and sharp enlargements are certain if the negatives are sharp. This enlarger is exposed to daylight. The disadvantage with this camera is that the degree of enlargement is fixed and that consequently it is not easy to select a small portion of a negative and enlarge it to a considerable extent.
Another good arrangement is that shown in Fig. 88, where the film or glass negative is put into the negative holder of the Kodak Enlarging Outfit. With this arrangement the negative is projected on to an easel or wall on which the bromide paper can be pinned, and since the distance of the enlarger from the easel or wall can be regulated, any degree of enlargement can be obtained and a small part of the negative can be selected and enlarged to any required size.
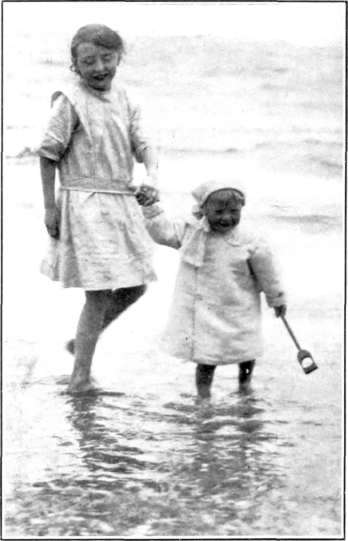
Fig. 86. Enlargement, of Part of a Snapshot.
Continue to:
My Books

