Chapter XXIII. Decoration: Embroidery
Description
This section is from the book "Clothing For Women: Selection, Design, Construction", by Laura I. Baldt. Also available from Amazon: Clothing For Women: Selection, Design, Construction.
Chapter XXIII. Decoration: Embroidery
Outline stitch (Fig. 235), is worked from left to right along the line to be followed.
Bring the needle out at the left-hand end of line, let the thread drop below line, take a stitch from right to left on the line, one-half the length of stitch to be used, bringing needle out in same hole, where thread came out last, and take up next stitch, one-half length beyond, and bring needle out in same hole with end of preceding stitch, continue in this way, making a long stitch on the right side and a short one on the wrong side, and allowing thread to drop below line each time. The right and wrong sides of this stitch are the reverse of the right and wrong sides of backstitch used in plain sewing.
Chain Stitch (Fig. 2 3 6), is worked toward one, bring the needle up at the end of the line, let thread hang naturally, or hold in place with the left thumb, put the needle back in the same hole it just came through, and bring it out a short distance in advance, and over the thread which thus is held down in the form of a loop; each stitch is made in the same way, one end of it coming out through the preceding stitch, and the other end held down by the next stitch.
Lazy daisy stitch (Fig. 237), is a very simple and easy way to work the petals of tiny flowers as small daisies or forget-me-nots. One lazy daisy stitch makes each petal.
To work: Bring the needle up at the inner end of petal near the center of the flower, hold the thread under the left thumb, put the needle in exactly beside the hole it just came through and bring it 406

Fig. 235. - Outline stitch.
out at the tip or outer point of the petal over the thread, thus making one chain stitch, then put needle in again at the tip of petal, outside the chain stitch so as to make one stitch over the thread, thus holding the chain stitch in place. Repeat on each petal.
Blanket stitch (Fig. 238), so called because used to finish the cut edge of a blanket or other flannel article, to prevent its ravelling; when used in embroidery it is usually erroneously called "buttonhole stitch." See Fig. 239 for details of stitch.
This stitch is used to finish edges of linens when finished with scallops or scrolls and to follow the outline of designs in surface work.
To work: For example, on a scallop, hold the lower edge of the scallop toward you, begin at the left-hand end of it, and work towards the right hand, do not use a knot, but run thread through center of scallop for a few stitches, and bring the needle through on the lower edge of the scallop, let the thread fall naturally toward the right hand, or hold down with the left thumb, put the needle in on the upper edge of scallop and bring through on outer edge exactly beside first stitch, pull thread into place and repeat, being careful that each stitch is perpendicular and very close to the preceding one. The stitch may be varied, when used elsewhere than on scallops or on very large scallops, by alternating one long and one short stitch or lengthening and shortening them gradually in groups, to form pyramids, triangles or battlements. If it is desirable to have the work raised slightly, the scallop or other design may first be padded by placing a row of running stitches on each outline and through the center. This padding may be done with the same thread used for the embroidery, or darning cotton may be used. The latter is cheaper and fills in more quickly (Fig. 240).

FIG. 236. - Chain stitch.
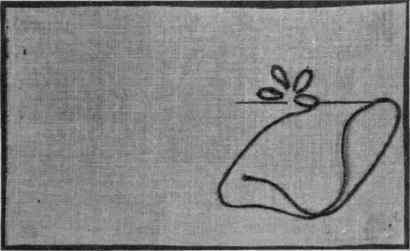
Fig. 237. - Lazy daisy stitch.
Feather, Briar or Coral Stitch (Fig. 241). - These names are given to variations of the. buttonhole or blanket stitch. Each stitch taken is a blanket stitch, worked first on the right of the line to be followed, then on the left, again on the right and so on to completion. The variation comes in the slant of stitch and the number placed on one side of the line before reverting to the opposite side.
The stitch is made toward the worker; bring the needle out at the top of the line, hold the thread under the left thumb, stick the needle in one-eighth inch or less, to the right of the point where thread came out, and bring needle out about one-eighth inch or less, below and slanted slightly toward line of design. As the needle is brought out over the thread, a buttonhole stitch is formed. Then throw the thread around to the left and make a similar stitch on the left-hand side of the line. Continue in this way. This may be varied by making two or more stitches on each side of the line each time before working on the opposite side. The illustrations show how this may be done.
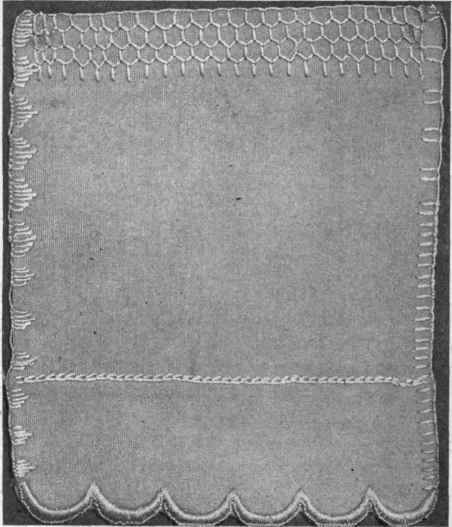
Fig. 238. - Varieties of blanket stitch, plain, honeycomb, scallops.
Herringbone or Catch Stitch (Fig. 242). - Used for decoration and for practical purposes to hold down an unfinished edge, as the unturned edge of a hem in flannel or the edges of a seam in flannel.
This stitch is worked from left to right, between two (imaginary) horizontal lines. Bring the needle out at the left-hand end of the lower line, take a stitch from right to left on the upper line, sufficiently in advance of the first stitch on the lower line, to give the desired slant to stitches, then take a stitch from right to left on lower line at the proper distance to give the desired slant; proceed in this way for the remainder of the work.
Cross Stitch (Fig. 243). - Used as ornamentation either by working the design with the stitch or by working in the background in cross stitch and leaving the pattern in the material itself. This stitch is also used for marking initials on undergarments, bed linen and towels.
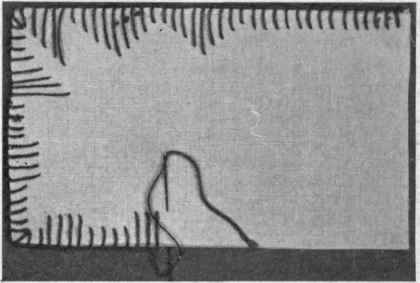
Fig. 239. - Blanket stitch, detail.
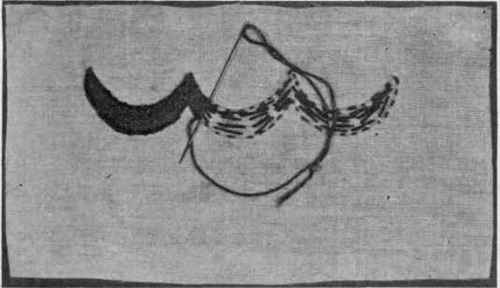
Fig. 240. - Blanket stitch, scallops.
Cross, stitch is simply one stitch crossed over another, the two occupying - a perfect square, crossing it diagonally from corner to corner; it must be worked according to the lines formed by the warp and woof threads of the material, which gives a quaint angularity to the design thus treated. If the threads of the material are very fine or otherwise difficult to follow, or one wishes to work a design diagonally across the corner of an article, as a hand-kerchief, pene-lope or cross stitch canvas may be basted upon the surface of the material and the stitches worked over and through both canvas and material, after which the threads of the canvas may be drawn out.
The stitches must always he crossed in the same way, and worked in the same direction in order to present an even surface.
To work: Proceed from right to left, use no knot, let end of thread be caught by stitches on under side; bring needle up at lower left-hand corner of first square to be crossed, put it down at upper right-hand corner, up at upper left-hand corner, and down at lower right-hand corner, completing the crossed stitch, go forward to lower left-hand corner of second square to be crossed and repeat.
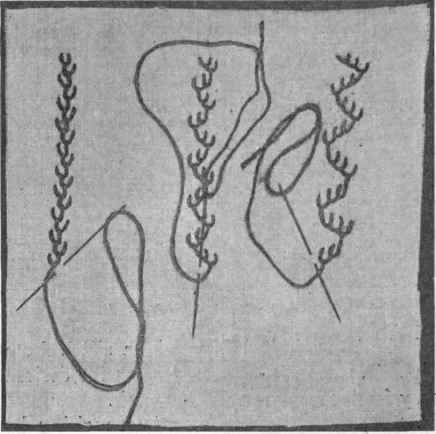
Fig. 241. - Feather, briar or coral stitch.

Fig. 242. - Herringbone or catch stitch.
Couching (Fig. 244). - A form of surface work used to outline the motives in a design.
To work: Two threads of the same or contrasting color, are necessary, one very heavy, the other fine, or a cord and a fine thread. The heavier thread or cord is laid along the design on the surface of the material and fastened to it by stitches of the finer thread.
To work: At the right-hand end of the design make a small hole with a stiletto, pass the end of the cord through this hole to the wrong side of the material, then either make a knot at the end of cord, and sew it to material, or firmly sew the end of cord to place. Holding the cord in place along the design with left hand, bring the needle through from the wrong side one-quarter inch from right-hand end of cord and just below it, then put the needle into material above cord, directly across from where it last came through, move forward as far as desired, from one-quarter inch to one-half inch, according to size of cord and thread being used, and repeat stitch as before.
French Knot (Fig. 245). - Used for center of flowers, as line decoration and to fill in solidly many forms, shapes or spaces.
To make: Bring the needle up to the right side of the cloth at point where the knot is desired, then hold the thread near the material with the left hand and wind it one or more times around the point of the needle, stick the point of the needle back into the cloth very near the place where it came out before, push the coil of thread down close to the cloth and hold it with the left thumb, while you pull the needle through to the wrong side. The coil of thread remains on the surface, forming the knot.
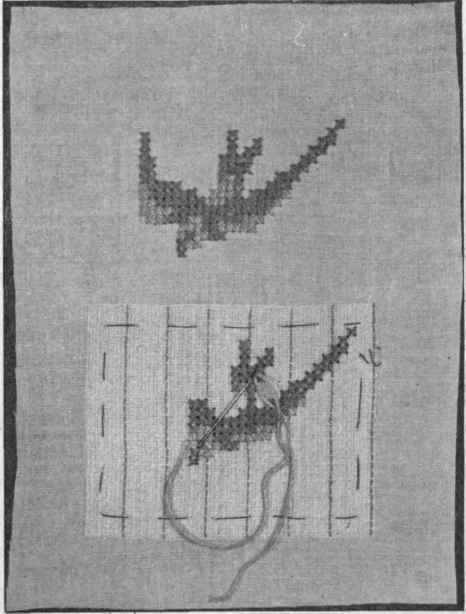
Fig. 243. - Cross stitch.
Continue to:
My Books

