Tailored Skirt Of Linen Or Cotton Suitable Materials. Part 3
Description
This section is from the book "Clothing For Women: Selection, Design, Construction", by Laura I. Baldt. Also available from Amazon: Clothing For Women: Selection, Design, Construction.
Tailored Skirt Of Linen Or Cotton Suitable Materials. Part 3
Making Alterations
Remove the skirt. Trace all alterations along the line of the seams. Open seams and trace the corresponding seams, and re-baste. Mark all changes in hip, waist or finishing lines with a new thread. Try the skirt on again to see that the alterations have carried out well. Unless there is a marked difference in the two sides of the figure, no further fitting should be necessary.
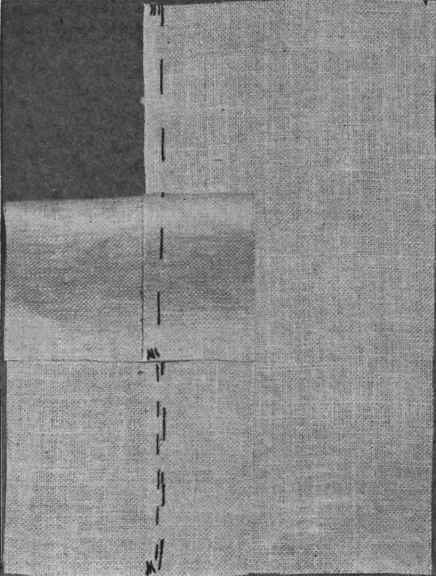
Fig. 195. - Basting the fronts of a skirt having tuck opening.
Plackets
Before stitching the seams of the skirt, the facings and stays should he basted to the placket openings. Three plackets will be described, any one of which may serve in turn to illustrate the principle of finishing the opening of the skirt you are making. Plackets usually fasten from right to left.
1. Placket Opening on Seam Having Two Bias Edges (Hip or Center Back Seam). - First mark the folded edge of the upper side of the placket, right hand side, and the line which this touches on the under side of the placket, left hand side, with a colored thread. Cut two pieces of five-eighth-inch linen tape the length of the placket opening and a strip of lawn or nainsook (which has been shrunk) the length of the placket and twice its width. Open the folded edge of the upper side of the placket and turn wrong side out. Take one strip of the tape and place one-quarter inch to the left of the colored thread, marking edge of fold; baste to place and stitch. This serves as a stay to sew hooks on when placket is finished. Baste strip of cambric to wrong side of placket so that the edge comes to the turn of the placket. Fold edge of placket on colored thread and baste one-eighth inch from edge. Stitch as far from edge as outside stitching of seam. Sew snap fasteners or hooks to tape one inch apart, and turn cambric facing over, edge one-quarter inch; hem to place. On the wrong side of the extension baste the second strip of tape far enough to the right of the thread, marking edge of placket to sew snap fasteners or eyes in correct position to meet opposite snaps or hooks. Stitch tape on both edges. Overcast or bind edge of extension with cambric or bias binding (Fig. 196).
2. Placket in a Tuck Opening. - Before stitching the tuck in place, mark the edge on which it turns with a colored thread; then open the tuck, turn to wrong side, and place a piece of linen tape, five-eighth inch wide, one-half to three-quarter inch to the left of the thread marking the edge of the tuck; baste and stitch on both edges. Fold tuck again and baste to place; stitch same width as below the placket opening. Sew hooks or snap fasteners on one inch apart. The extension should have a piece of five-eighth-inch linen tape basted far enough to the right of the marking of placket, so that when the eyes are placed the skirt will hook together properly. Baste tape to place and stitch both edges. Sew eyes on to meet hooks. The placket must close smoothly and evenly. Press before stitching. If the tuck should be on the bias, it must also be faced with a straight strip of lawn, nainsook, or batiste (Fig. 197).

Fig. 196. - Placket facing on bias seam.
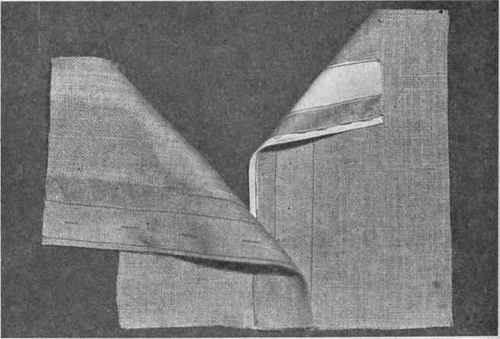
Fig. 197. - Placket facing in tuck opening.
3. Buttons and Buttonholes. - The buttonhole side must be reinforced to provide for the strain in fastening the skirt. Place a lengthwise strip of cambric or muslin, the width of the tuck on the inside of the tuck. Baste to place. Cut and work the buttonholes through the three thicknesses of material. The buttonholes may be either worked or bound. Two- or four-hole, or shank, buttons are used, the size depending on width of tuck and individual taste. It is better to use a button with a shank which can be slipped through an eyelet and fastened with one of the metal catches specially made for the purpose. These are easily removed for the purpose of laundering the skirt. In any case, stay the extension with a piece of linen tape through which you either work the eyelets or sew the buttons. The edge of the extension, if selvedge, remains unfinished. 22

Fig. 198. - Plain seam, overcast single, and together; A, right side; B, wrong side.

Fig. 199. - Cord seam; A, basting for outside stitching; B, wrong side before outside stitching; C, outside stitching; D, wrong side after stitching.
Continue to:
My Books

