Testing Shirtwaist Pattern. Part 2
Description
This section is from the book "Clothing For Women: Selection, Design, Construction", by Laura I. Baldt. Also available from Amazon: Clothing For Women: Selection, Design, Construction.
Testing Shirtwaist Pattern. Part 2
To Fit Waist
Clip underarm seam at waist line, and two inches above and below to let it spring so as to provide for good fitting; also sleeve seam at inside curve. Put waist on, with seams inside, lapping it so that center front lines meet; pin together. Draw waist band around waist, turning underarm seams to front, and pin band. Adjust fulness. Look waist over carefully before fitting. A well-drafted pattern should need little alteration. Fit only the right side at first fitting. See that the waist fits easily throughout.
Following are some faults which might be found, together with method for correcting them:
Loose In Neck
Pin up shoulder seam at neck and slope to armhole. This will usually make neck too high; clip neck at several points, and pin neck band again into place (Fig. 39A). If the waist seems tight at neck and chest, let the whole front out and mark new center front line.
Fine wrinkles in front at right angles to shoulder, - front shoulder needs stretching on back. Rip seam and throw more fulness into back shoulder seam by stretching front seam on back.
Wrinkles (deep folds) which draw from tip of shoulder to arm-hole occur sometimes on sloping shoulders. Pin a deeper seam at armhole, sloping to nothing at neck. This will sometimes raise the armhole too high under the arm, so it must be cut lower (Fig. 39B).
A similar result may follow when the grain of the material in the front of the waist does not run at right angles to the shoulder line, but runs toward the neck at the shoulder seam. This occurs more often, however, in commercial patterns. To correct, open shoulder seam and slip front of waist down on back until wrinkles are removed and grain is correct; then pin again on same shoulder line; notch center of shoulder seam so as to put together correctly again. Cut off extra material from front at armhole and build up again at neck (Fig. 390). Very square shoulders sometimes cause a deep wrinkle across the chest and back. Open shoulder seam at armhole and let it down for fleshy figures, but this would make the armhole too large for slight figures. It is better in this case to take up shoulder seam at neck, sloping to armhole, then cut neck out in front and back (Fig. 39A).
Armhole
If armhole line is not good, notice whether shoulder seam is too long or width of back or front at fault. Mark corrections. If a figure is very full in the bust and flat under the arm, quite a little fulness will be found in the waist, at the armhole, just above the bust. To remove this in a shirtwaist, open the underarm seam and slip the front down on the back, which makes the front more bias just above the waist line, giving fulness where needed. Pin seam, build up the front at the armhole and mark new waist line (Fig. 39D).
Waist Band
When arranging fulness in the back, pin belt at underarm seam, then again where fullness should begin; the bottom of the belt should come to waist line. Mark the center on belt very carefully, also where fulness stops and where the belt is placed to the underarm seam. Remove waist, trace alterations, open seams and trace on opposite side of waist; rebaste, and try on again.
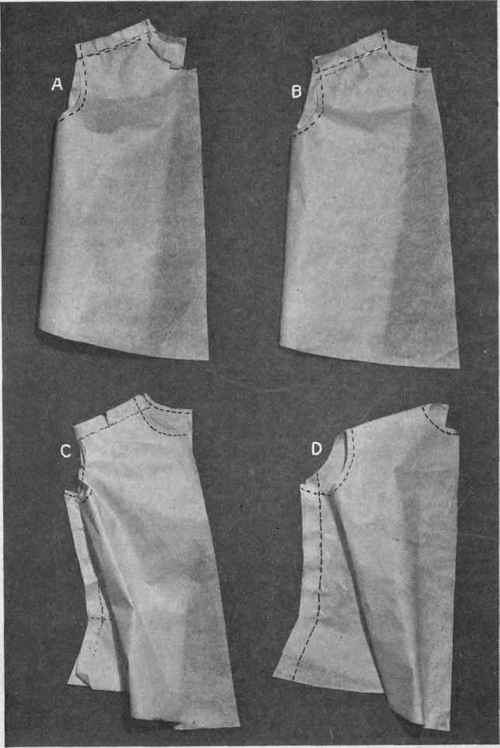
Fig. 39. - Several methods of correcting faults when fitting shirtwaists.
Place sleeve and neck band before second fitting.
Continue to:
My Books

