Lesson 2. Simple Articles Easily Made From Silk Scraps
Description
This section is from the book "Clothing And Health. An Elementary Textbook Of Home Making", by Helen Kinne. Also available from Amazon: Clothing And Health.
Lesson 2. Simple Articles Easily Made From Silk Scraps
There are so many things which can be made from silks. Suppose you start with something easy. Miss James had some good suggestions. The little pin-case or the sewing-case are both useful (Figs. 68 and 69). You know the overhanding stitch; so you can make them quickly. Several of the Pleasant Valley girls will make them for Christmas gifts as well as for the fair. Which will you make?
Here are the directions for making both the pin-case and the sewing-case. They are not difficult if the directions are followed carefully.
For the Pin-case. Cut two circles of stiff cardboard from 2 to 3 inches in diameter, if your silk pieces will permit. The circles must be exact. Cut two pieces of silk 3 or 4 inches in diameter, so the silk pieces will be 1/2 inch larger all around than the cardboard. 1/4 inch from the edge, with double thread, make a row of gathering stitches; slip cardboard within and draw up the silk around the card. Now crisscross with your thread through the edges of material until all is held firmly (Fig. 67). Cover both cards. Then hold the two together, and very neatly overhand with silk thread of a color to match. Tiny stitches should be taken. Put in a row of pins around the edges close together. A pretty decoration can be made by working a design or an initial on the silk if it is a plain color. This can be done with chain stitch or featherstitch, before the cover is put over the cardboard.
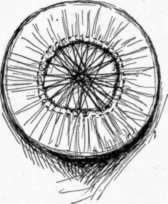
Fig. 67. - This shows how to cover the circle, and draw the silk neatly at the edges.
In the picture (Fig. 68) notice the other cases. They are made exactly like the pin-case but of circles or of pieces of different shape.
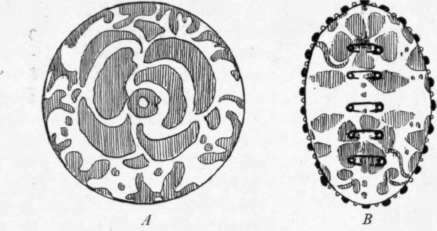

Fig. 68. - Several useful cases: A, pin-case; B, oval pin-case; C, spool-case; are put inside. The case naturally closes itself; but, when pressed at the ends, it opens easily.
D, darning-case; E, needle-book.
Cases for doilies can be made of two large circles of 12 in. in diameter. The circles can be tied together with ribbon and the doilies lie flat between. The case for darning thread is also very useful.
For the sewing case. This is more difficult. It is three-sided and is made of three elliptical disks covered as we did the round ones for the pincase. How many cardboards will you need? Thin cardboard is necessary. What does elliptical mean? A good size is 4 inches the long way and 2 1/2 inches across. All the girls know how to draw an ellipse. Cut the six pieces of silk 1/2 inch larger all around than the ellipses, and cover in same way as you did the round disks. If there are not enough scraps of one color, use a contrasting color for the lining. After the six pieces have been covered and joined together to make three ellipses, then the three are to be over-handed together very neatly, leaving open the third edge, which is the opening of the case where the spools, etc.
What are some pretty stitches that may be used for decorating? If one wishes, the sewing case can also be decorated with a good design like the one in the picture (Fig. 69). Would you like to make the chain stitch and the featherstitch? They are both useful for decoration on bags, aprons, dresses for baby, underwear, and many things. Mollie Stark learned this stitch and used it on a dress for her baby brother. Mrs. Stark is very happy to think Mollie is learning how to sew. These are the directions for making several pretty stitches:
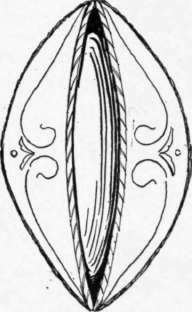
Fig. 69. - The sewing case made of three elliptical disks sewed together.
The chain stitch is easy to learn. Begin with a knot. Pass the thread from the under side up. Throw the thread so as to make an O (see Fig. 70). Put the needle into the hole where thread came through, and make a stitch about 1/8 inch long. Hold the cloth over the fingers with the thumb on top. The needle should be pointed towards the worker, and the point of the needle should be brought up through the little round O. Care must be taken in pulling the thread through to have the loop of thread lying flat on the cloth. The length of stitch should be uniform. What does uniform mean? The outline of an initial or any drawn design can be followed with this stitch.
The featherstitch is very beautiful when made small and even (Fig. 71). It can be varied by making one or two stitches on each side of a center line. The length of the stitches and the slant always affect the appearance. In practicing the featherstitch draw a pencil line on your cloth as a guide. The stitches are slanting and are taken towards this line. This stitch is used for decoration in the same way as the chain stitch.
The single featherstitch. Hold the work over the finger with thumb on top of cloth. Work towards you. Start with knot on under side of pencil line. Draw thread through to right side. Lay thread on the pencil line and hold with thumb. To right of thread near beginning, take a small 1/8 inch slanting stitch towards the line of thread. Draw needle through over the loop of thread. Have it loose and lying flat. For the second stitch, hold thread again on the pencil mark. Throw thread for next stitch on the left of the line. Take slanting stitch towards center line. Draw needle up through the loop, which should lie flat. The next stitch is taken to the right of the center line directly under the stitch above it, and should be the same length and slant. The beauty of this stitch depends on its evenness. A striped material makes a good practice piece. After the stitch is learned, it is easy to make it on plain cloth; hut one must then keep constantly in mind an imaginary center line. This is a very useful stitch for finishing hems instead of using the hemming stitch. The lawn ruffles on our petticoats were finished with this stitch. The featherstitch is sometimes a straight stitch instead of slanting. It is taken each side of the imaginary center line as the slanting one, but the needle is held straight.

Fig. 70. - The chain stitch.

Fig. 71. - A, the single featherstitch; B, the double featherstitch.
The outline stitch. This is another easy stitch (Fig. 72) which every girl should learn. It can be used instead of the chain or featherstitch, as decoration. It outlines, or follows, the design, and so gets its name. The stitch is taken on the line and is worked from left to right. Care must be taken to have the stitches all the same length and to throw the thread in one direction either away from or towards the worker. The pretty effect will be spoiled if there is a variation. Away from the worker makes a neat effect. Begin with knot. Draw needle to right side on the line. Throw thread away from worker; take a small back stitch on the line, needle pointing towards the worker. This will make a long thread on the surface and the short stitch beneath. The effect is much prettier when the stitches are taken close together.

Fig. 72. - The outline stitch.
Exercises And Problems
1. Name some other articles on which the featherstitch or chain stitch can be used; some on which the outline stitch may be used.
2. Draw a picture on the blackboard of the featherstitch, chain stitch, and outline stitch. Can you show how the needle looks in position, without looking at your textbook ?
Continue to:
My Books

