III. Hemming
Description
This section is from the "Home And School Sewing" book, by Frances Patton. Also available from Amazon: Home And School Sewing.
III. Hemming
A hem is a fold turned down twice, used to strengthen and finish the material on which it is placed.
The two turns of the hem are called the fold of the hem.
A notched card may be used as a guide in turning wide hems. This is called a measure or gauge.
Exactness and uniformity in the size, slant, and space between the stitches are necessary to insure beautiful hemming.
While you are learning, hems should be made across the muslin.
The turning of the hem may be practiced on paper before making it on muslin.
Materials. - The materials required for this lesson are: A piece of muslin (12 inches square) ; "ground downs" or "between" needles; cotton of a suitable number (No. 50 red preferred) ; scissors; a ruler or tape measure.
Folding and Basting of the Hem.
1. Hold the muslin up with the selvage edge at the right side. Pupils without a selvage edge on their piece of muslin will hold it up so that the line (drawn by the teacher) runs vertically.
2. Make the first turn of the hem one-fourth of an inch, creasing it from right to left. (Special care should be given
to this turn, as the evenness of the hem greatly depends on it.)

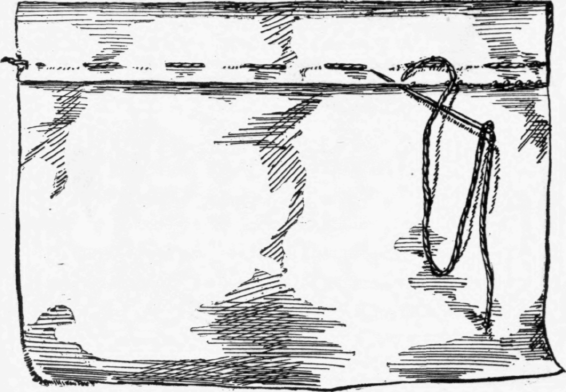
ILL. 9. - The Needle in Position for Beginning the Hem.
3. Make the second turn of the hem one inch; begin to turn it at the right-hand side and crease it by laying it in plaits between the thumb and first finger of the right hand. (Never crease it by stretching across from side to side.)
4. Test the results with an inch measure.
5. Baste close to the edge with even basting, as in the picture. See Illustration No. 9.
6. Avoid using knots.
7. Hold the hem straight around the first finger of the left hand.
8. Pointing the needle towards the right, put it through the fold of the hem only. See Illustration No. 9.
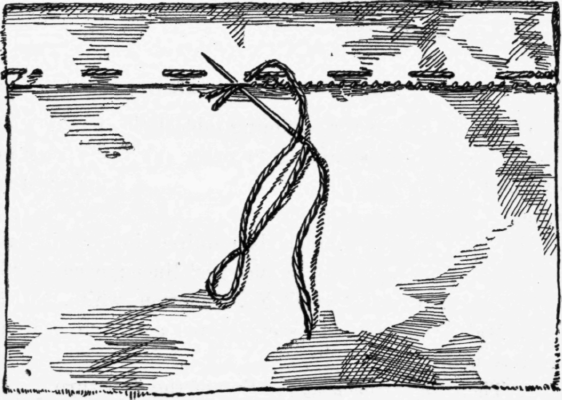
ILL. 10. - The Hem Partly Done.
9. Draw the needle through, leaving about one-half an inch of thread.
10. Tuck the end of the thread under the fold of the hem.
11. Make two stitches through the fold of the hem, and turn the needle towards the thumb nail of the left hand. These stitches take the place of a knot.
12* Take up a few threads of the muslin and the fold of the hem at each stitch (that is, through three thicknesses of the material).
13. Draw the needle out and continue to make the stitches close and slanting. See Illustration No. 10.
14. Train the eye to know when the stitch is uniform in slant, size, and space.
15. Finish the hem by taking two or three stitches on top of each other, and then slip the needle under the hem as far back as three stitches before cutting the thread.
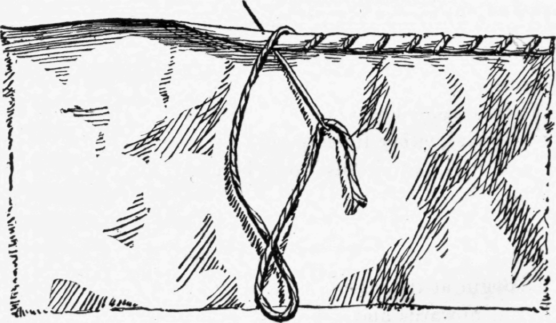
To mend the thread, if there is no end left, rip out a few stitches and tuck the end of the thread under the fold. Start the new thread as in commencing; tuck the end of the new thread under the fold of the hem and secure both ends with the next stitches. See Illustration No. 11.
Measure or Gauge for a Wide Hem.
1. Measure the desired length at the edge of a card, and make a straight cut into the card.
2. Below this, cut at an angle so as to take out a three-cornered piece.
ILL. 11. - Joining the Thread in Hemming.
To Turn a Wide Hem.
1. Make the first turn as in the narrow hem.
2. Crease the second turn of the hem by placing the straight cut of the gauge to the edge of the fold of the hem and turn it the width of the gauge.
3. Turn about a half yard in this manner, and then go back to the beginning and test it as you baste it.
Mistakes Likely to be Made in Hemming.
1. Upright stitches caused by not holding the work in the right position and not giving the needle sufficient slant.
2. Stitches not uniform in size.
3. Stitches irregular in space.
4. Incorrect mending of the thread.
5. Hem not turned accurately.
Napery or French Hem.
This hem is used for hemming tablecloths, napkins, etc. Housekeepers are beginning to realize that the hemming of fine table linen with a sewing machine is far from satisfactory.
Materials. - The materials required in learning this lesson are: A napkin or a piece of linen; needles, "be-tweens" or "ground downs" No. 9; cotton, white, No. 70.
1. Make the first and second turn as in an ordinary narrow hem.
2. Then fold it back at the line of the first turn.
S. Hold the hem towards you.

ILL. 12. - Napery or French Hem.
4. Sew it like an overseam. See Illustration No. 12.
5. Open it out and rub it flat.
Rolled Hem.*
A rolled hem is frequently used on the edges of ruffles, handkerchiefs, etc., particularly where the material is very fine and a lace edge is to be sewed on, and in sewing lace and needlework insertions together. The stitch used in this case is often referred to as whipping.
Materials. - The materials required are: Some sheer fine material, either linen or cotton; cotton No. 80 or 100; needles, "ground downs" or "betweens" No. 9 or 10; scissors.
1. Trim off all frayed edges.
2. Hold the wrong side of the material towards you.
3. Begin at the right-hand side and rub an inch of the material upwards and downwards between the thumb and first finger until you feel a small roll.
*Advanced work.
4. Do this with the left hand, pressing the material firmly while making the roll.
5. Roll about two inches at a time.
6. Sew with a long, slanting stitch somewhat similar to hemming; the needle being held at the same angle, but inserted under the roll and brought out at the top.
7. Do not make the stitches quite as close as in hemming. See Illustration No. 13.
8. Keep rolling the hem a little in advance of the sewing.
9. If lace is to be sewed on, sew both lace and hem at one time.
Back Hemming.*
This hemming stitch, on account of its strength, is particularly adapted to sewing braids and facings on skirts.
ILL. 13. - Rolling and Whipping the Hera.
*Advanced work.

ILL. 14. - Back Hemming - A Stitch Used in Sewing on Braids.
Mateeials. - These materials will be required: A hem basted; heavy silk or cotton; needles No. 8.
1. Begin with a small knot, tuck it under the hem or facing, and instead of taking the needle forward each time, take it a short distance back of where the thread came through last. See Illustration No. 14.
2. The stitch may be a good-sized one, but it must not show through on the right side.
Continue to:
My Books

