Overhanding
Description
This section is from the book "School Needlework. A Course of Study in Sewing designed for use in Schools", by Olive C. Hapgood. Also available from Amazon: School Needlework: A Course Of Study In Sewing Designed For Use In Schools.
Overhanding
Overhanding is done by sewing closely over two edges of cloth. The edge of the cloth may be either a selvedge or a creased fold.
Materials
No. 8 needle, No. 60 thread, and either two selvedge strips or two folded strips of cotton cloth, carefully basted together with even stitches, near the edge.
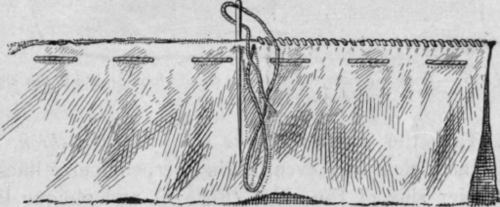
Fig. 24. - Showing overhanding stitches, needle in position.
Practise Drill No. 5 (page 17).
1. Have no knot in the thread.
2. Hold the work horizontally along the edge of the cushion of the left forefinger, and around the end of the finger, as in Fig. 9 (page 17).
3. Pointing the needle towards you, insert it at the edge nearest you, taking up two or three threads of the cloth.
4. Carefully draw the thread through, leaving half-an-inch of the thread.
5. Hold the half-inch of thread down with the thumb, so that it may be sewed over by the first stitches (Fig. 26, a).
6. Pointing the needle towards the chest, put it through both edges, taking up as little of the cloth as possible.

Fig. 25, - Showing how the stitches should look on the under side, with the seam opened.
7. Take the stitches at the side of the cushion, and make them close and even, having perpendicular lines on the under side of the seam (Fig. 25), and oblique lines across the edges (Fig. 24).

Fig. 26. - Showing, the edges of the seam being separated, how the end of the thread is fastened in beginning, how the stitches should look on the side towards you, and how to join the thread (the double line representing the old thread, and the black line the new thread).
8. Joining the thread (Fig. 26). When the thread becomes too short for use, draw the needle through the further edge of the cloth, as in taking a stitch. Insert the needle at the opposite edge, one-fourth of an inch to the left, taking up one thread of the cloth. Draw the thread through, and remove the needle. Have no knot in the new thread. Pointing the needle from you, insert it at the hole where the old thread is hanging. Draw the thread through until about an inch is left, and hold the end under the thumb. Pointing the needle towards you, insert it at the nearest edge, exactly opposite the last stitch on the other edge. Hold the ends under the thumb, while the threads along the top are being over-handed; afterwards, cut the ends off.

Fig. 27. - Showing another way of joining the thread.
The thread can also be joined as in Fig. 27. If preferred, a knot can be used by beginning back and sewing over a few stitches, and afterwards cutting off" the knot.
9. Finish the seam by turning the work around, and overhanding back four or five stitches; this will fasten the thread securely.
10. When the seam is finished, draw out the basting thread, open the seam, and rub it first on one side and then on the other with the thumb-nail until it is flat.
Suggestions
This stitch is sometimes called "top-sewing," also "over and over." The stitches should only be deep enough to hold, taking care to avoid making a ridge in the seam. The work will not pucker if the needle is pointed towards the chest, and the stitches are taken at the side of the cushion, not around the end of the finger. The necessity of taking the stitches properly is shown by overhanding two pieces of striped cloth. Either side of the sewing may be used as the right side. A seam in stiff material can be pressed open by holding it between the thumb and forefinger of each hand and rubbing.
How is overhanding done? How should the work be held? How and where should the needle be inserted? What should be done with the end of the thread? How are the stitches made? Mention one way of joining the thread. How should the seam be finished? What is done after the seam is finished?
Continue to:
My Books

