Straightway-Tear
Description
This section is from the book "School Needlework. A Course of Study in Sewing designed for use in Schools", by Olive C. Hapgood. Also available from Amazon: School Needlework: A Course Of Study In Sewing Designed For Use In Schools.
Straightway-Tear
Darned with vertical stitches. A blue thread represents the tear.
1. Crease across the middle of one of the squares of cloth.
2. Leaving an inch and a fourth at each end, make a running on the crease, with the blue thread (Fig. 68).
3. Make two creases, one, one-fourth of an inch above; and one, one-fourth of an inch below the running.
4. Leaving an inch at both ends, make a running on each crease, with pink thread (Fig. 68). (The pink threads are boundary lines for the stitches).
5. Hold the tear over the cushion of the left forefinger.
6. Threading the needle with red thread, insert it at the right of the lower pink line (Fig. 69, a).
7. Take six running stitches upwards, bringing the needle out a little below the upper pink line (Fig. 69, b) and leaving an end of the thread to be cut off later.
8. Finish the row, by inserting the needle above the line ; draw it through below the line for beginning the next row.
9. Taking up the threads of the cloth, which were passed over in the preceding row, bring the needle out a little above the lower pink line.
10. Insert the needle below the line, and draw it through above the line for beginning the next row.
11. Make two rows, between this row and the end of the tear.
12. Beginning the fifth row above the lower line, put the needle, at the third stitch, down through the blue line or tear (Fig. 69, c).
13. Take two more stitches, bringing the needle out below the upper pink line.
14. Finish the row; and continue in the same manner, always putting the needle at the third stitch, down through the tear, to secure the edges.
15. In finishing the darn, make four rows beyond the tear.
Darned with slanting stitches.
1. Crease, and run a square of cloth as before (Fig. 68).
2. Threading the needle with red thread, insert it at the right of the lower pink line (Fig. 70, a).

Fig. 69. - Showing the tear partly darned with vertical stitches.
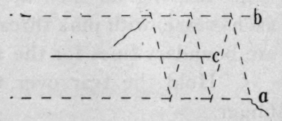
Fig. 70. - Showing the tear partly darned with slanting stitches.
3. On a line, slanting so as to cut off one-eighth of an inch on the opposite line, take six running stitches, bringing the needle out a little below the upper line (Fig. 70, b), and leaving an end of the thread to be cut of later.
4. Insert the needle above the line, and pointing it towards you, take six stitches on a line, all having the same slant. Bring the needle out above the lower line at the sixth stitch.
5. Insert the needle below the lower line and take six stitches, having the same slant as before; at the fourth stitch, draw the needle down through the tear (Fig. 70, c).
6. Continue in this manner, always drawing the needle down through the tear, at the fourth stitch.
7. In finishing the darn, make several rows beyond the tear.
Bias-Darn.
Materials
Same as for a straightway-darn (page 93).
Bias-darn, or across both the warp and the woof
A blue thread represents the tear.
1. Crease the square of cloth diagonally from corner to corner.
2. Leaving two inches at each end, run on the crease with blue thread.
3. Make two creases, one, one-fourth of an inch above; and one, one-fourth of an inch below the running.
4. Leaving an inch and a fourth at both ends, make a running on each crease with pink thread.

Fig. 71.- Showing a bias-darn.
5. Thread the needle with red thread.
6. At the right, and beyond the blue line or tear, make four rows of eight stitches each, (as for a straightway-darn, page 94) on a line with the vertical threads of the cloth (Fig. 71).
7. Beginning the fifth row above the lower line, draw the needle down through the tear at the fourth stitch (Fig. 71, c).
8. Take three more stitches, bringing the needle out below the upper line.
9. Insert the needle above the line, to finish the row; drawing it out below the line for the next row.
10. Continue in this manner, always drawing the needle down through the tear, at the fourth stitch.
11. In finishing the darn, make several rows beyond the tear.
Corner-Darn.
Materials
Same as for a straightway-darn (page 93). Corner-darn
A blue thread represents the tear.
1. Crease one side of the cloth one inch from the edge.
2. At right angles with the crease, make another crease one inch from the edge.
3. Call the vertex of the angle a (Fig. 72).
4. With the pink thread run on the crease, on both sides of the angle, one and a half inches from point a (Fig. 72).

Fig. 72. - Showing the cloth prepared for practice in darning a cor-ner-tear,and the corner darned.
5. Crease an angle half-an-inch inside the first angle.
6. With the pink thread, run on the crease, on both sides of the angle, one inch (Fig. 72).
7. Crease half-way between the two angles, and run with blue thread.
8. Using red thread, make a large knot (cut it off afterwards), and insert the needle from the right side, at the corner (Fig. 72, b). The knot is made to aid in drawing up the corner.
9. Run to point a, putting the needle down through the tear, at the fourth stitch.
10. Slightly curving to the right, return to point b.
11. Make a row very close and to the left of the first row, taking the stitches alternately.
12. Slightly curving to the left, return to point b.
13. At the left, make a row directly on a line with a thread of the cloth, to the outer pink line.
14. Make a curved line at the right to point b.
15. On the opposite side of the corner, make a row on a line with a thread of the cloth, as far as the outer pink line.
16. Making a line, curving to the left, return to point b.
17. Beginning at the corner, darn both sides with vertical stitches (page 94), or slanting stitches (page 94).
Darning with a Piece Underneath.
In darning a tear, where the garment is worn thin, or is badly torn and ravelled, a piece of cloth should be placed underneath.
1. Cut the piece larger than the tear, being careful to match the grain of the cloth, also the figures and stripes.
2. Draw the tear into place, and baste the right side of the piece to the wrong side of the garment, matching it exactly.
3. Baste around the edge of the tear.
4. Take either vertical stitches (page 94), or slanting stitches (page 94), through both thicknesses of cloth.
5. If the hole is large, darn the sides of the tear separately, tucking the ravellings under with the point of the needle, as you come to them.
6. After the darn is finished, lightly secure the piece on the wrong side, or cut it off near the darning.
Fine Drawing on Heavy Woollen Material.
1. Use very fine sewing silk, and hold the edges of the tear flat upon the left forefinger.
2. Inserting the needle half-an-inch below the edge of the tear, run it through half the thickness of cloth, concealing the silk.
3. Inserting the needle in the opposite edge, run through the cloth in the same manner.
4. Draw the edges closely together.
5. Continue in this manner, being careful not to lap the edges.
6. Brush up the nap on the right side.
7. Dampen, and press on the wrong side with a hot iron.
It is better to do the darning on the wrong side; but, if the garment is lined, it may be done on the right side, being careful to insert the needle in the cloth exactly where it came out.
Another way to darn a tear on heavy material is to overcast the raw edges closely together, on the wrong side, then rub the seam open and darn lightly. Lay a wet cloth over the darn, and press. To make a perfectly flat seam on selvedges or heavy woollen cloth, the edges may be joined, as in Fig. 73.
Suggestions
The aim in darning a tear is to repair the rent so nicely that it can not be perceived. In darning twilled material, instead of taking the stitches alternately, make them in slanting rows to correspond with the twill. A rent should be repaired with fine thread or silk, matching the material in quality and color; if the same color can not be obtained, use lengthwise ravellings of the material. On fine woollen goods, hair can be used, and the needle should be threaded with the root. When darning with very fine thread or ravellings, use short needlefuls. As fine a needle as possible should be used.
Darning can be done on the right or wrong side, according to the material. For a tear in coarse material, the stitches should be taken more than one-fourth of an inch from the edge. The closeness of the rows of stitches depends upon the material and the tear. Edges should always be worked in and out alternately to secure them. Always protect the ends of a tear by darning beyond them. To keep the edges of a long tear even, it is best to begin to darn in the middle. When a darn is finished, it should be dampened and pressed on the wrong side, or a thin, damp cloth can be laid on the right side and pressed. To mend a rip in the seam of a kid-glove, overhand the edges together on the right side, using fine thread or sewing silk matching the color of the glove. If there is a strain coming on the seam, button-hole stitch the edges, and then overhand the purls of the stitches together.
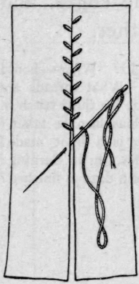
Fig. 73.
For what is cloth darning used? How should the tear be held? Where should the needle be inserted? What kind of stitches should be taken? What threads are taken up in the second row? Where should the needle be put at the third stitch in the fifth and succeeding rows? How should the stitches on a bias-darn be taken? Where should the needle be inserted in a corner-darn? Why is a knot made? How many rows of stitches are made at the corner? What is the aim in darning? What can be used instead of thread? What should be done after a darn is finished? How should a kid-glove be mended?
Continue to:
My Books

