Whipping
Description
This section is from the book "School Needlework. A Course of Study in Sewing designed for use in Schools", by Olive C. Hapgood. Also available from Amazon: School Needlework: A Course Of Study In Sewing Designed For Use In Schools.
Whipping
Whipping is forming gathers by overcasting a rolled edge of fine material, and drawing up the thread.
Materials
No. 6 and No. 8 needles, No. 40 and No. 60 thread, pins, scissors, a strip of paper, and a piece of cotton cloth six inches long and four inches wide, with a narrow hem on the ends and upper edge, and an inch hem on the lower edge; for the ruffle, a piece of plain cambric, twelve inches long and two inches wide, with a narrow hem on the ends and one side.

Fig. 61 . - Showing the rolling and overcasting of the ruffle.
1. Practise rolling tightly the edge of the piece of paper. It must be rolled, not folded.
2. Divide the edge of the inch hem, and the raw edge of the cambric, into halves and quarters, and mark, one inch from the edge, by cross-stitches.
3. Trim the ravellings from the raw edge.
4. Hold the wrong side of the cambric towards you.
5. Beginning at the right-hand corner, roll the first half-inch of the cambric towards you, between the thumb and the forefinger of the left hand.
6. Take the coarse needle and thread, and make a small knot.
7. Inserting the needle at the corner, under the roll, take one or two stitches, to fasten the end.
8. Hold the end of the roll between the right thumb and forefinger, and, placing the cambric between the third and little finger of the left hand, draw tightly.
9. Pressing the left thumb against the forefinger, rub an inch of the edge upwards and downwards, until a small, firm roll is made.
10. Overcast, as far as the cloth is rolled tightly, inserting the needle under the roll (Fig. 61).
11. Draw up the thread, holding it on a line with the raw edge. If the roll is small, and the stitches are taken loosely and at regular intervals, the ruffle will draw easily on the thread.
12. Continue, rolling and whipping an inch or two at a time.
13. Placing the right sides of the ruffle and hem together, pin the divisions of the ruffle to the divisions of the hem.
14. Draw up the ruffle to the length of the hem, and wind the thread around the pin.
15. Holding the ruffle towards you, overhand, inserting the needle in each fold of the whipping, so that the thread will lie between the folds (Fig. 62).
16. Fasten both the whipping and the overhanding thread.
Suggestions
The fingers should be perfectly clean, to prevent soiling the work. In whipping, some prefer to take hemming stitches instead of overcasting stitches. A ruffle, for whipping, should be twice the length of the part to which it is to be sewed; it is sometimes advisable to make it more than twice as full. A ruffle cut across the cloth whips easier than one cut lengthwise. A fine material whips more readily than a coarse one. Ruffles should be cut by a thread, which can be done by tearing, and then trimming the edges.
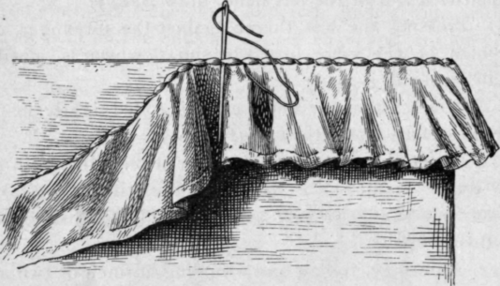
Fig. 62. - Showing the overhanding of the ruffle to the cloth.
It is best to use short lengths of thread, as a great strain comes, when the ruffle is drawn. In making a long ruffle, have a thread for each division, and measure as you draw the thread. The thread will draw easier, if a large needle is used. When corners are to be turned, allow extra fulness, so that the ruffle will lie flat (page 79). In over-handing a ruffle, the garment can be held towards you, but, if the whipping thread should prove too short, there is no way to lengthen it; while, if the ruffle is held towards you, the thread can be drawn up or lengthened.
What is whipping? In whipping, which side of the ruffle should be held towards you? How do you begin? What kind of a needle and thread should be used? How is the roll held? How rolled? What is done next? How is the thread drawn? How continue? How is the ruffle sewed on to the hem?
Continue to:
My Books

