Bungalow Apron
Description
This section is from the book "School Sewing Based On Home Problems", by Ida Robinson Burton, Myron G. Burton. Also available from Amazon: School Sewing Based On Home Problems.
Bungalow Apron

Materials
Gingham (Chap. I, Par. 19) or
Percale (Chap. I, Par. 31), or Chambray (Chap. I, Par. 9).
3 yards of gingham, 30" or
36" wide. 1 2/3 yards rickrack. Thread No. 70. Needle No. 8.
Pattern for kimono night gown (drafted or commercial).
Introductory Statement
The over-all or bungalow apron is very desirable to put on over the Sunday dress, or it may even be worn as a house dress.
This apron may be made of calico, percale, gingham, or similar wash materials. If it is to be worn in the kitchen when doing work which would soil a light colored apron, dark colored material will be most serviceable; light colored aprons may be saved for ironing day, baking day and meal time when you wish to look particularly fresh and clean.
In dark colors there are many good patterns which may be selected. The small blue and white checked, black and white striped materials, the plain blue chambrays or ginghams will make up attractively in the design given in this lesson. Rickrack used to finish the neck and sleeves of the apron will brighten it and add to its appearance.
References:
Textiles, Dooley. D. C. Heath & Co.
A Dictionary of Calico Printing, O'Neill. Baird & Co., Philadelphia.
Suggestions For Optional Modification
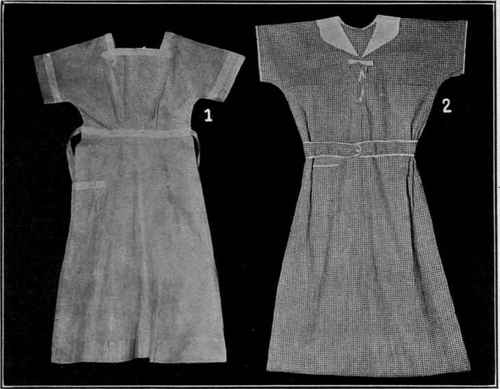
Bungalow Apron
No. 1. This apron is made by combining a kimono waist with a plain gored skirt, at the waist. A belt made long enough to tie in the back is stitched across the front of the waist line. The apron is trimmed with bias bands of a contrasting color. This apron may be made from a commercial pattern; patterns drafted from the upper part of kimono night gown and the plain three or five gored skirt may be used.
Bungalow Apron
No. 2. This apron is very similar to the one described in the lesson, except that it is opened in front and the neck is finished with a plain rolled collar instead of rickrack. It may be made from a kimono night gown pattern. It is trimmed with bias tape of a contrasting color and the front opening is laced together with cotton tape.
Working Directions For Bungalow Apron
Preparing Material
Shrink the material before making. To do this, wet it thoroughly, allow it to partially dry then iron until thoroughly dry.
Cutting Out The Apron
Use a drafted pattern for a kimono night gown (Chap. IV); or if desired, a commercial pattern may be used. If a commercial pattern is used, study carefully the guide chart and all directions which accompany it. This apron is made without seams on the shoulders, the back and front being cut alike, hence one-half the pattern for the front of the kimono night gown will be sufficient to use in cutting it out. To prepare the material for cutting, fold it lengthwise in the center, making the selvages even; fold it crosswise in the center. Lay the straight edge, or center front of the pattern on the lengthwise fold of the goods with the top of the shoulder even with the crosswise fold. Pin it in several places to keep it from slipping. Cut out the apron. (Do not cut the cloth at the top of the shoulder, or on the center fold). Remove the pattern.
Joining Seams
The only seams in this apron are the under-arm seams. These may be made French seams. To make them, baste the edges of the material together on the right side and follow directions for making a French seam (Chap. II, Par. 137).
Finishing Neck, Sleeves And Back
As this apron is opened in the back, you may cut the back piece in two on the center crease. Lay a hem 1/2" wide on each edge; baste and stitch in place. (If necessary face it by sewing a strip 1" wide on the edge and, turning it back on the wrong side like a hem, finish it in the same manner). Try on the apron; pin it together at the back; cut out the neck the desired shape; see that the sleeves are the proper length. (If they are too short, lengthen them by setting on an extra piece of material; if they are too long, cut them off to the length desired.) While you have the apron on, it may be hung, that is, evened around the bottom. To hang the apron, decide on the distance you desire to have it from the floor. Stand on a table and have someone turn up the bottom of the apron exactly even all the way around using a skirt gauge or a yard stick. Remove the apron, lay a narrow hem around the neck and around the bottoms of the sleeves; baste in place but do not stitch. If rickrack is used to finish the edge, baste it on the wrong side, over the hem. Join it on the sleeves with a felled seam. Turn under the ends in a narrow hem at the neck and stitch it in place with two parallel rows of machine stitching.
The Hem
The hem at the bottom may be made the width desired; about 4" is a good width. Fold the hem on the line marked when the apron was hung. With a cardboard gauge (a strip of cardboard 1/2" wide and the length that you desire the width of the hem) used as a guide trim off the material of the hem making it exactly even; turn under the raw edge, pin and baste in place. Extra fullness at the top of the hem may be removed by laying small pleats in it. (Turn all the pleats in the same direction.) Stitch the hem in place.
The Belt
To make the belt, use the material cut from the sides; if necessary, to make the belt long enough, piece it in the center. It may be made long enough to allow the ends to lap in front, or it may button together in the back. Make it about 3" wide. It may be made double, or the edges may be finished with narrow hems and rickrack, the same as the neck and sleeves. It should be fastened to the apron with a vertical row of machine stitching.
Fastenings
The apron is fastened in the back with buttons and buttonholes (Chap. II, Par. 135-136). These may be placed about 4" apart and may extend about 6" or 8" below the waist line.
The belt should be fastened together with one button and buttonhole if lapped in front; if lapped in the back, it should be fastened together with two.

Continue to:
My Books

