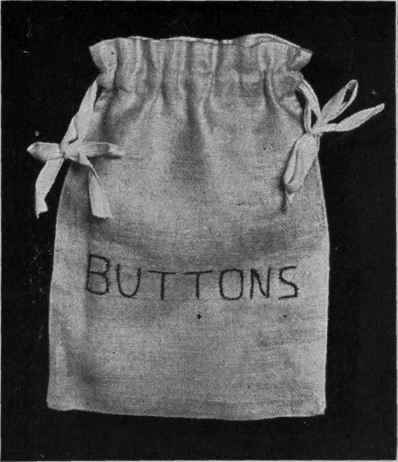
Button Bag
Description
This section is from the book "School Sewing Based On Home Problems", by Ida Robinson Burton, Myron G. Burton. Also available from Amazon: School Sewing Based On Home Problems.
Button Bag
Materials
Linen Crash (Chap. I, Par. 44).
Gingham (Chap. I, Par. 19).
1 piece linen crash or checked gingham 9" wide, 22" long.
Embroidery floss or san silk (colored) with embroidery needle to correspond.
Thread No. 70.
Needle No. 8.
Introductory Statement
Some place in which to keep the collection of buttons of various sorts is a necessity in every household. Buttons may be cut from worn out or discarded garments and kept in this receptacle for future use.
The design and shape of a button bag is not important, as its principal purpose is for convenience. It may be desirable to make it rather large with several compartments so as to provide suitable places in which to keep different kinds of buttons.
As this bag is made for service it should be of some strong, substantial material. It is not intended to be a piece of art needlework, it should, however, be neatly made for no project however simple should ever be carelessly done.
References:
Manufacture of Buttons, The Great Industries of the United States. Story of the Making of Buttons, How We Are Clothed, Chamberlain.
Suggestions For Optional Modification
Button Bag
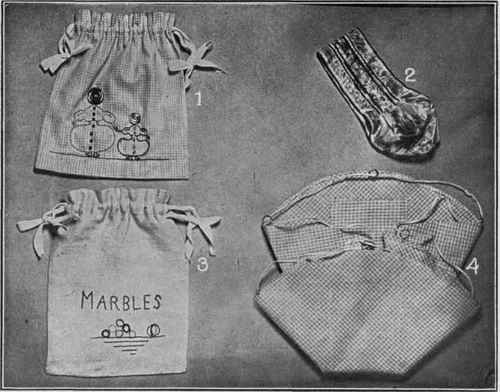
No. 1. This bag is made of gingham. The freehand design was transferred with carbon paper, worked with the outline etching stitch and trimmed with buttons and beads.
Crochet Bag
No. 2. This bag is made of ribbon, with narrow pleats feather-stitched on each side, to make a strip to hang over the wrist. A pocket for the crochet cotton is formed by sewing the ends together.
Marble Bag
No. 3. This marble bag is made of linen crash in the same way as No. 1.
Button Bag
No. 4. This bag is made from a circular piece of gingham, hemmed around the edge. Two strips 12" long and 4" wide are stitched on in the shape of a cross in the center of the inside of the bag; the open ends form pockets. It is closed with cotton tape drawn through eight brass rings sewed on the edge of the bag.
Working Directions For Button Bag
Preparing Material
Straighten two adjoining edges of the material (Chap. II, Par. 102). On the shorter edge measure out 8" (the width of the bag), draw a thread lengthwise and cut on the line drawn. On one long edge, measure down 20" (twice the length of the bag plus the hems at the top). Draw a thread and cut on the line.
To Finish The Long Edges
This bag is to be joined on the edges with an overhand seam (Chap. II, Par. 110). The raw edges of the seams are to be turned under and hemmed down to make neat seams inside the bag. On one of the long edges of the material fold a hem about 1/4" wide with a narrow even first turning. Baste with even basting (Chap. II, Par. 103) and hem neatly (Chap. II, Par. 114). Finish the opposite edge in like manner.
To Make The Hems On The Ends
(These hems must be made before the bag is sewed up). On one end of the material fold a hem 1 1/4" wide with a narrow first turning. Baste with even basting (Chap. II, Par. 103) and sew neatly in place with a hemming stitch (Chap. II, Par. 114).
A space must be provided in this hem through which to slip the draw string. To do this, make a row of running stitches the full length of the hem (about 3/4" from the edge). Finish the other end of the material in the same manner. The design should be placed on the bag before sewing up the seams.
Making And Transferring The Design
It is very desirable to have an original design worked out in the drawing class. To transfer the design to the bag, first fold the ends of the bag over as you would if you were going to sew the edges together. Next lay a piece of carbon paper just a trifle larger than the design, carbon side down on the bag, in the position which you think is best suited for the design. Place the design on this and pin it to the bag in several places to keep it from slipping. Trace around the design with a lead pencil. Remove pattern and carbon paper from the bag and work the design with the outline etching stitch (Chap. II, Par. 125).
To Finish The Seams On The Bag
As overhand seams are frequently sewed together on the right side, you may lay the wrong sides of the material together making all the edges even. As it is necessary to leave the casings in the hem open at the ends for the draw string, you may begin at the hemming stitches on the lower edge of the end hems and baste the hemmed edges together with even basting stitches (Chap. II, Par. 103). Then overhand the basted edges making an overhand seam on each edge of the bag (Chap. II, Par. 110).
Putting In The Draw String
There should be two draw strings of ribbon or tape about 1/4" wide, each one being cut 6" longer than twice the width of the bag. With a bodkin or hair pin, fastened to the end of one of the strings. draw it through the casing around both sides of the bag, bringing the end through until it meets the other end. Tie the two ends in a bow knot as shown in the illustration.
Starting the other string through one of the openings in the opposite end of the casing, draw it through the casing around both sides of the bag in the opposite direction from the way the first tape was drawn, pull it through until both ends are even, just as you did with the first, then tie the ends in a bowknot.
If desired the raw edges on the ends of the tape may be notched, cut diagonally, or hemmed with 1/4" hems (Chap. II, Par. 114).

Continue to:
My Books

