Cooking Apron
Description
This section is from the book "School Sewing Based On Home Problems", by Ida Robinson Burton, Myron G. Burton. Also available from Amazon: School Sewing Based On Home Problems.
Cooking Apron

Materials
Long Cloth (Chap. I, Par. 24).
1 piece long cloth twice as long as the skirt length plus 1 yard for bib and 9" for hem.
Thread No. 70.
4 pearl buttons.
1 yard drafting paper for pattern.
Introductory Statement
In order to protect their dresses while at work in the cooking laboratory, teachers usually require the girls to wear some sort of cooking apron.
As white gives a pleasing impression of cleanliness, it is most commonly chosen for this purpose. White cambric, percale or any smooth finished, firm white material may be used. There are a number of different ways of making cooking aprons, but if a uniform pattern is chosen it gives a most attractive appearance to the class.
References:
Hints on Choosing Textiles, Cornell Bulletin, Ithaca, N. Y. Saving Strength, Cornell Bulletin, Ithaca, N. Y.
Suggestions For Optional Modification
Gored Cooking Apron
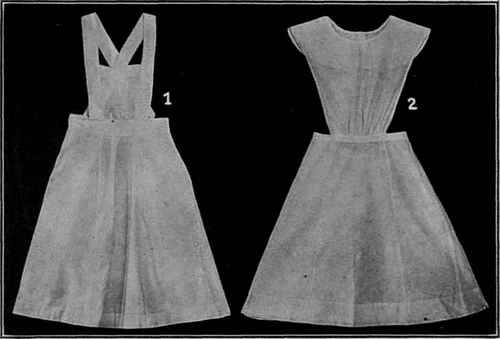
No. 1. The skirt of this apron is gored. It may be made from a five gored commercial pattern or a drafted pattern. The band is made 2 1/2" wide, and the straps, which cross in the back and button at the band, are made 2" wide. This bib is finished with an inch hem; it is made 7 1/2" wide at the top and 6 1/2" wide at the bottom.
Cooking Apron
No. 2. The skirt of this apron is made the same as in No. 1. The bib is made of one piece of material, a half pattern for which may be cut free-hand. To do this, place the straight edge of a piece of paper on the center front of the waist, curve the neck and shape the pattern on the sides and back as in the illustration. When the pattern is made, the front edge should be gored off about 1/2" at the top, otherwise the neck of the apron will fall forward in a pleat. When worn, the back of this apron may be pinned in place with a beauty pin to keep it from slipping up on the neck.
Working Directions For Cooking Apron
Preparing Material
Shrink the material.
Pattern For Bib
Although a commercial pattern may be used for this bib, a freehand pattern may be cut. To do this, take a strip of paper one yard long and the width from the center front of the waist to the shoulder. Hold it up to the person for whom intended with the straight edge on the center front of the body; pin it in front and curve out the neck the width desired. Pin it smoothly on the shoulder and, making it about 5 1/2" wide at the bottom, cut a curved line up to within about 6" of the shoulder, as in the illustration. To make the back of the pattern, crease the edge of the paper so it will make a straight line down the center back (this will make a bias edge); cut off extra paper 3/4" outside of crease to allow for seams. Curve the back of the pattern up toward the shoulder as in illustration. Trim off even with the waist line, both back and front.
The Skirt
Make your apron the same length as your dress skirt allowing 4 1/2" for hems and fitting. Tear off two strips the desired length. Use one strip for the front gore. It is necessary to make this apron narrower at the top than at the bottom, in order to remove some of the fullness. To do this, fold the strip lengthwise in the center, pinning it to hold it in place. At the top, measure in from the selvage to the center fold, 4". Mark with a pin. Fold over the two selvage edges forming a slanting fold from the pin to the bottom. Crease firmly with the thumb nail; cut on the crease.
In order to make the front gore fit smoothly on the belt it should be curved out slightly in front. To do this, measure down on the fold from the top 3/4". Cut an inward curved line from this point to the top outside edges of the material. Remove pins.
The back pieces of this skirt are made from the other strip of material. Tear the material in the center, lengthwise. Sew the torn edges of the back pieces to the front gore with French seams (Chap. II, Par. 137). (Be careful to make the pieces even at the top.) The back edges of the apron may be left with the selvage edges for the finish, or, a 1" hem may be made if preferred.
The Bib
As you are to use a half pattern for the bib, it must be cut from a double thickness of material. Fold the remaining material on a warp thread, making a strip the width of the bib pattern; lay the center front of the bib pattern on the fold of the goods; pin in place and cut out.
Finish the outside edges and the neck of the bib with a narrow hem stitched on the sewing machine. Gather the bib across the bottom (Chap. II, Par. 141). Make a 1/2" hem on each edge at the back.
The Band
Cut or tear two strips of material 2 1/2" wide and the length of the waist measure plus 2" for lapping and underturning. Set the gathers on the skirt of the apron on the edge of one piece of the band (Chap. II, Par. 142), allowing the band to extend beyond the gathers about 1 1/2" at each end. Baste one edge of the other piece of the band on the opposite side of the gathers making the ends and edges even with the first piece. Stitch the ends together with a 1/4" seam. Remove bastings. Turn the band right side out and baste. Turn in the raw edges, adjust the gathers and insert the bib between open edges of the band, being careful to have center of bib on center of band. Pin and baste in place. Put the apron on and insert the back pieces of the bib in the apron band even with the ends, pin in place and remove the apron and baste the bib in place at the back. Stitch entirely around the edges of the band.
Place buttons and buttonholes on back of apron as shown in illustration (Chap. II, Par. 135-136).
Put on the apron and have someone even it around the bottom. Remove apron, baste along the folded edge of the hem, even it to the desired width (use a strip of cardboard as a gauge), turn in the raw edge, stitch in place.

Continue to:
My Books

