Drafting A Foundation Shirt Waist Pattern The Front
Description
This section is from the book "School Sewing Based On Home Problems", by Ida Robinson Burton, Myron G. Burton. Also available from Amazon: School Sewing Based On Home Problems.
Drafting A Foundation Shirt Waist Pattern The Front
NOTE: You should make a careful study of the illustration given here, locating each point and thinking through every operation connected with making the pattern. Most students who have difficulty in drafting patterns can trace their unsatisfactory work to the habit of trying to follow directions blindly, without considering the reasons, or exercising judgment in the various steps.
You will also find it very profitable to secure a plain waist and skirt pattern of any reliable pattern company and study them piece by piece until you know in general about what shaped pieces you are attempting to draft.
As this pattern is drafted for only one-half the waist, you will use measurements for half of the chest and half of the front bust in drafting it.
For construction lines draw line AB 2" from the right-hand edge of the paper; draw line AC at right angles to it.
To Draft the Neck. To lay out the neck at the shoulder, measure 2" from point A on line AC and locate point L; to lay out the neck at the center front, measure down 2" from point A on line AB for a neck measuring 12" (increase this measurement 1/8" for each 1/2" increase in neck measure, for instance for a neck measuring 13", measure 2 1/4", etc.). This locates point M; connect points L and M with an easy inward curve as in the illustration.
To Draft the Shoulder. From point L, measure out on line AC the measurement for the shoulder, locating point N; drop a perpendicular line 1 1/2" (if the shoulder is very sloping drop this line 2"). Draw a line from point L through the end of the perpendicular line. (This is shown by a dotted line in the illustration.) Lay out shoulder measure on this line, measuring from point L, thus locating point O.
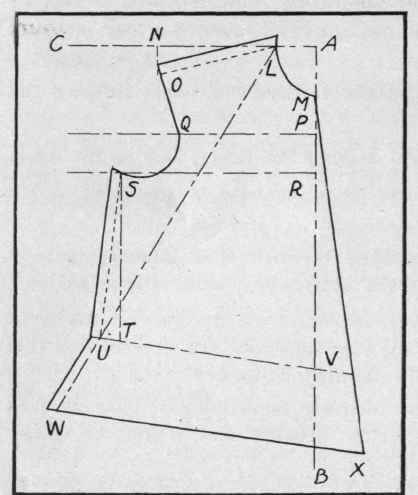
To Draft the Armhole. As the chest measure is taken 2" below the base of the neck, locate the place for the chest line on the pattern by measuring down from point M 2" on line AB; call this point P; from point P draw a line parallel to the line AC. Lay out one-half the chest measure on this line, locating point Q. To locate the underarm seam and base of armhole, measure down the depth of front armseye from point M on line AB and locate point R; draw the line RS parallel with line AC and equal to one-half of front bust measure. Connect points OQ and S with a curved line, allowing it to drop 1/2" below the line RS, as in illustration.
To Draft Under-arm Seam. From point S drop a line parallel to line AB the length of the under-arm measure and locate point T; measure 1" to the left, locating point U, and draw a slanting line from point S through this point. Line US should equal length of underarm measure.
The pattern should be made to extend about 4" below the waist line, forming a tail, or skirt, as it is sometimes called. The under-arm seam must slant out below the waist to allow for extra size at the hips. To obtain the slant for this line, lay the yard stick so it touches the points L and U and draw the line UW 4" long. For a person with extra large hips place yard stick on points M and U to draw the line UW. From point M measure down on line AB the measurement for length of front; locate point V. Draw line UTV (this is the waist line), extend it beyond line AB to the edge of the paper. For the bottom of the skirt, draw the line WX parallel to line UV, allowing it to extend to the edge of the paper.
To give extra fullness to the bottom of the waist, draw a slanting line from point M to point X.
To Draft the Seams. Draw lines parallel with and 1/2" outside of the shoulder and under-arm seam.
The Back
The back pattern also is drafted for only one-half the waist, therefore, you will use measurements for one-half the neck and back bust.
Draw a construction line AB parallel with the left edge of the paper; draw line AC perpendicular to it.
To Draft the Neck. To lay out the center back of the neck, from point A measure down on line AB 1/2" for a neck measuring 12" to 14" (measure down 5/8" for neck measuring 14" or over); mark point L. To lay out the neck at the shoulder (the size of the neck on the back of the waist should be 1/3 of the entire neck) measure out from point A on line AC 1/3 of 1/2 the neck measure. Mark this point ML Draw a curve connecting points L and M.
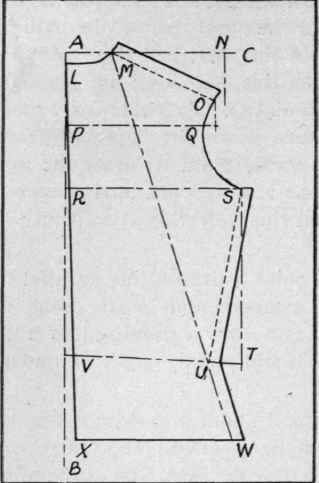
To Draft Shoulder. From point M on line AG, lay out the shoulder measure, locating point N; to make the slope on the shoulder, drop a perpendicular line from N 2 1/4" for an ordinary shoulder (for a very sloping shoulder make this line 2 1/2" long). With a ruler on the end of this line, draw the slanting line MO, the length of the shoulder measure. To Draft Armhole. On the line AB measure down one-half the depth of armhole measurement and locate point P. At point P draw a line parallel with line AC. From point O, drop a perpendicular to this line. As the armhole curves in slightly from the shoulder, measure in 1/4" locating point Q. To locate the bottom of the armhole and the top of the under-arm seam, measure down from point A on line AB the depth of armseye measurement and draw the line RS parallel with line AC, equal to one-half the back bust measurement. Connect points OQ and S with a curved line as in the illustration.
To Draft Under-arm Seam. From point S drop an indefinite perpendicular line. On this line from point S lay out the under-arm measurement and mark the point T. As the under-arm seam should slant in toward the center back at the waist line to remove fullness under the arm, measure in and up slightly from point T locating point U; draw a line from point S to point U. This will be the under-arm seam and should be the length of under-arm measurement.
To form the line for the center back, measure down from point A on line AB the length of back measure. One-half inch in from this point, locate point V; draw the line AV, allowing it to extend at least 4" beyond point V. Draw the line VU for the waist line.
To Draft Skirt of Waist. To allow for the extra size over the hip, the under-arm seam must slant out below the waist line the same as for the front pattern. To draw this line, lay the yard stick on points M and U and draw the line UW 4" long. For an extra large hip place one end of the yard stick on point L instead of point M. Draw the line XW parallel with AC for the bottom of the waist.
To Draft Seams. Draw lines parallel with and 1/2" outside of the shoulder and under-arm seams.
Directions For Using Shirt Waist Pattern
For a waist which is to be opened in the center front, lay the center back represented by the line AX on a lengthwise fold of the material, thus cutting the back in one piece. For a waist which is to be opened in the center back, lay the hems the width desired and place the center back of the pattern on the center of the hems.
As no allowance is made for finishing the hems on the center front of the pattern, the center opening of the waist may be finished as desired and the center front of the pattern represented by line MX may be placed in the line where the fastenings are to be sewed.
If a tucked waist is desired, the tucks may be laid in the material, the pattern placed over them and the waist line cut out the same as for a plain waist. If a yoke is desired, the shape may be marked with a pencil on the upper part of the pattern. Extra allowance should be made for seams along this edge when the waist is cut out. If fullness is desired in the waist below the yoke, lay a pleat in the material lengthwise, wide enough to allow for the fullness desired.
Continue to:
My Books

