Holder
Description
This section is from the book "School Sewing Based On Home Problems", by Ida Robinson Burton, Myron G. Burton. Also available from Amazon: School Sewing Based On Home Problems.
Holder

Materials
Chambray (Chap. I, Par. 9) or
Gingham (Chap. I, Par. 19).
Outing Flannel (Chap. I, Par. 30).
1 piece chambray or gingham 10"x27".
1 piece outing flannel 9"xl4".
1 yard 3/8" cotton tape.
Thread No. 70.
Needle No. 8.
Introductory Statement
In lifting hot utensils it is very desirable to have a holder. As the purpose of the holder is to protect the hands from the heat, it should be made thick enough to keep the heat from penetrating it quickly. For this reason it is always interlined or made of several thicknesses of material. It is often quilted with parallel rows of machine stitching to keep the layers of material from slipping.
The interlining is sometimes made separate from the cover and removed when the cover is washed. Odd pieces of percale, gingham or similar material left over in making dresses may be used in making holders.
The holder in this lesson is made with an interlining and has a tape with which to suspend it from the apron band.
References:
The Making of Thread, The Great Industries of the United States. Handicraft for Girls, McGlauflin. Manual Arts Press.
Suggestions For Optional Modification
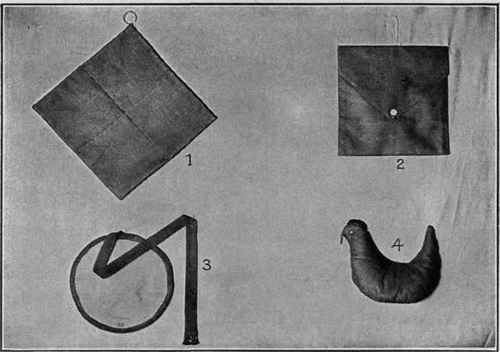
Square Holder
No. 1. This holder is made by covering two thicknesses of outing flannel with denim or percale. A tape or ring with which to hang it on a hook is sewed in one corner.
Envelope-Shaped Holder
No. 2. This holder is made by making an envelope of percale or denim 9" square. It has a double thickness of outing flannel to pad the inside. The flap is held shut by a button or snap.
Round Holder
No. 3. This holder is made by basting two thicknesses of outing flannel between two covers of percale or denim, then finishing the edges with mercerized dress braid which is stitched on with the sewing machine, or hemmed on by hand.
"Chicken" Iron Holder
No. 4. For this holder two chicken-shaped pieces are made of percale and stuffed with cotton batting to give them a rounded appearance. They are overhanded together along their backs so as to sit like a saddle on the iron handle.
Working Directions For Holder
Preparing Material For Cover
Straighten one short edge of the material (Chap. II, Par. 102). (If the edge is selvage, trim it off to prevent puckering when laundered). Straighten an adjoining edge of the material in the same manner. Measure out on the short edge 8 1/2" the width of the holder. Draw a thread lengthwise and cut on the line. Measure down on the long edge 27", twice the length of the holder, plus the width of the hems. Draw a thread crosswise and cut on the line.
Making The Outside
As you will notice in the illustration for this lesson, a pocket is formed on each end by folding the ends of the material to the center. Before folding the pockets, the hems should be made on the ends of the material. Fold a 3/4" hem with a 1/4" first turning on one end of the material, baste with even basting (Chap. II, Par. 103), keeping it even with the thread; sew in place with the hemming stitch (Chap. II, Par. 114). If desired, you may turn the hem away from you and with the right side of the material toward you, finish the edge of the hem on the right side with catch stitching (Chap. II, Par. 120), featherstitching (Chap. II, Par. 121) or backstitching (Chap. II, Par. 107). Make a hem on the opposite end in the same way, being careful to turn it to the same side of the material.
Find the center by folding the two ends together exactly even; crease along the fold with the thumb nail. Open the material and with the hems turned outside, fold the two ends over to this center crease (be sure to have the raw edges even).
Baste the raw edges together with uneven basting (Chap. II, Par. 104); sew them together with the combination stitch (Chap. II, Par. 108). Overcast (Chap. II, Par. 113) the raw edges, remove the basting and turn right side out.
To Prepare The Inside
The outing flannel padding should be made the required size to lit inside of the cover. To do this, straighten one of the shorter edges (Chap. II, Par. 102). Straighten an adjoining edge in the same manner. Measure out on the shorter edge 8" (the width of the inside of the holder). Draw a thread crosswise and cut on the line. Measure down on the long edge 12 1/2" (the length of the inside of the holder). Draw a thread lengthwise and cut on the line.
As the padding is made separate from the outside of the holder, the edges of the outing flannel should be finished in some way to keep them from raveling. This may be done with overcasting (Chap. II, Par. 113), or blanket stitching (Chap. II, Par. 128); or two thicknesses of material may be used, turning in the edges and overhanding them together (Chap. II, Par. 109).
To Sew On The Tape
If the holder is to be hung on an apron band the tape should be long enough to let it come to the bottom of the apron, from 27" to 36". To sew on the tape, first turn in the raw edge at one end and place it at the center of the back of the holder near the edge where the ends of the pockets join as shown in illustration. Turn under the raw edge and place it so it overlaps the holder about 1/2" Hem the tape on the holder down one edge, across the bottom, and up the other edge, being careful that the stitches do not run through to the pockets.
The other end of the tape which is to be suspended from the apron band, is finished with a loop. To make this, fold the raw edge over 2" onto the tape. Turn it in and hem it in place. Overhand the double fold together about 1/4" up from the hemming stitches and backstitch (Chap. II, Par. 107) across it; then overhand down to the hemming stitches (Chap. II, Par. 109).

Continue to:
My Books

