Sewing Apron
Description
This section is from the book "School Sewing Based On Home Problems", by Ida Robinson Burton, Myron G. Burton. Also available from Amazon: School Sewing Based On Home Problems.
Sewing Apron

Materials
Batiste (Chap. I, Par. 2).
1/2 yd. batiste or any soft, plain colored material.
1 1/2 yds. ribbon.
San silk or mercerized embroidery cotton.
Needle No. 8.
Introductory Statement
Since laundering handmade articles, particularly if they are decorated with handwork, frequently destroys much of their attractive appearance, it is desirable to keep them as clean as possible during the making so as to avoid laundering. In order to do this it is necessary not only to wash ones hands frequently, but to protect the article from any dust that may cling to ones clothing.
A small apron answers this purpose very well and as there is very little strain on it and it is not subject to any hard use, it may be made as dainty as one desires. There are a great many styles and designs of sewing aprons, but one with a pocket in which to keep thimble, needle and thread is especially desirable.
The apron presented in this lesson is made as simple as possible. It is not set on a band but merely has a hem at the top through which a ribbon may be run. While it does not present any of the difficulties of a more complicated apron, it will be found very satisfactory for the service for which it is intended.
References:
Sewing Apron, Library of Work and Play, Vol. VII. The Story of Shears, Wiss Bros., Newark, X. J. Manufacture of Thimbles, Scoville Mfg. Co.
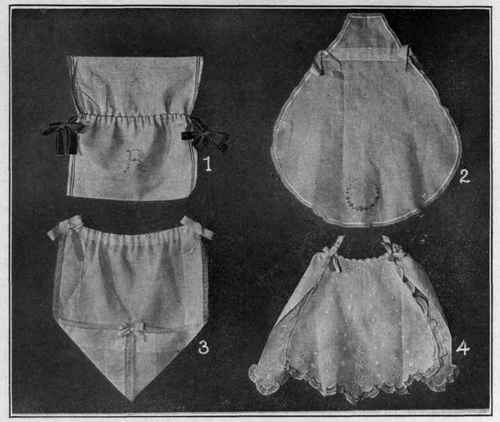
Combination Sewing Apron And Bag
No. 1. This project may be made of 3/4 yard of toweling. The pocket is 10 1/2" deep. Two pieces of ribbon, or tape, serve as draw strings and ties. The bib of the apron is tucked inside of the bag when not in use.
Lawn Sewing Apron
No. 2. A sewing apron may be made of lawn 3/4 yard long and 22" wide. Pattern should be drawn freehand. A casing for a ribbon band is hemmed onto the apron at the waist line.
White Lawn Sewing Apron
No. 3. This sewing apron is made of white lawn with 2" hems on each side and at the bottom. The two bottom corners are turned up to form pockets. The lace is overhanded together down the center of the pocket.
Fancy Sewing Apron
No. 4. A fancy sewing apron may be made of white lawn, with scalloped edge and embroidered dots worked in a delicate color with strings and rosettes made of ribbon.
Working Directions For Sewing Apron
Preparing Material
The apron in this lesson may be made crosswise of the material. This will bring a selvage on the hem at the top of the apron and also at the top of the pocket; as a selvage usually draws the edge of the material when laundered, trim it off. Straighten one long edge of the material by drawing a thread and cutting on the line (Chap. II, Par. 102); from this line measure out 18" (half a yard), the width of the apron, and draw a thread; cut on the line.
To Finish The Edges
Measure down from the top of the apron 9 1/2" to the place where the top of the pocket will come, on one long edge. Mark with a pin. On this long edge turn a 1/2" hem with a narrow first turning toward the under side of the apron and crease firmly in place. Where the pin is placed, make a cut across the hem and turn the edge over in a hem toward the upper or right side of the apron the rest of the way to the bottom (this part of the hem will be inside the pocket when made). In this apron the basting thread is used as a trimming for the apron and should be of a color that will contrast nicely with the material used and each stitch should be made as nearly perfect as possible. Baste the hem in place with even basting (Chap. II, Par. 103) with thread to match the material in the apron. Finish the opposite edge of the apron in the same manner. The cross-stitch Chap. II, Par. 124) or catch stitch (Chap. II, Par. 120) may be used instead of the basting to trim the apron.
To Finish The Top End
As you will notice by looking at the illustration, this apron has no band, but is held in place with a ribbon which is run through a casing formed by a hem at the top of the apron. To prepare this casing turn a hem with a narrow first turning 1" toward the wrong side. Crease carefully and pin crosswise at each end to keep from slipping. Baste in place with even basting (Chap. II, Par. 103) and hem (Chap II, Par. 114) neatly. Remove bastings.
To Finish The Bottom Of The Apron
A hem at the bottom of the material finishes the top of the pocket. (The material is to be turned up to form the pocket.) In order to have this hem inside of the pocket when the pocket is folded in place, the hem must be turned toward the right side of the material. Fold hem about 1/2" wide with a narrow first turning, baste carefully in place with even basting (Chap. II, Par. 103) and hem neatly (Chap. II, Par. 114). Remove bastings.
The hem may be finished on the right side with featherstitching (Chap. II, Par. 121) or cross-stitching (Chap. II, Par. 124).
To Form The Pockets Of The Apron
The pockets should be about half as deep as the apron, but the depth may be varied according to the taste of the one making the apron. This must be decided when the hem is made down the edge of the apron as the pocket must extend up to the place where the hem is turned toward the under side. The pocket in the illustration is made 8 1/2" deep. To form the pocket fold the bottom edge of the material 8 1/2" up on the right side and pin in several places, being careful that both edges are even. Baste the pockets and the under side of the apron together with even basting (Chap. II, Par. 103) and overhand them together (Chap. II, Par. 109). Fasten the thread very securely at the top, where it will be subjected to considerable strain.
A line of stitches is made up and down the center of this pocket, dividing it into two parts. To find the center, lay the opposite edges of the apron together and make a sharp crease on the fold with the thumb nail. Mark this crease with a basting thread, then backstitch (Chap. II, Par. 107) up the crease, to form the two pockets. (If you have used cross-stitching or featherstitching to finish the hems on the apron, use a corresponding stitch to divide the pockets). Fasten the stitches very securely at the top.
Run the ribbon through the hem at the top of the apron, making the ends extend evenly. In the center, on the under side of the hem, take two or three backstitches through the ribbon. This will keep the ribbon from slipping out of place. Cotton tape or mercerized dress braid can be substituted for the ribbon, or a 1" band may be made from the material by doubling under and stitching, or over-handing together (Chap. II, Par. 109) the edges of a strip about 2 1/2" wide and long enough to reach around the waist; it may be fastened with a hook and eye (Chap. II, Par. 133).
Continue to:
My Books

