Silver Case
Description
This section is from the book "School Sewing Based On Home Problems", by Ida Robinson Burton, Myron G. Burton. Also available from Amazon: School Sewing Based On Home Problems.
Silver Case
Materials
Outing flannel (Chap. I, Par. 30) or
Felt (Chap. I, Par. 58) or
Canton Flannel (Chap. 1, Par. 7).
1/2 yard flannel or felt.
3/4 yard of tape to match material.
Cotton or silk thread to match.
Needle to correspond with the thread.
Embroidery cotton.
Embroidery needle to correspond.
Introductory Statement
There is nothing which adds to the attractiveness of the table more than well kept silverware. Silver rapidly loses its polish if it becomes scratched. Even a thorough cleaning with silver polish will not restore the characteristic luster of new silver after it becomes marred or scratched. One piece of silver rubbing on another scratches it and thus both pieces are damaged. Knives, forks, spoons and other small silver may be kept looking bright and new much longer if each piece is kept separate from the others. For this reason, a case made with a little pocket for each piece of silver will be found very desirable.
The silver should be thoroughly dried before placing it in the case. The case should be made of soft material, like flannel, outing flannel, or felt. Very satisfactory cases can be purchased, but they can also be very easily made, at much less cost. Where linen is used for the outside and embroidered, it should be lined with outing flannel, or some soft material.
References:
Wool and Manufacture of Wool, W. C. Ford.
A Story of Table Furnishings, The Cornell Reading-Courses.
Suggestions For Optional Modification
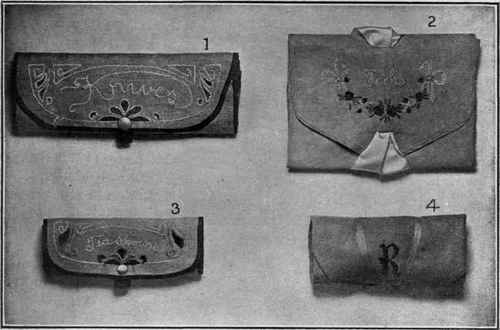
Knife Case
No. 1. This knife case contains separate pockets very similar to the one presented in the lesson. It folds over and over and fastens with a snap.
Fork Case
No. 2. The fork case shown in No. 2 presents a design which may be made very pretty. The use of the embroidery and ribbon adds much to make it attractive.
Teaspoon Case
No. 3. This spoon case is made to match the knife case shown in No. 1. This will suggest the idea of a complete set of silverware cases to match.
Rolled Spoon Case
No. 4. This case is made of a soft flannel material so it can be rolled and tied with a tape or ribbon. The embroidered initial adds to its appearance.
Working Directions For Silver Case
Preparing Material
Straighten two adjoining edges of the cloth (Chap. II, Par. 102). To prepare the larger piece, measure out on the short edge 13", (the width of this piece) draw a thread crosswise and cut on the line. Measure out on the long edge 20" (the length of this piece). Draw a thread lengthwise and cut on the line. The narrow strip remaining is to be used for the pocket. Straighten the edges where necessary and make it 5" wide by 15" long.
The Back Piece
As you will notice in the illustration, the back is not a perfect oblong, but is rounded at the top corners and shaped off at one end to form a lap which is to be wrapped around the rest of the case after the silver has been rolled up in it.
To Shape The End
First lay the long edges of the material parallel with the front edge of a table or desk before you. Fold the upper edge of the material over toward the lower edge, 5 inches. Leaving it folded, measure from the lower right-hand corner of the folded material 15 1/2" toward the left; mark this point with a pin. From here cut a straight line to within 1 inch of the folded edge at right angles to it. Curving to the left, cut on the line of the folded edge to the left end of the material (this cuts the upper left-hand corner out of the material). The part which extends at the left forms the flap mentioned above.
To round the corners of the flap, measure out from one corner 2 1/2" on the adjoining edges; mark these points with pins. Cut the corner rounding between the pins the same as in the illustration. Round the opposite corner in like manner.
The top corners of the back piece should also be made slightly rounding. To do this, measure out from one corner one inch on the adjoining edges, marking these points with pins; cut the corner rounding between them. Round the other corner in like manner.
Making The Pocket
The pockets into which the silver is to be placed are formed by sewing the smaller piece on the back piece, as shown in the illustration. Baste it in place with uneven basting (Chap. II, Par. 104). Sew the pocket to the back piece along the bottom and right end with blanket stitches (Chap. II, Par. 128), working them very close together; continue around the remaining raw edges of the silver case. Finish the raw edges on the top and left end of the pocket in the same manner.
If desired, the edges may be finished with binding ribbon which should match the material of the silver case. To put it on, crease it lengthwise in the center, lay the inside of the crease on the edge of the silver case and with the edges on the opposite sides, fasten it in place sewing through both edges at the same time. Stitch close to the edge of the tape on the right side with the sewing machine (Chap. II, Par. 164).
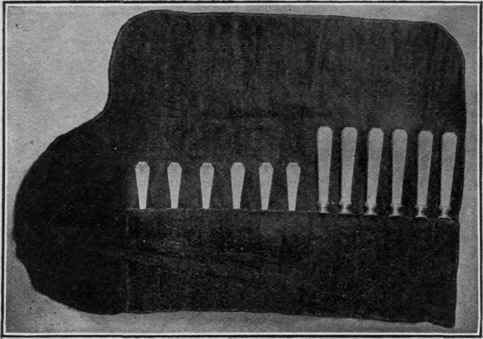
Making Divisions In Pocket
This large pocket is to be divided into twelve small ones, each of which is to hold one piece of the silverware as shown in the illustration. To make these pockets, divide it into spaces 1 1/4" wide, marking each division with a line of basting stitches extending from the bottom of the pocket to the top. Stitch in place with sewing machine (Chap. II, Par. 164).
Sewing On Tape For Ties
When the silver case is folded, it should have a tape corresponding in color tied around it to keep it folded. To sew on the tape, first find the center by folding the two ends together; crease on the fold, lay the center of the tape on the center of the rounded flap, near the edge. Sew it to the flap with two parallel rows of backstitching (Chap. II, Par. 107) placed about 1/4" apart.
Continue to:
My Books

