Sofa Pillow Cover
Description
This section is from the book "School Sewing Based On Home Problems", by Ida Robinson Burton, Myron G. Burton. Also available from Amazon: School Sewing Based On Home Problems.
Sofa Pillow Cover
Materials
Linen (Chap. I, Par. 40), in natural color.
32" art linen, 22" wide. 32" linen fringe. Embroidery cotton. Embroidery needle. Thread No. 70. Needle No. 8.
Introductory Statement
The sofa pillow is particularly suggestive of comfort and should be used for that purpose rather than for an ornamental one. However, if its cover is made of pretty cretonne, or decorated with hand embroidery which harmonizes with the color scheme of the room, it will add a decided touch of beauty to it. Harsh, stiff materials should be avoided in making a pillow. Any kind of decoration which makes it uncomfortable for the head to rest upon, is in poor taste.
A pillow with a bright cover is suitable for a room with plain curtains and rug which needs a bit of color to brighten it. If the curtains, the wall paper, and the rug have considerable design in them, the sofa pillows should be plain or they will give a spotty appearance to the room.
In selecting your material and designs for this pillow carefully consider the room in which it is to be used.
References:
Home Decoration, Ohio State University Extension Bulletin.
Art and Economy in Home Decoration, Priestman. Whitcomb & Barrows.
Suggestions For Optional Modification

Crash Pillow Cover
No. 1. This pillow cover is made about the same as the one described in the lesson; the embroidered design is different, but the same stitches are employed in making it.
College Pillow
No. 2. This pillow is made of two shades of felt (the college colors). The designs and letters are cut out of felt and stitched to the top of the cover. The edges are laced together with strips of the felt
College Pillow
No. 3. This pillow is also made of felt; the college colors are used, but are combined in a different manner than in No. 2.
Monogram Pillow
No. 4. On this felt pillow cover the monogram of the college cut out of felt is used to decorate the top. The edges are laced together with cable cord.
Working Directions For Sofa Pillow Cover
Preparing Material
Straighten one end of the material (Chap. II, Par. 102), measure down on the selvage 32" (twice the width of the pillow).
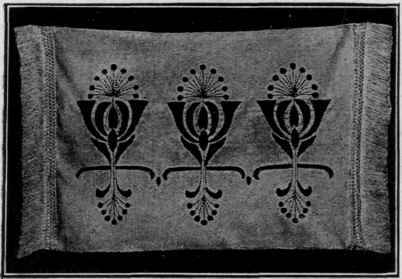
Drawing Design
The pillow cover should be embroidered before the seams are sewed together. The design shown in the illustration is intended only as a suggestion. Each girl should draw a suitable design for her own pillow (this design should be worked out in the drawing class). When drawing a design for a pillow cover keep in mind the purpose which the pillow is to serve. The use of beads, heavy braid and elaborate embroidery are not in good taste for a sofa pillow.
You should plan a simple design, but make it attractive by doing it very carefully.
Transferring The Design
After you have designed your pattern transfer it to the proper position on the material. To do this, place a piece of carbon paper, carbon side down on the pillow cover, pin pattern over it, being sure to pin it sufficiently to avoid slipping. Trace the pattern with a lead pencil. Remove the pattern and carbon paper.
The sofa pillow in this lesson is worked with the satin stitch (Chap. II, Par. 131) and outline etching stitch (Chap. II, Par. 125). Consider the color scheme of the room in which this sofa pillow is to be used, then select colors that will be suitable for your embroidering. Work this design very carefully for this is the portion of the work from which your skill will be judged.
Joining The Seams
As this pillow cover is to be made of one piece of material, fold the two edges together evenly with the wrong side out. On one end baste and stitch the edges together with a 1/4" seam (the other end is to be left open to put in the pillow). Also stitch the long side with a 1/4 " seam, turn the pillow cover right side out.
To Sew On The Fringe
As the fringe is not used entirely around the pillow, cut it into two equal parts. Finish the ends with narrow hems (Chap. II, Par. 114) making each piece when hemmed just long enough to finish one end of the pillow as shown in the illustration. Lay the straight edge of one piece of fringe flat on one end of the pillow allowing it to overlap about 1/2" (be sure it overlaps evenly across the end of the pillow). You should pin it on, baste it in position if necessary. Sew the fringe onto this edge with fine running stitches. Make a second row of running stitches parallel to the first on the extreme edge of the pillow cover.
NOTE: The opposite end of the pillow cover is left open to receive the pillow. The fringe on this edge must therefore be sewed only to the top portion of the cover.
Turn in the edge of the top side of the cover about 1/4", pin or baste the fringe on the upper side of this edge and with running stitches sew it in place as you did on the other end.
Putting In The Pillow
Any pillow which will fit the cover may be used. Slip the pillow into the opening and overhand the edges together neatly under the fringe.

Continue to:
My Books

