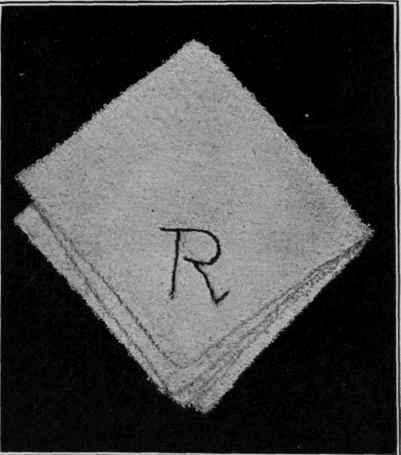
Wash Cloth
Description
This section is from the book "School Sewing Based On Home Problems", by Ida Robinson Burton, Myron G. Burton. Also available from Amazon: School Sewing Based On Home Problems.
Wash Cloth
Materials
Turkish Toweling (Chap. I, Par. 35).
1 piece Turkish toweling 14" square.
San silk, or similar mercerized cotton the color desired.
Crewel or embroidery needle No. 5.
Introductory Statement
There is an old axiom, "Cleanliness is next to Godliness." This is a general statement and refers to the care of the body as well as the care of the home. The wash cloth is a valuable aid in keeping the face clean. It takes quite a number of wash cloths for the average family for they lose their efficiency after they become badly soiled, and clean ones need to be supplied frequently.
It is very desirable for each member of the family to have an individual wash cloth, which may be marked with an initial. While any soft cloth will answer the purpose, Turkish toweling, which has been suggested for the wash cloth in this lesson, is particularly desirable because of its loosely woven threads, giving a rough texture which readily removes the dirt from the skin. Soft huck toweling is also used for wash cloths.
References:
Story of the Cotton Plant, F. Wilkinson.
Manufacture of Cotton, The Great Industries of the United States.
Suggestions For Optional Modification
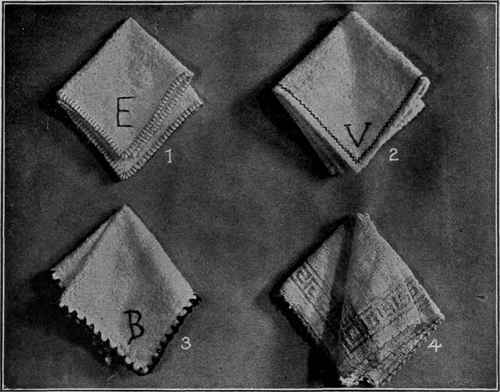
Wash Cloth
No. 1. This is a wash cloth made from Turkish toweling about 12" square with a 1/4" hem, blanket stitched around the lour sides. The initial is worked with the outline etching stitch.
V
Wash Cloth
No. 2. This wash cloth is made of huck or Turkish toweling about 12" square with a 1/4" hem, basted, then held in place on the right side with catch stitching. The initial is worked in French knots.
Wash Cloth
No. 3. This wash cloth is made of Turkish toweling 12" square with a 1/4" hem held in place with crocheting. San silk, or some coarse mercerized thread is used. The initial is worked with the unpadded satin stitch.
Wash Cloth
No. 4. This is a factory made wash cloth edged with crocheting of mercerized thread to match the color in the wash cloth.
Working Directions For Wash Cloth
Preparing Material
If necessary, straighten two adjoining edges (Chap. II, Par. 102) of the Turkish toweling by drawing a thread on each of these edges and cutting on the lines formed; then from the corner, measure out on each edge 12" (the size of the wash cloth before it is hemmed); mark each measurement with a pin and draw one thread, forming lines, one lengthwise and the other crosswise; cut on these lines.
Turning And Basting The Hem
A hem has two turnings, the smaller of which turns under the raw edge and should be 1/8" to 1/4" in width, and the wider turning which makes the finished hem; it may be any width desired. Allow about 1/4" for the first turning on the edge of the wash cloth. Turn one edge down (even with a thread of the material), toward the side of the wash cloth which you may call the wrong side (there is no right and wrong side to the Turkish toweling); baste with even basting about 1/4" long (Chap. II, Par. 103), as you turn. On the other three sides turn and baste as you have the first side (making the basting stitches as even as possible).
After the first turning of the hem is made around the four edges of the cloth, make the second fold in the hem by beginning on one edge and folding over the edge of the material again 1/4" towards the same side on which you have already turned the raw edge; baste in place carefully with even basting, as you fold. Turn and baste the hem on the adjoining side in the same manner, being careful to keep the edges even at the corner. Continue turning and basting until the hems have been turned and basted on all four edges of the wash cloth.
Sewing The Hem In Place
Sew the hems in place with the hemming stitch (Chap. II, Par. 114). Using coarse colored thread will give a pretty appearance to the wash cloth, and will also enable you to see whether you are getting your stitches even. Hem all four sides of the wash cloth.
You will notice by carefully examining the corner of the wash cloth that the ends of the hems are open. These will look neater if sewed together with the overhand stitch which is generally used to fasten together the ends of hems. You may overhand (Chap. II, Par. 109) the ends of the four hems.
Designing And Transferring The Initial
An initial may be selected from a commercial pattern book and used as a guide in designing your own initial, or the commercial pattern for the initial may be used. If the commercial pattern is used, transfer the first initial as follows: Place it in the position desired with the rough side of the initial down, pin it to the material in two or three places and press it with a hot iron for about one minute. After the pattern has been used once it will be necessary to use carbon paper to get other copies from it. To do this, place the carbon paper with the carbon side down on the wash cloth, over the place where you wish to have the initial, then place the pattern over the carbon paper, pin in two or three places to keep it from slipping, and trace around the design with a lead pencil. As it is difficult to transfer a design onto the rough Turkish toweling, trace around the initial several times before removing it.
If you wish to design your own initial, print it, or write it carefully on a piece of paper first, and submit it to your teacher for correction. It should be from 1" to 2" high and should have the width in proper proportion. After the initial is designed, it may be copied onto the wash cloth with carbon paper, as directed above, or may simply be drawn freehand on the cloth, using the pattern as a guide.
Working The Initial
Remove the pattern and the carbon paper and work the initial with the outline etching stitch (Chap. II, Par. 125). The initial may be worked with French knots (Chap. II, Par. 130) or chain stitch .(Chap. II, Par. 126).
Continue to:
My Books

