Sampler Number Five. Buttonholes And Loops
Description
This section is from the book "Text-Book On Domestic Art", by Carrie Crane Ingalls. Also available from Amazon: Textbook On Domestic Art: With Illustrations And Drafts.
Sampler Number Five. Buttonholes And Loops
Cut or tear a strip of cloth 12 inches long on the woof and 3 inches wide on the warp. Turn over the raw edges and fold on the length, basting and stitching the edges as near as possible. By cutting the cloth this way, the buttonhole stitches are worked with the warp of the goods which is easier sewed than with the woof.
In the center of the cloth, 3/4 of an inch from the top, and 3/4 of an inch apart, cut 9 buttonholes 3/4 of an inch long. Use buttonhole scissors and cut each line parallel. To cut a buttonhole the correct size for a button, measure the diameter of the button, allowing it to slip thru easily. They may be cut vertically or horizontally, the first being mostly used on waists, corset covers, night gowns, etc., while the horizontal ones are used on belts, coats and on waists where the buttonhole is visible.
The ends of a buttonhole may be worked in three different ways, namely: fan ends, bar ends, or bar at one end and fan at the other. The fan ends are the strongest, but the bar and fan is perhaps the most used. The first three buttonholes on the sampler are worked with the fan ends, as these are the easiest; the second three with the bar and fan ends, and the last three with the bar ends.

The fan end simply means a continuation of the buttonhole stitch all round the cut, and is not used for large buttonholes, because it tends to increase the size of the buttonhole, while the bar end does not. When the bar and fan ends are to be used, the end that receives the strain of the button, is the end to be worked with the fan.
Having cut the buttonholes, start with the top one, holding stitched edge of sampler to the right and fold at left, beginning at stitched edge each time in working. Use No. 40 thread, and cut it long enough to complete one buttonhole. With no knot in thread, overcast the raw edges of the cut, making 4 or 5 stitches on either side only deep enough to keep the cloth together and from fraying. Without breaking the thread, commence the first buttonhole stitch.

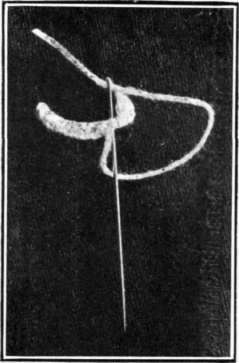
The tailor's buttonhole is worked by bringing the needle up on the right side of the cloth, just deep enough to cover the overcast stitch. Before pulling the needle thru, take the thread that hangs from the eye of the needle and throw it under the needle from right to left. This makes a little loop or knot which is pulled thru tightly so it comes on the edge of the cut.
Form each stitch like the preceding one and so close that there will be no space between the loops or knots, and the depth of each stitch will be uniform. The thickness of thread used in working the buttonhole may be the guide for allowance of space between each stitch taken. Consequently, the finer the cotton, the closer the stitches and the coarser the cotton, the greater the space. In working around the curve, spread the stitches a trifle, but evenly, in order that the knotted edge will not be overcrowded; this is the fan end.
The opposite end is the bar end, when the bar and fan ends are both used. To make a bar end take three over and over stitches, connecting the first and last buttonhole stitches on either side. If the goods fray so it is impossible to work a buttonhole, before cutting, make two rows of stitching 1/8 inch apart on the machine, the desired length of buttonhole, and cut between them with a sharp knife. If the goods is very sheer, a piece of cloth basted on wrong side, then cut and worked with the buttonhole, will give it added strength.
The above description is the only true method of making the tailor's buttonhole. The embroidery buttonhole is not worked the same, nor is it as strong.
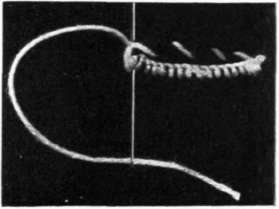
Loops are often used in place of buttonholes, especially on thin material. Mark line where loop is to be; with No. 40 cotton thread, sew 4 strands the same length as mark, making them large enough to slip over button used. Starting at left end, buttonhole over these four strands, thus forming a cord. Use a small pencil or stiletto to keep the strands in place, and fill the space, pulling each stitch tight. Finish on wrong side, with an over and over stitch.
Press this sampler on wrong side, stretching the buttonholes on the length to close the spaces. Attach name and date.
Continue to:
My Books

