A Window Conservatory
Description
This section is from the book "Amateur Work Magazine Vol6". Also available from Amazon: Amateur Work.
A Window Conservatory
John F. Adams
The arrangement for winter plants here described is the result of much planning to obtain considerable more room for plants than could be spared conveniently inside the room to which it. was fitted. As will be seen from Fig. 1, it is much like a small bay-window, and is attached to the outside of the house, thus affording room for quite a large stock of plants without infringing upon the interior of the house. It is located against a window on the sunny side of the house, the sash of which is removed, care being tak-
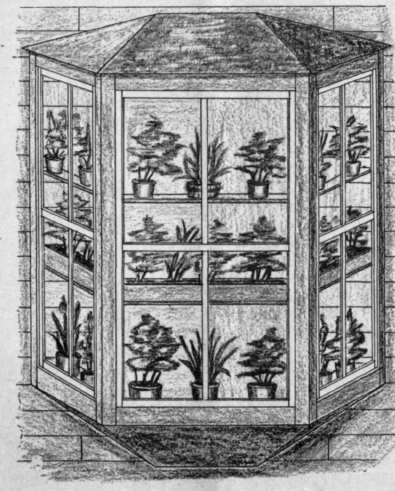
Fig. 1.
en to prevent the window cords from running through the pulleys by tying knots in them. In the more northerly and colder states it will be advisable to fit curtains, which are lowered on extremely cold nights, and in addition, a small lamp may be used for heating. During much of the time, however, the heat from the adjacent room will be quite sufficient for most kinds of plants.
It will hardly be possible to give exact dimensions, owing to the great variation in the sizes of the windows to which such a frame can be fitted. The first requirement is to make a dimensioned drawing of the window to be used; then purchase one full-size and two half-size outside windows, the larger one having a sliding pane, which may be opened for ventilation whenever the weather is mild.
A framework is then made of 2 x 3 in. planed spruce, as shown in Fig. 2. The ends are first made with halved joints for the front cross pieces. In the ends of the vertical pieces tenons are cut as in Fig. 3. It will be noted that the outer end edges of the vertical pieces are bevelled to the angle formed by the side. The windows fit snugly between the various pieces of the frame, the front edge of which is from 12 to 15 in. from the rear edge against the side

Fig 2. of the house, varying according to the size of the windows used. The ends of the cross pieces connecting the ends are halved, as before mentioned, and attached with strong wood screws.
The under side may be covered with matched sheathing, planed both sides, or splayed as shown in Fig. 1. In the former case the work is done before the frame is attached to the house; but if splayed the work must be done in place to secure accurate fit and tight joints which is also true of the top. That part of the frame of the top, and also of the bottom, if splayed, which is attached to the rear cross piece must also be cut out and fastened in place. The height in the clear is about 6 in. and length about one-third that of the width of the window.
The frame is then firmly attached to the side of the house, using small angle irons for the purpose and screws long enough to reach through the clapboards into the siding. The weight of the window, when loaded with plants, is considerable, and ample strength should be secured by using plenty of angle irons.
The roof, of matched sheathing, is then added, the lengths of board being sufficient to give an overhang of about 3 in. A smooth surface is desirable, as roofing paper is to be used for the final covering. This can be obtained of any hardware dealer, together with directions for laying. The chief difficulty will be to secure a tight fit between the boards at the rear edge and the clapboards on the house, and in addition to accurate marking, considerable " cut and try" work will be needed. After the roof is covered with the roofing paper, a strip of electrician's tape can be used to cover the joint with the house, which will prevent rain or melting snow from enteri»g.
The frame is then completed by putting on strips 3 or 4 in. wide, on the outside forming a casing much like the outside of any window. It should lap over the edges of the timber frame work about 1/2 in. The joints at the corners will have to be bevelled, and it will be advisable to halve the joints between the vertical and cross pieces. Tight joints are absolutely necessary to exclude both cold and rain.
The windows may now be put in, fastening with a few screws, or strips of wood may be fastened to the wood frame with screws, this method being preferable, as it makes an additional break to the joint. If the joints are not then tight enough to keep out the cold, run electricians tape around all the joints, which will completely close them; in fact, it is desirable to do this as some of the joints are liable to open up during a winter.
Curtains are next to be fitted and then the shelves, either three or four in number, according to the size of the plants to be grown. The shelves, 6 or 7 inches wide, are put up on brackets or large angle irons. By cutting the ends where they join to an angle, a screw can be put through the bracket into the ends of each shelf.
It will also be found desirable, in place of flower pots to use wooden boxes about 6 or 7 Inches wide and deep, and filled three-quarters full of rich loam. The boxes at the large window reach clear across; those at the ends having one end cut to a mitre to fit without loss of room. These boxes are most attractive when painted green. On the top shelf, the plants are best handled if in pots, as it is not convenient to handle boxes so high.
Nothing has been said about painting, this, of course, being determined by that on the house. A priming coat of lead paint is necessary before putting on the last coat. A pleasing selection of colors is to paint the windows to match those on the house, and the woodwork to match the trimmings.
Continue to:
My Books

