Dress - Practical Lessons In Dressmaking. Fifth Lesson. A Simple Skirt
Description
This section is from "Every Woman's Encyclopaedia". Also available from Amazon: Every Woman's Encyclopaedia.
Dress - Practical Lessons In Dressmaking. Fifth Lesson. A Simple Skirt
Examiner in Dressmaking, Tailoring, French Pattern Modelling, Plain Needlework, and Millinery, of the Teachers in Training at the University College of South Wales and Monmouthshire, Cardiff; the London Higher Technical Examination Centres, etc.; First Class Diploma for Tailoring; Diploma of Honour for Dressmaking; Diploma of Merit of the Highest Order for Teaching; Silver Medallist, London Exhibition, 1900; Silver Medal, Franco-british Exhibition, 1908; Author of " Up-to-date Dresscutting and Drafting" also " The Practical Work of Dressmaking and Tailoring."
A Simple Walking Skirt - How to Measure for a Skirt - Drafting the Gores - Fitting the Skirt
This skirt can be made of serge, tweed, etc. Three and a quarter yards of material, 54 inches wide, would be required for a skirt 42 inches in length. The measurements of the person for whom it is to be made must be ascertained. Take the waist measure first, rather tight; then round the hips, about 7 inches below the waist, rather loose. Measure the length of the front, from the bottom of the waistband to the floor; the side, from the bottom of the waistband over the fullest part of the hips to the floor, on the right and left side.
N.B. - The size of the hips is not always the same on both sides, and where this is the case allowance must be made for it, or the skirt will not hang perfectly even all round. Next measure the back, from the bottom of the waistband to the floor.
The person must stand perfectly erect while these measurements are being taken, and they must all be to the floor, but the skirt can be made any length desired. For a useful walking skirt, it should be the same distance off the ground all round, about two or more inches, but this is a matter of fashion.
The measurements taken in this way should be kept, as any style of skirt can be made from them.
Whatever material is used for an unlined skirt should be of a good and firm make. Black or navy Estamene serge (shrunk), 54 inches wide, can be had from 3s. 3d. per yard, and cream serge (shrunk) for 3s. 4d. There is no up and down to a serge, so the gores may be cut some one way and some the other (if it will economise the cloth); but, of course, all the gores must be cut selvedgewise and not across the material.
As there is a right and wrong side to serge, care must be taken that the gores of one side of the skirt " face " the other, and that they are not all cut for the one side.
To ascertain the right side of serge, place it on the table, look at it from the cut edge, and if the diagonal lines run from left to right, it is the right side; if from right to left, it is the wrong side. If the gores can be cut from the serge folded double, they will, of course, match. Three and a quarter yards of material, 54 inches wide, are required for a skirt 24 inches round the waist, 42 inches round the hips, and 42 inches in length all round.
Open out the material, and place it wrong side uppermost on the table, and, with a piece of tailor's chalk and two tailor's squares (see Lesson on Tailoring in Part 1), draft the skirt on the material from the measurements (no pattern is necessary).
From the " cut edge " measure down the selvedge 4 1/2 inches (for the hem and turning), and make a mark. From it, measure 42 1/2 inches (the length the skirt is to be when finished, plus half an inch for turning at the waist) and make a mark, and three inches beyond it, make another mark. At this point square the rule (as shown in Diagram i) by the selvedge, and draw a line 12 inches long half the waist measure) and a curved line for the waist from the mark on the selvedge to the end of the line just made (as shown on Diagram 2).
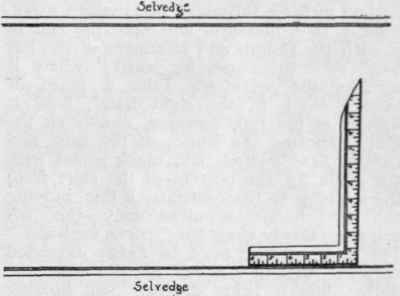
Diagram 1. Squaring the rule
Draw to the left a second curved line, 7 inches below the curve for the waist, for the hip measure. Deduct 3 inches from the half hip measure (21 inches), and measure along the hip line 18 inches, and make a mark.
Place two squares with the short arms side by side (as illustrated in the first Lesson on Tailoring in Part 1), and the long arms forming one long line from the end of the " curve for waist," passing through the mark on the hip line, and draw a long dotted line for the centre-back seam. From it, measure 1 1/2 inches, and draw a long chalk line for the turning.
N.B. - This extra wide turning on the back seam is an advantage, as it makes the skirt hang better.
From the " curve for waist," measure down the centre-back seam 42 1/2 inches (the length for the back of the skirt, plus half an inch for turnings), and make a mark. Take a tape measure, and hold the end of it with the thumb and forefinger of the left hand on "the curve for waist "where it touches the selvedge. Take a piece of tailor's chalk in the right hand, hold it upright in the tape measure, exactly on the mark denoting the length of the skirt and turning (42 1/2 inches), and mark round with the chalk for the bottom of the skirt from the selvedge to the centre-back line, moving the two hands simultaneously - the left one more slowly along the "curve for waist." The tape measure must be tightly extended between the two hands all the time the dotted line is being drawn. Still holding the left hand in the same position, place the chalk 4 1/2 inches lower down the tape measure, and draw a second line for the hem and turning. Cut the material out on the chalk lines all round (none of the dotted lines must be cut), and place the piece along the opposite selvedge of the material, in the position shown on the diagram, with the wrong side facing the wrong side of the material, and cut out the second piece exactly the same size as the first. For this skirt the front should be 5 inches wide at the top and 10 inches at the bottom, plus 1 inch on each side for the turnings. To draft it, measure from the selvedge across the material 6 inches, and make a mark; from it, measure down 42 1/2 inches (for the length of skirt when finished, plus half an inch for turning at the waist), make a mark, and with the squares draw a dotted line parallel to the selvedge from one mark to the other; this gives the centre of the front. Measure and mark 2 1/2 inches on each side of the dotted line, and for the bottom, measure and mark 5 inches on each side of the other end of the dotted line, and with the squares draw a slanting, dotted line from one mark to the other on each side. From each of these slanting lines measure and mark 1 inch for turnings, and draw two long chalk lines. Draw a chalk line across the top and a dotted line across the bottom. Beyond this dotted line measure 4 1/2 inches for the hem and turning, and draw a chalk line across as shown in the diagram. Cut out the front on the chalk lines. The three pieces of the skirt are now ready to be put together. Place one of the gores, right side uppermost, flat on the table, and lay the front, wrong side uppermost, over it, with the edge level with the straight side of the gore, and the top edges of the two pieces quite even. Pin, and then tack them together all down the dotted line on the side of the front. Place the second gore, right side uppermost, on the table, and lay the other side of the front, wrong side uppermost, over it, with the edge level with the straight side of the gore, and the top edges of the two pieces quite even. Pin, and then tack them together down the dotted line on the side of the front.
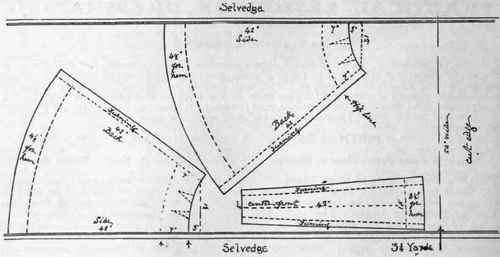
Diagram 2. Drafting the skirt
N.B. - The seams of every skirt must be pinned, and then tacked, from the top downwards, and this must always be done flat on the table, or the seams will be puckered.
The straight of each gore must always be placed towards the front, or if the gores are sloped on both sides, the side which is least sloped must be placed towards the front.
The home-worker will find it easier to fit the skirt before the back seam is joined, and it should always be fitted right side out. Pin the skirt at the centre of the front to the figure or dress-stand, bring the skirt round smoothly, but not strained, over the hips (about 7 inches below the waist), pin it together at the back, and again pin it to the figure or stand at the waist.
The top of this skirt must be reduced to the size of the waist by means of two darts on each side. The space between the two darts should be the same as that between the side-seam and the first dart.
Continue to:
My Books

