Practical Lessons In Tailoring. Seventh Lesson. The Coat - continued
Description
This section is from "Every Woman's Encyclopaedia". Also available from Amazon: Every Woman's Encyclopaedia.
Practical Lessons In Tailoring. Seventh Lesson. The Coat - continued
Examiner in Dressmaking, Tailoring, French Pattern Modelling, Millinery, and Plain Needlework of the Teachers in Training at the University Colleges of South Wales and Monmouthshire, Cardiff, the London Technical Examination Centre, etc. Author of " Up-to-date Dresscutting and Drafting," also" The Practical Work of Dressmaking and Tailoring."
Adjustment of the Waist Line - How to Place and Cut the Lining - The Canvas Interlining for Fronts and Sleeves
As the waist line of a coat cut from a bodice pattern must always be lowered, especially in the back and side pieces, this must be done before the stitches of the "tailor tacking" are cut and the pieces separated. Draw a second "waist line" one or one and a half inches (according to the figure) below the one already marked; on the "back," "side body," and "side piece." The "waist line " of the "front" can be lowered (if necessary) when the coat is being fitted.
Slope the outline for the seam inwards to meet this second waist line, and gradually slope the line outwards below the waist, as shown in diagram 2.
"Tailor tack" the line through to the under line, draw the pieces slightly apart, cut the threads, and separate each piece, according to the instructions given in the Sixth Lesson on Dressmaking (p. 759). Before joining the seams of the coat together it is necessary to cut out the lining. How to Cut out the Lining for Coat If a single-width lining, such as striped or plain satin, is to be used, fold the piece in half, the cut edges together, and place it flat on the table.
Arrange the pieces for the coat on it to the best advantage, placing all the pieces selvedgewise, and the waist line perfectly straight across the lining; with the exception of the side of the front which must be placed on the lining in the same position as the bodice pattern was placed on the material for cutting it out, i.e., slightly across the material, the upper part of the " seam to shoulder ' on the straight (see diagram 1 in Part 6, page 757).
The "side body," "side piece," and "side of front," may be cut the same size as the cloth, but extra width must be allowed on the centre-back seam for a small pleat to be made in the lining down the middle of the back. For this allow about one inch extra lining at the neck, and slope it off to nothing at the waist. This centre-back seam is the only one in the lining that need be " tailor tacked."
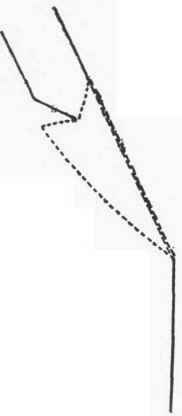
Diagram I. The dotted line indicates how to cut the "facing" of the collar (see p. 758)
N.B. - This pleat should always be made in the lining of every tailor-made coat, as the lining is always put in separately, and the pleat is made so that when the coat is on the figure and the arms are moved forward, the pleat in the lining will open and allow the cloth to set smoothly across the back.
As the fronts of the coat will be " faced " back with cloth about four or five inches in width, it is only necessary to cut the lining sufficiently large to meet that " facing."
As the bottom of the sleeves will be " faced " up about two inches in depth with cloth, it is only necessary to cut the lining long enough to meet that facing - a Utile extra length must be allowed at the top of the sleeve to prevent any " drag " (caused by too short a lining) when the sleeve is stitched in and the lining felled over.
The Interlining of French Canvas
The French canvas for interlining the fronts must next be cut, 1 1/4 yards is sufficient; and, contrary to the lining, the canvas must reach to the outer edge of the coat, so as to stiffen the revers, and down the fronts.
Fold the canvas in half, the two selvedges together, and place one of the cloth fronts on it along the selvedge, with the bottom across the canvas, as shown in diagram 3. Pin the cloth front to the canvas, take a tracing-wheel and trace all along the " tailor-tacked " outline through the material to the double canvas. Remove the cloth, and cut the double canvas, allowing the same amount of turning as is on the cloth at the shoulder; but one quarter of an inch only beyond the traced line for the " seam to shoulder." The " side of front" is only partly interlined with canvas, and as it is not quite wide enough to cut it as large as is required, a small piece will have to be joined on where the v v are shown on diagram 3. This must be cut with the threads running in the same direction, and joined on the straight.

Diagram 2. Slope the outline for the seam inwards to meet the second waist line

Diagram 3. Cutting the canvas interlining. The canvas must reach to the outer edge of the coat
Pin the cloth " side of front " to the canvas, in the position shown on diagram 3, and with the tracing-wheel trace along the ' tailor-tacked " outline for the " seam to shoulder " through the cloth to the double canvas. Remove the cloth, and cut the double canvas with the same amount of turning as is on the cloth at the shoulder and armhole; and a quarter of an inch only beyond the traced line for the " seam to shoulder." Cut through the fold of canvas to separate the two pieces (" sides of front "), cut out the pieces (on the double canvas), as shown on the diagram, to join on to the basque, and join them on according to the instructions for joining canvas which were given on page 642, Part 5. Pin, tack, and machine stitch together the " seam to shoulder " of the fronts and " side fronts " of the canvas. Press the seams open, and then put these pieces aside until they are required to interline the fronts of the coat.
N.B. - The canvas must never be stitched in with the cloth.
The collar and the pieces for interlining the cuffs of the sleeves will be cut from the rein maining piece of canvas later on.
The "back," "side body," and "side pieces " of the coat should now be pinned and tacked together. Care must be taken to make them all exactly even at the waist line. They must all be tacked the same way, from the top downwards, leaving any difference there may be in the length at the bottom, and tacked flat, not held over the finger or hand.
N.B. - On no account must the seams of any garment, whether it be bodice, coat, or skirt, be tacked in different directions, that is, some upwards and some downwards. This is a most common fault, and frequently causes the back seam of a coat or bodice to be crooked, and is also the cause of the coat failing to " balance " at the waist. " To balance a coat at the waist " (a technical term used by tailors), is to make the threads of the material on the waist line in the pieces of the back, side body, and side piece run in a perfectly straight line from one side to the other.
When all the seams of the back have been carefully tacked together, exactly through the lines of " tailor tacking," pick out all the short threads from the seams (but not from the waist lines).
The seams should now be stitched; this should be done on a lockstitch machine, and silk should be used both for the upper and under thread, as it is so much more elastic than cotton, which is apt to snap.
When this stitching has been done, take out the tacking and notch all the seams well, especially at the waist, so that when the seams are opened and pressed the turnings may be perfectly flat.
It is necessary not only to notch the seams where they are hollowed out (as at the waist, etc.), but to notch those that are rounded, and cut out small pieces of the cloth, otherwise the seams would overlap, and when opened and pressed, the coat would be marked on the right side wherever this overlapping occurred.
Continue to:
My Books

