Practical Lessons In Tailoring. Sixth Lesson. Cutting Out And Making A Coat
Description
This section is from "Every Woman's Encyclopaedia". Also available from Amazon: Every Woman's Encyclopaedia.
Practical Lessons In Tailoring. Sixth Lesson. Cutting Out And Making A Coat
Roll Collar (concluded) - How to Cut Out and Make a Coat - Placing the Pieces on the Material
The edges of the collar having been turned down and tacked, and all superfluous material cut away from the corners that they may set as flat as possible, the raw edges must now be herringboned down to the canvas - the stitches must not be taken through to the material. It is not necessary to work this very neatly or to use silk. The collar must next be pressed. To do this, place it on a bare ironing or sleeve board, with the canvas uppermost, dip the tips of the fingers into water, damp it all over equally, and press it out flat with a tailor's goose.
Continue pressing the collar, and while doing so stretch the outer edge of the "fall" of the collar in the length as much as possible from one end to the other. Holding the iron with the right hand, stretch as hard as possible with the left; then, holding the iron with the left hand, stretch as hard as possible with the right, that both ends may be stretched equally and exactly alike. Continue doing this until all the moisture has dried up from the board and the canvas has regained its stiffness.
Pressing The Collar
Take the collar off the board, and crease down sharply all along the curved line of running stitches - dividing the "stand" from the "fall" - with the finger and thumb; hold the ends of the collar together, one over the other, forming the collar into a circle, with the "fall" outside. Dip the finger into water, and damp along the crease just made. Place the collar on the board with the "fall" downwards, and the "stand" to the right turning inwards. Hold the two ends together, one between the thumb and forefinger, the other between the second and third finger of the left hand, and press the crease sharply down all round with the narrow end of the iron. Hold the collar in a circle all the time, lifting the iron constantly, and moving the collar round under it. Great care must be taken not to flatten the collar again, the crease alone requires to be pressed. The collar is now ready to be fixed on to a coat.
The worker having learned to make a
"flap" pocket, and to pad and make a
"roll" collar, can now apply the knowledge she has gained to the making of a coat like the one in the finished sketch.
How to Cut and Make a Coat
This useful little coat, designed to be worn with the skirt illustrated in the same sketch (instructions for the making of which are being given in the Lesson on Dressmaking), can be drafted direct on to the material from a good and well-fitting bodice pattern, and then cut out by the worker. No coat pattern is necessary.
Explanations of the Lines and Marks used in Drafting the Coat from the Bodice Pattern:

Denotes the seams that are to be joined together.
Denotes outline of bodice pattern and waist line.
Denotes fold of material.
Denotes the cut edge of the material and edge of turnings.
Denotes where the seams are to be stitched.
Denotes the selvedge of the material.
For adaptation to a coat it is better to have the bodice pattern modelled to a Length of 7 inches below the waist, so that the size of the hips may be obtained.
How to Place the Pattern on the Material
Two and three-quarter yards of serge, 54 inches wide, will be required to make the coat as shown in the sketch. It should be of a firm make, not loose and " stretchy," or the seams will be crooked. The basque of the coat, measured from the waistline to the bottom, is 14 inches in depth. Place the piece of material on the table, folded lengthwise, the two selvedges together, and place the front of the bodice pattern on it at one end, with the front edge about 3 inches from the selvedge to allow for the revers, and extra width for the front of the coat (see diagram 1). Pin it smoothly to the material with ordinary pins, or through the material to the deal table or board with "push pins." (These pins are illustrated on page 72 in Part 1.) Take a piece of tailor's chalk, hold it upright, and outline the pattern close to the edge all round, and mark the waistline on each side. Take a tape measure, and hold the end of it between the thumb and forefinger of the right hand on the waistline of the front of the bodice pattern.
Take a piece of tailor's chalk in the left hand, and hold it upright in the tape measure exactly on the number denoting the length (14 inches) the basque is to be when finished. Mark round with the chalk held upright, working the hands slowly and simultaneously to the width required for the front, being careful to keep the tape tightly extended between the two hands. This gives the line for the bottom of the front of the coat.
From each side of the bodice pattern, draw with the square a straight line to the one just made.
To allow for the revers, draw lines on the material from the front to the selvedge, as shown on the diagram. The selvedge itself can be left on for the turning down the front edge.
This completes the outline for the front piece of the coat. Draw a second line about 1 inch beyond the outline of the side-seam for the turning.
For the shoulder, draw a second line about 1 1/2 inches beyond the outline, as this is a "fitting seam."
Draw a second line, about 1 1/2 inches from the bottom, for the turning up. Place the pattern of the side of the front in the position shown on the diagram. Outline the pattern close to the edge all round, and mark the waistline on each side. Measure the length for the basque (14 inches), and with the tape measure and piece of chalk draw the line for the bottom of the side in the same way as for the front.
From the front side of the bodice pattern draw with the square a straight line to the one just made, and from the back side draw a sloping line. To do this, place the square from the waist along the edge of the bodice pattern, and draw a line to the bottom of the coat. This completes the outline of the side of the front.
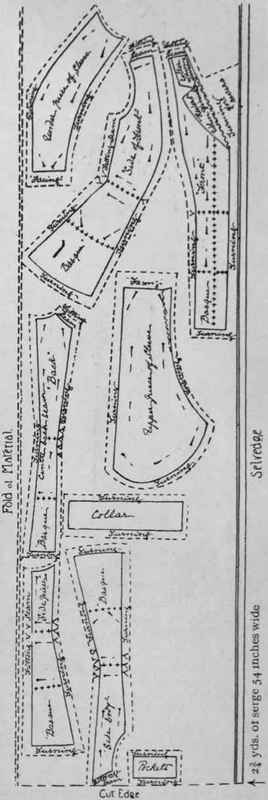
Diagram 1. Showing how the separate parts of the pattern for coat must be placed on material. When cutting out, the selvedge should be in front of the worker

Finished sketch of the coat, showing collar, revers, pocket, etc., as described. The making of the skirt is fully described and illustrated in the dressmaking lessons
Measure and mark for the turnings in the same way as the front.
Place the patterns of the "back," "side body," and "side-piece" on the material as shown in the diagram, and outline each piece all round near the edge.
A Coat Is Made Longer Waisted than a Bodice N.b. - A coat must always be longer waisted than a bodice, especially in the back and "side body," from I inch to 1 1/2 inches, according to the figure. For a slight figure 1 1/2 inches would not be too much; for a stout figure 1 inch would be sufficient.
Add to the length for the basque 1 or 1 1/2 inches (to lengthen the waist), and with the tape measure and piece of chalk draw the line for the bottom of each piece.
Draw a straight line for the front, and a sloping line for the back of each piece, in the same way as for the side of the front.
N.B. - As there is no " face " to a serge, the pieces can be placed up and down on it (see diagram). There is no fear of the pieces not matching, as they are being cut from the material folded double; but as serge is a diagonal material, the bottom of the sleeve pattern must always be placed straight across the cut edge, as shown in the diagram. If this is not done it will be found that the "diagonal" will run across the one sleeve and down the other.
Outline the pattern of the sleeve, and draw a second line about an inch beyond it on the inner seam and round the top, and about 1 1/2 inches for turning on the back seam (as this is the fitting seam), and draw a second line about 2 inches from the outline at the bottom for turning up.
N.B. - Tailors always leave this extra turning or "inlay" at the bottom of the sleeve to turn up, instead of "facing" a sleeve as dressmakers do.
The blank space left on the diagram represents the material left over for the "facing' of the " revers " and front (which should be cut in one piece), also for the straps round the sleeves. (See finished sketch.)
The "facing" for the front of the coat must be cut longer than from the bottom of the coat to the top of the "revers," because then the " revers " is turned back; the " facing " of it should also form part of the "facing" of the collar, as shown by the dotted line in diagram. (This will appear in the next Lesson in Tailoring.)
N.B. - It is better to leave the cutting out of these " facings " until the coat is in a more advanced stage, - i.e., until the fronts have been interlined with French canvas, the revers padded, and the edges of both turned in, the shoulder seams joined up, and the collar padded and put on. When all this has been done, the correct size and shape of the "facing" is more easily ascertained, and a diagram for cutting it out will be given in a future lesson.
Cut out all the pieces of the coat, sleeves, etc., carefully, on the outer lines (which denote the turnings). Unpin all the pieces of the bodice pattern; do not separate the pieces of the material, but put a pin or two through each double piece, to keep them exactly together. Take a square and draw the waist line across each double piece of the coat from the chalk line on each side of the waist.
The double pieces for the collar and for the pocket-flaps can be put aside, as they are not required at present.
" Tailor-tack " through the double pieces on all the chalk lines denoting the outline of coat, waist line and sleeves, in order to reproduce these lines on the under pieces of the material. Instructions for " tailor-tacking " are given in the lesson on dressmaking.
Continue to:
My Books

