The Handkerchief Camisole
Description
This section is from "Every Woman's Encyclopaedia". Also available from Amazon: Every Woman's Encyclopaedia.
The Handkerchief Camisole
How to Cut the Handkerchiefs - Joining the Pieces with Insertion - Forming the Yokes - Inser tion Threaded with Ribbon Will Add to the Dainty Result
Here is a way in which a dainty and useful little camisole can easily be fashioned from three pretty kerchiefs. These will provide the main foundation, besides which will be required eight yards of narrow insertion, three yards of lace for edging, and a few yards of coloured bebe ribbon.

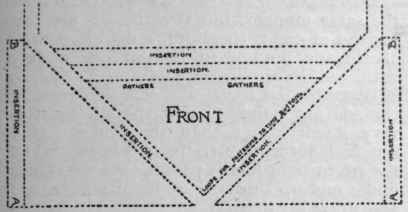
Fig. I. Diagram showing the arrangement of the three triangular portions that form the front of the camisole
The handkerchief bodice can be put together by simply following the diagrams here given, without the trouble of cutting out a pattern in the ordinary way. Another point in its favour is that it can be so quickly made, and it is also economical in cost.
Before setting to work to make the bodice, the handkerchiefs should be folded from corner to corner, and pressed with a moderately hot iron to ensure a perfectly straight line across the centre. This must be cut through with a pair of scissors so that each handkerchief is divided into two equal triangular portions. The pieces can then be arranged in readiness for putting together, and it is a good plan to pin them in the required position on the background of a large sheet of paper. The side sections must be placed so that the embroidered edges will come on the outside. The centre pieces are arranged at an angle to form an embroidered V back and front (Figs. 1 and 2).
The whole bodice is joined together with insertion, and strips of the necessary length to connect the back and front to the side pieces can be cut and tacked in position. These can be carried right over from the back to the front, thus fixing the two portions together, and forming the sleeve without the necessity of a seam on the shoulder. However, if preferred, the sleeve band can be fixed afterwards and neatly sewn down to the bodice with little mitred points. The prettiest way of joining in the insertion is to make the embroidery points stretch over it, and each one should be sewn neatly down, the stitches being hidden in the edge. On the left side of the front, tin-embroidered edge should be left unjoined to the insertion, as the bodice will fasten here. The tiniest pearl buttons should be used for the purpose. When all the sections are fastened together, the bodice may be fitted on the person for whom it is intended, as the back and front will probably need to be taken into tiny gathers, according to the width required. When these are made, the yokes, formed of strips of insertion joined neatly together, should be sewn in position, all the raw edges being turned slightly over to the right side and hidden under the insertion borders.
The camisole

Fig. 2. Here the three portions are arranged to form the back of

Fig. 3. The camisole when finished. A dainty and inexpensive piece of lingerie that can be made both easily and quickly
An edging of dainty lace will form an effective finish for the top of the Camisole and round the sleeve bands. A pattern should be selected with eyelet-holes for the purpose of threading with bebe ribbon, as this will serve the double end of giving a pretty effect and drawing up the camisole. The insertion chosen may also be one which will take a running of ribbon, and it may be threaded up and down the joins. The bottom of the camisole is completed by sewing a strip of insertion under the broidery points, so that it forms a hem to hold a ribbon or tape (see Fig. 3).
A very pretty underslip for wearing with a transparent evening blouse can be made from this pattern with silk Maltese or real lace handkerchiefs. With very choice kerchiefs of fine old lace, it is even possible on these lines to make a very effective over-blouse upon a tight foundation of silk or net.
Continue to:


