Cut-Work Embroidery
Description
This section is from "Every Woman's Encyclopaedia". Also available from Amazon: Every Woman's Encyclopaedia.
Cut-Work Embroidery
Effective Work - Materials Required - Choice of Designs - Buttonholing and Weaving Stitches
A very interesting way of embroidering linen is to cut portions of it away, forming some regular pattern, and then to fill the spaces with designs made up of stitches worked with linen thread.
The patterns are built up on strengthening lines, made by throwing one or more threads across the open spaces in various directions. The planning of these spaces and the variety of shapes that can be introduced into them will prove a pleasant tax on the ingenuity of the worker.
Such embroidery, when well carried out, is very durable; and as it also washes well it is specially suited for objects in daily use, such as tray and tea c l o t h s, cushion-covers, washing blouses, or for bedspreads. It can also be introduced amongst other kinds of embroidery. For example, a bedspread might have squares of cut-work alternating with other squares of solid embroidery. Many kinds of designs are suitable; flowers and trees, birds and beasts, and geometrical shapes can be used, and a clever worker will with four fanshaped leaves radiating from it. Note the variety in the fillings, this being an essential feature of the work soon learn to arrange her stitches so as to give some quaint likeness to the objects she wishes to represent.

Pincushion cover in cut-work embroidery. A square in the centre
The materials needed are some make of linen, such as Old Bleach or Harris linen, not too fine; and a reel of Mecklenburg thread, No. 5, can be used to commence with, as it is rather coarse, and so shows the stitches easily. The stitches used are three in number - buttonholing (both open and close), overcasting, and a kind of weaving stitch (see diagram).
When the design has been chosen, it should be transferred on to the linen, and all the shapes which it is intended to cut away should be run round twice with Mecklenburg thread, No. 5, to prevent the linen from stretching after it has been cut.
Then, with a sharp pair of scissors, slashes should be cut across the shapes in such a way that the edges can be neatly doubled back. For instance, in a square the cuts should be taken from corner to corner, cross-wise, and the triangular pieces of linen which result should afterwards be folded
N back along each side of the square. The edges should then be buttonholed all round, and afterwards the extra pieces of linen cut away from behind; not too closely, or the material may fray out.
Each shape should be cut, by itself, 'just before embroidering it. It is best to proceed in this way, as if all the shapes were cut at once some would become frayed and stretched before the time came to work on them.
The two examples illustrating this article are a tray-cloth and a pincushion cover. The tray-cloth has a design at each end representing a stiff little tree bearing seven acorns. Two birds with spreading tails stand on either side of the tree-trunk. A border round of squares, filled in variously, has also two tiny trees, one in the middle of each side.
The pincushion has a simple design; a square in the middle, with four fan-shaped leaves radiating from it to the corners, and a diamond, each point of which ends in a small squar, placed outside the middle square.
It may be helpful to take the fillings of the pincushion in detail, for those in the more important design of the tray-cloth are worked in much the same way.
Starting with the centre square, each side, after being buttonholed round, is divided into three by means of two double threads laid across from side to side, cutting up the square into nine small ones. Each of these long double lines is strengthened by weaving the thread in and cut, over and under, as is shown in the diagram, all along each line. It is not necessary to cut the thread in this work; it is better to pass it along at the back of the material, and bring it out at the next point to be worked. All four long lines should be woven in the same way, crossing the thread behind at each intersecting point. Of the nine squares, five are rilled in and four left blank. These blank spaces are a great feature of this kind of work, but they must be so arranged that they do not weaken the material, and make it liable to tear. The five squares are all filled in the same fashion. An open buttonhole-stitch is taken from the centre of each side, crossing the corners, and then the circle thus formed is buttonholed closely over.
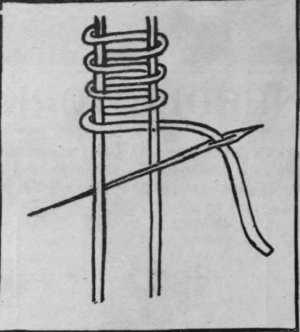
Diagram that shows the working of the "weaving" stitch so much used in cut-work embroidery
The four fan - shaped spaces are filled with two different designs, the opposite corners matching. The first two have a thick bar of two threads, taken across just beyond the rounded head of the leaf, and buttonholed closely all along. From this bar, two short bars, also buttonholed, connect it at right angles with the rounded end. The two outer spaces are left blank, the middle one is filled by two diagonal threads, overcast afterwards. The pointed base is covered in with a lattice-work of single threads, five threads taken downwards and three across. These are all overcast afterwards, taking care to make each line firm where it crosses another.
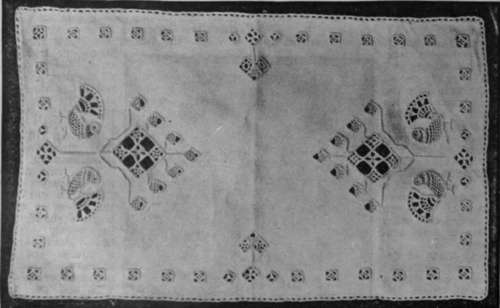
Tray-cloth in cut-work embroidery. The stiff conventional tree with acorns at either end forms a characteristic design, while the quaint birds give scope for fine open buttonholing with good effect
Another way of filling, and one which has been used in the body of the bird in the tray-cloth, is to make rows of open buttonholing, working one row into the preceding one, and afterwards overcasting these all round.
The two other leaves each have two thick bars, worked in the same way as the first two, connected by another bar down the centre. Into the thick bar at the side nearest the rounded end a line of open buttonholing is worked, afterwards strengthened by over-casting. A single thread, connecting this with the centre of the rounded edge, is afterwards buttonholed closely, and from the middle of the space at each side a fan-shaped piece of close buttonholing is built up from a single stitch at the top, gradually increasing in width by making one fresh stitch in each row. When it is long enough, each end is attached to the edge. The tip of the leaf is then filled in in the same fashion as the one already described.
The four small squares have also two different fillings. The first two have triangles of buttonholing, like those in the second leaf; the other two have an open buttonholing taken across the corners, and afterwards buttonholed closely, so that the headings face inwards. The four sides are then connected by stitches taken across the centre of each, drawing them together.
All the stem lines are worked in the same way. Two threads are first laid side by side on the linen the whole length of the line in the design, and the weaving stitch is taken across and across them. Only, in this case, in order to attach it to the linen ground, the needle must be made to pick up a tiny thread of the ground here and there, so as to hold the woven line firmly down to it, a very important detail.
The edge is first buttonholed round, after having been turned in. Then a second line of buttonholing is made into the heading of the first, buttonholing two stitches, then leaving two alternately all the way round. Finally, this second row is strengthened with another row of close buttonholing, and the work is completed.
Continue to:
My Books

