Practical Lessons In Tailoring. Twenty-second Lesson. The Remodelling And Renovation Of Clothes
Description
This section is from "Every Woman's Encyclopaedia". Also available from Amazon: Every Woman's Encyclopaedia.
Practical Lessons In Tailoring. Twenty-second Lesson. The Remodelling And Renovation Of Clothes
Remodelling a Coat and Skirt - Finished Sketch
The subject of remodelling and renovating garments has a wide range, including not only cleaning and dyeing them, but the transformation of old-fashioned clothes into up - to - date ones.
A home worker, who may be afraid to venture to cut into a new and expensive piece of cloth, and who feels unequal to the work of a new "tailor-made" costume, need not hesitate to under-take the altering of an o1d -fashioned coat and skirt into a little costume like the sketch, which has been designed for, and adapts itself to, this alteration.
An out-of-date striped flannel or tweed skirt, and a sacque, Chesterfield, or, indeed, almost any shaped coat, can be remodelled to this design, even if the material has shrunk in the cleaning, washing, or dyeing process.
The garments should, of course, be unpicked, and all fastenings removed before being cleaned, and then properly pressed. If the washing is done at home, and the material is to be turned, the pressing must be done on the original right side, and it should be done before it is thoroughly dry, as the material will then be equally damp all over, and there will be none of the "rough-dry" appearance which often results when the material is left to get quite dry, and then damped and pressed. The actual alteration of the garment must commence with the skirt. This being old-fashioned, and consequently much wider than those now worn, a width, or perhaps even more, can be taken out and used for trimming the coat and skirt, the stripes being placed in the reverse direction.
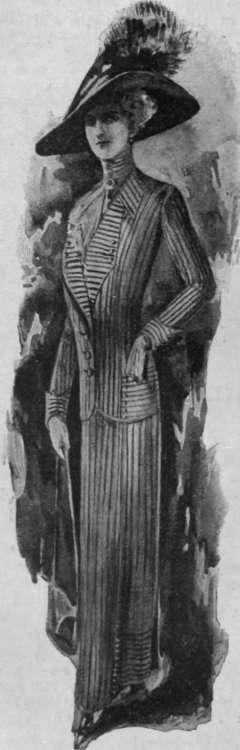
A striped costume when altered, as described in this lesson
The narrow panel for the front can be cut out of the old wide front - it should measure about four inches across the top and eight inches across the bottom (as shown in Diagram 1).
Cut the gore for each side from the old side gores, or, if none of these are wide enough, they can be cut out of the two back gores - these side gores need only be cut short - about twelve inches less than the skirt is desired to be, as the border of horizontal stripes will complete the length (see Diagram 2).
The panel back, which requires additional width at the bottom for the box-pleat, can be joined if none of the old pieces are wide enough to cut it without a join.
N.B. - Joins in a striped material can be made quite invisible if they are carefully matched and well pressed.
The back panel can also be cut about twelve inches shorter than the required length for the skirt, as the border of horizontal stripes will be added on (as shown in Diagram 3).
The pleats on each side of the panel back add to the comfort of the skirt for walking, whilst preserving the fashionable slim appearance. They should be pressed so well and flat as to be invisible, except when the wearer is moving.

Fornt Panel.
Diagram 1. Narrow front panel cut out of the old wide front
The paper patterns from which to cut the various pieces can easily be drafted from the measurements given on the diagrams. Turnings must be allowed for everywhere in cutting out the material.

Diagram 2. The side gores, with border of ho izontal stripes
The striped border should first be stitched on to the two gores and on to the back panel, and the seams pressed - both raw edges turned downwards. The front panel turned in down each side, then tacked and machine-stitched over the edge of the front of each side gore, to form " lapped " seams.
The back panel should be turned in and tacked as far down as the extra width (allowed for the pleats). Join the edge of the additional piece to the back of the side gore, press the seam open, and pleat it under the back of the panel (so as not to show the pleat at all). The edge must form a continuous line with the tacked-down edge of the panel. Tack the upper part over the edge of the gore, and machine-stitch it down to about an inch on to the pleat, to secure it firmly at the top.
N.B. - The dotted lines on Diagram 3 show where the folds for the pleat should be made. Make the placket-hole down the left side of the front panel and put on the dress fasteners. Try on the skirt and fix the darts, stitch and press them open carefully, then put on the band round the waist. Sew on the hooks and eyes and the loops by which to hang up the skirt. Measure it up for the length, turn it up round the bottom, and put on a false hem, either cut to shape or on the cross. This hem can either be narrow or deep enough to reach, and cover, the raw edges at the top of the striped border. If the hem is cut narrow, these raw edges must be "faced " over with lute ribbon or Prussian binding.
Press the hem well and sew on the buttons, which are placed down each side of the front as a trimming.
A paper pattern for the back of the coat can be drafted and cut out by follow-ing the instruc-tions given for cutting out a " double-breasted coat" with a panel back, given on page 2203, Vol. 3. As the panel will match the skirt just made, the pattern for the fronts can be drafted and cut from the instructions given on page 757, Vol. 1, for a "single-breasted coat."
As the side pieces and back are to be bordered with a piece of the material, the stripes in a horizontal direction, these can be cut about four inches shorter than the required length of the coat.
The sleeve is a plain one, and can be cut from any well-fitting coat sleeve pattern.
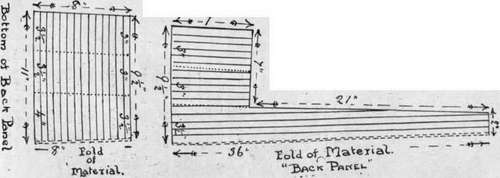
Diagram 3. The back panel can also be cut shorter than the required skirt length. The folds for the pleats are indicated by dotted lines
Continue to:
My Books

