Book Shelves
Description
This section is from the book "Shop Projects Based On Community Problems", by Myron G. Burton. Also available from Amazon: Shop Projects Based on Community Problems.
Book Shelves

Materials
Yellow Pine (Chap. III., Par. 48) or Oak, plain or quartered (Chap.
III., Par. 29).
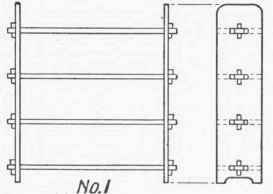
5 pcs. 7/8"x7 3/4"x33" S 2 S Shelves.
2 pcs. 7/8"x7 3/4"x52" S 2 S Sides.
Introductory Statement
To insure proper protection and arrangement of books, they should be kept in some sort of bookcase or shelves. Since a bookcase is rather expensive, a very satisfactory substitute can be provided by neatly made shelves. If desired these shelves may be provided with curtain rods and a curtain to protect the books from the dust.
While cabinet wood is preferable for this purpose, yet if the workmanship is carefully executed a very satisfactory shelf can be made from soft wood, particularly of yellow pine. The stain and finish should be made to correspond with the other furniture of the room in which the shelves are to be placed.
References:
Easy to Make Furniture, Crater and Holt. The National Builder, Chicago, 111.
Woodworking for Amateur Craftsmen. The National Builder, Chicago, 111.
Bench Work in Wood, Goss. Ginn & Co.
Wood and Forest, Noyes. Manual Arts Press, Peoria, 111.
Bookshelves

Suggestions For Original Design

Book Shelves Specifications
The Sides
Select the best surface and mark it the working face (Chapter II., Paragraph 2). Prepare a working edge (Chapter II., Paragraph 4.) On a long piece of material of this kind planing the edges will require very careful work. With the marking gauge (Chapter II., Paragraph 6), or with the pencil and ruler (Chapter II., Paragraph 7), gauge the width of the side pieces on both surfaces; carefully plane to the gauge lines. Be sure that all edges are perfectly square. In like manner prepare the second side piece.
Lay out the bottom and top ends of one side piece, as shown in the drawing, or according to your own design. If you use an original design, first draw it on paper, then lay it out on your material. Carefully saw just outside the lines. With a wood file and block plane finish the edges, making them perfectly square and smooth. Make the second side just like the first.
Lay out the spaces for the shelves with the try-square; square these lines across the working face; lay out the gains on each side piece (Chapter V., Paragraph 61). The width of the gains is determined by the thickness of the shelves, for they must fill the gains snugly. It is well to lay out the gains a very little smaller than required, so you may thin the ends of the shelves slightly with a steel scraper, if necessary, in assembling. Use this piece as a pattern in laying out the gains on the other side piece. These gains must be exactly the same distance apart, or the shelves will not be level when the work is assembled.
The Shelves
Select the best surface of one shelf, and mark it the working face (Chapter II., Paragraph 2). Plane one edge for a working edge (Chapter II., Paragraph 4). Gauge the width on both surfaces (Chapter II., Paragraphs 6 or 7); carefully plane to the gauge lines; square one end (Chapter II., Paragraph 5). Lay out and cut the length, as indicated in the drawing. Prepare all the shelves in the same manner. If you desire you may change the length to suit your needs, but be sure all the shelves are exactly the same length.
Surfacing
Before the work is assembled, each piece should be carefully resurfaced with a sharp plane set to take a thin shaving. This will remove the marks left by the planing mill. All surfaces must then be finished with a sharp steel scraper to remove plane marks (Chapter II., Paragraph 16); the final smoothing should be done with very fine sandpaper (Chapter II., Paragraph 17).
Assembling
This work is to be assembled with finishing nails driven through the outside surface of the side pieces. Be very careful not to bruise the material. The nails should be uniformly spaced so, if the places where they are driven show, they will not mar the appearance of your work. Use the hammer as shown in Chapter II., Paragraph 21. With a nail set drive all nails slightly below the surface of the wood. The holes may be filled with putty, colored to match the stain you intend to use; or by careful work you may be able to cover them satisfactorily by putting a tiny drop of glue in each hole and sandpapering over it, allowing the wood dust to mix with the glue and fill the hole.
Finishing
With a piece of fine sandpaper remove all pencil and tool marks. Stain the desired color (Chapter IV., Paragraph 54). If your book shelves are made of oak, a filler should be used (Chapter IV., Paragraph 55). Finish with shellac (Chapter IV., Paragraph 57), wax (Chapter IV., Paragraph 56), or varnish. (Chapter IV., Paragraph 58).
Optional and Home Projects Employing Similar Principles.
Pantry Shelves
1. The plan of shelf construction presented in this lesson is very suitable for the construction of shelves in the pantry. The length and spacing of the shelves should be determined by local conditions.
Hardware Cabinet
2. For small hardware, such as nails, screws and sundries, a very simple but serviceable cabinet may be prepared by constructing a series of shelves on the plan given in this lesson. For the sake of economy, discarded cigar boxes could be used for drawers, the shelves being conveniently spaced to suit them.
Continue to:
My Books

