Exercise 7. - Use Of The Rip-Saw
Description
This section is from the book "Exercises In Wood-Working", by Ivin Sickels. Also available from Amazon: Exercises in Wood Working.
Exercise 7. - Use Of The Rip-Saw
Material. - Squared block of the previous exercises. Work. - To saw the block into boards which may be planed to 1/2" thick.
Examine the rip-saw; note that its teeth are about four and a half to an inch; the angular opening 60°, and the slant of the tooth about 90° to the direction of the cut. In Fig. 1 the teeth are shown slanting toward the point, and are called hooked. At a, Fig. 2, the teeth are square, and at b are raked. The teeth are smaller near the point of the saw. The face of the teeth may be cut square across, as at a, Fig. 3, or obliquely as at b. In order that the saw may not bind, its teeth are set - that is, the points are bent, as at a, b, c, Fig. 3, alternately to one side and the other. The effect of the teeth on the wood-fibers shows that the action is tearing. Fig. 4 exhibits a magnified view of a section through a saw-kert
Gauge all around the block 1/2" from its face. Fasten the block vertically in the vise with its face outward. Hold the saw firmly in the right hand, against the thumb of the left acting as a guide (a, Fig. 7), and about 1/8" beyond the gauge-mark. Move the saw with short strokes, back and forth, a little above the wood; let it gradually approach and enter the wood. The weight of the saw must be sustained by the right hand while starting; after it has entered fairly into the wood, let the saw cut by its own weight. Go slowly, and push the saw as straightly as possible. When the saw has penetrated as far as shown at a, Fig. 8, change to the opposite side and saw down as shown at b; change again, and continue this alternation, keeping the saw all the while about 1/8" from the gauge-mark.
In starting the saw, many workmen would begin at b, Fig. 7, and draw the saw backward, resting on the wood. The saw cuts quickest if pushed at right angles to the grain, but if inclined, as in Fig. 6, requires less force. In sawing boards, use the horses for supports and test the position of the saw, as shown in Fig. 5, until practice gives a correct habit.

Fig.4
RIP - SAW.
Ex. 7.

Fig. 2

Fig. 3

Fig. 5

Fig, 6
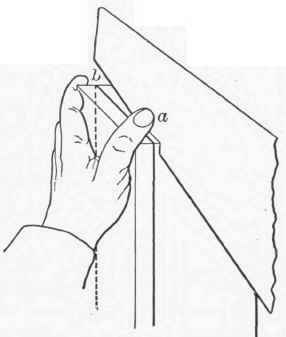
Fig. 7

Fig. 8
Continue to:
My Books

