A Simple Leather Project
Description
This section is from the book "Time Out for Living", by Ernest DeAlton Partridge and Catherine Mooney. Also available from Amazon: Time Out for Living.
A Simple Leather Project
Perhaps the best way to describe the various steps in decorating and assembling leather articles is to explain in detail the making of a simple little coin purse.
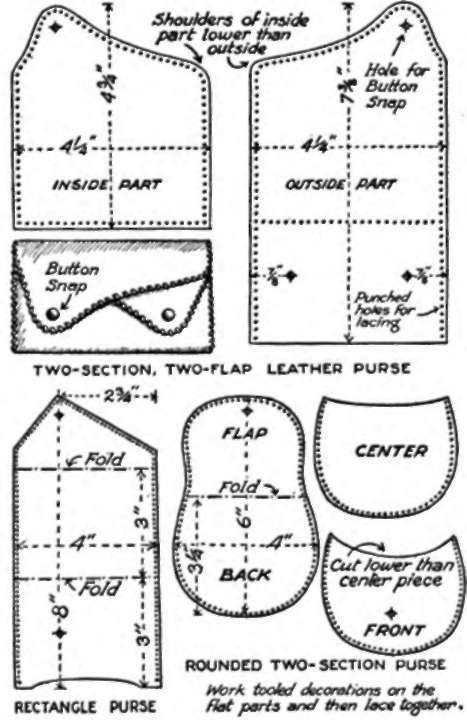
The first step in a leather project is to plan it in detail. Usually the best way to start is to make a paper pattern in exact size. This paper pattern will show the place of the folds and will also carry a copy of the design to be put on the leather. It is much easier and less expensive to experiment with paper than with leather. The sketches presented herewith give the dimensions for simple coin purses. From these dimensions you can cut your own paper pattern.
When the pattern has been cut and has been found satisfactory, it can be used to mark the leather for cutting. The leather can be marked with a rounded point, such as a knitting needle or a nut-pick. The leather should be marked slightly larger than the pattern since it will shrink a little as it is worked. Furthermore, a fold in leather takes more space than a fold in a paper pattern. Make allowance for the difference. A pencil or carbon paper should never be used in marking leather because both discolor the leather. The leather is cut with a sharp knife on a hard wooden surface. Straight lines can be cut by using a straight edge, such as a ruler, along which to run the knife.
After the leather has been cut according to the pattern, you are ready to begin decorating it. The first thing to do in this connection is to decide upon the nature of the decoration. A design of your own can be drawn on the paper pattern to see how it will look. You may find initials effective, if they are arranged artistically, or you may see a design somewhere that appeals to you and that you can copy. When the design is decided upon, it can be transferred to the leather in the following way. Wet the leather slightly on both sides with a sponge or cloth. If water oozes out when the leather is pressed with the fingers, it is too wet. Now lay the paper pattern upon the leather (it can be clipped there with paper clips to hold it in place) and carefully trace the design with a pointed instrument such as a nut-pick, a knitting needle, or a marlin spike.

After the design has been transferred to the leather, it is ready for tooling. For this next operation several tools are needed. Many of these tools can be made from nut-picks, nails, and such articles. Some of the tools can be carved from hard, close-grained wood. Study the different tools shown in the pictures so that you can recognize them. If you are handy with a knife, you may be able to make some of them.
The actual tooling of the leather should be done with the leather resting on some hard, smooth surface, such as a piece of plate glass or marble. The modeling tool is held in the hand in much the same manner as a pencil. The first thing to do is to deepen the design that has been traced on the leather. Deepen it by taking a pointed tool and carefully pressing the design into the leather. Then a flat-pointed modeling tool is used to press down the background around the design. It is then smoothed over until it darkens and takes on a smooth shiny surface. If the leather which constitutes this background is carefully pressed with a modeling tool up to the edge of the design, the design will be more prominent. The deerfoot tool is used to get into the small corners.
For making the mottled or stippled background around designs, a simple tool can be made from about eight or ten ordinary needles. Cut a section of broom handle, or some other round wood of about the same thickness, approximately three inches long. Make a hole with a small nail in the center of one end and tap the needles into this hole. Be sure to tap very gently. After all of the needles have been driven in, to the same depth, wrap them together with thread to hold them in place. The heads of the needles will then stamp the leather when they are pressed into it.

Stippling Tool made of needles
Leatherwork Tools
One does not need all of these tools. A practical set would be the top one for general tooling, the second one for small areas and corners, and the bottom one for lining and general work. Try carving your own tools from hard wood.
It is a good plan to practice first on a small scrap of leather in order to get the feel of the tooling process and learn the use of the tools. Study the design beforehand and mark on the paper those parts of it that are to be pressed down and those that are to stand out. By shading the portions that are to be tooled, one can make the design look as it will look when it is finished.

Before the purse is punched for lacing, the entire edge should be creased with the creasing tool. This tool can be made from a nail or a piece of hard wood. The accompanying drawing shows two of these tools, one made of hard wood and the other of a large nail head. If the edge of the leather is rounded, it gives the article a finished appearance.

Thin the edge of leather before you lace it.
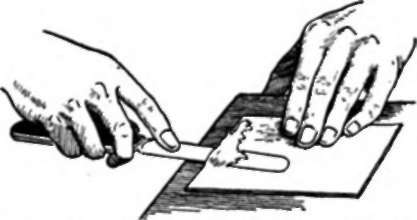
After the tooling has been completed, the purse is ready to be laced. In preparing for lacing, the edges should be skived down with a sharp knife, if the leather is thick. Skiving takes off the excess leather on the under or flesh side of the leather. The laced edges then do not appear too bulky. Skiving is not difficult if the knife is sharp. Rest the edge of the knife on the plate-glass surface to guide the thickness of the strip you cut off. After the skiving, the edges that are to be laced together should be covered with leather cement and glued together. Gluing holds the edges together while they are punched and laced.
The punching of the holes can be done either with a drive punch or a spring punch. A drive punch is cheaper and probably preferable. If a drive punch is used, the leather should be placed on a piece of hard wood and a wooden mallet should be used to tap the punch. It is well to practice with scrap leather for a while before punching the purse. A small punch should be used - size 00, if it is obtainable. The holes should be just large enough to permit the lacing to be pulled through with some difficulty. The lacing should completely fill the hole.
Measure each hole carefully for distance from the edge and from the previous hole before it is punched. You can use a small compass for this purpose, or better yet, mark the spaces for the holes on your paper pattern and trace them upon your purse. Careful measurement is necessary if the lacing is to look well when finished. The lacing should be cut to a tapered point at the end, so that it will start through the hole easily. It sometimes helps to dip the pointed end of the lace in ambroid glue in order to stiffen the lacing and make it easier to pull it through the hole. A marlin spike will help in stretching the hole slightly to get the lacing started through.

A Hand Punch is a handy tool for the leather craftsman. The one shown here has four different sizes of punch.
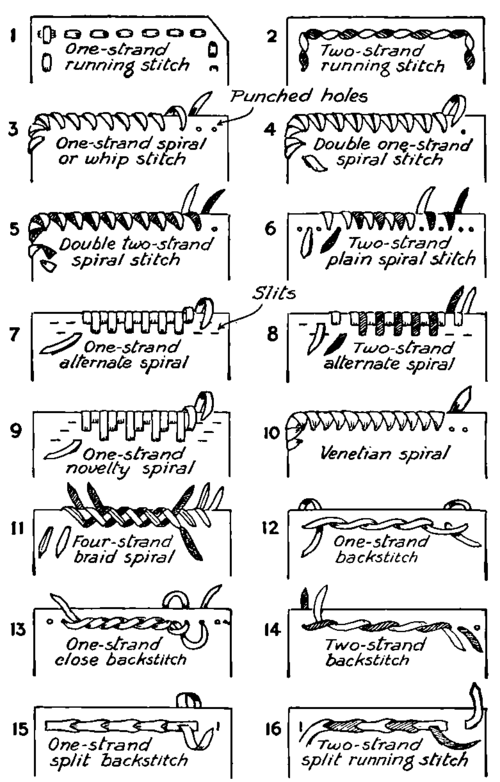
The purse should be laced all around the outer edge, except the bottom, where the leather is folded over. In starting the lacing on any project, it is well to commence in a corner or some other place which is not conspicuous. Figures 1-16 on the next page show various kinds of lacings.
After the lacing has been completed, the edges should be hammered down lightly with a wooden mallet to flatten them.
If you carefully follow the above directions for making a coin purse, you will know most of the skills that are needed for making more advanced and complicated projects. The procedures are the same except that the patterns are more complicated and hence take more careful and intricate work. For further information on advanced leather projects, consult some of the references listed at the end of the chapter. From these references you will see that many beautiful and useful articles can be made with the skills you have learned in this simple project. A few of these more advanced projects are shown on page 233.
Coloring Leather
There are several methods for coloring leather after it has been tooled. India ink in the various colors or ordinary water dye can be used with good success. The leather should be wet slightly before applying the color with a camel's hair brush. The coloring should be washed on several times to insure an even spread on the leather.
For the best results, however, leather should be colored with regular leather dye. There are two kinds of such dyes, acid and aniline. These come in powder form and must be mixed with water before they are used. One-half teaspoonful of dye to three ounces of boiling water is the correct proportion. When the dye is not in use, the bottle should be tightly corked and kept in a dark place. A drop of vinegar added to the dye when you use it helps to set the color. It is usually necessary to dilute the dye mixture before it is used.

Drive Punch.
DECORATIVE EDGE LACINGS.
Before applying leather dye to a project, it is well to try it out on a scrap of leather first. Then you can tell how strong the dye is and how it spreads on the leather.

A Simple Purse with a One-Strand Spiral Edge.
Continue to:
My Books

