No. 21. Hanging Pegs Or Rack
Description
This section is from the book "Hand-Craft: The Most Reliable Basis Of Technical Education In Schools And Classes", by John D. Sutcliffe. Also available from Amazon: Hand-craft.
No. 21. Hanging Pegs Or Rack
(Requiring Exercises 5, 7, 12, 8, 9, 10, 14, 15, 26, 13, 18, 4,26,37, 29, 35, 39, 40, And 42.)
From Deal cut out two pieces, one 18 in. long, 3 1/2 in. wide, and 7/8 in. thick ; the other 15 in. long, 1 in. wide, and 7/8 in. thick.
Commencing with the larger piece, plane one side and one edge at right angles. Then gauge-mark to a width of 3 in., and plane the rough edge down to that mark. At the centre of the width draw a line from end, as shown in Fig. 1, f to f. On that line, with compasses, mark the points indicated by a, 6, c, of Fig. 1 of the drawings No. 21. At each point drill a 5/8-in. hole right through, taking great care to drill vertically. With the square, draw the cross lines at d d, the intersections with the central line forming additional central points. Set compasses to a radius of 7/8 in., and, from each of those central points, describe a semicircle as shown in the Fig.; then from each of the same central points describe an outer semicircle as also shown in the Fig. With tenon saw make a nick at each of the four points g, in each case reaching to the outer of the semicircles, each nick being strictly at right angles. Then, with turning saw, follow the line of each of the outer semicircles. Then dress the edges all round with chisel and file as required. Then gauge-mark all round for a thickness of 3/4 in., and plane the rough side down to the mark, evenly throughout. Gauge-mark all round for the chamfer, in the proportion shown in Fig. I, and chamfer to the mark accordingly, using the plane for the sides and the knife for the curves and corners. File throughout where necessary, and finish with sandpaper.
The smaller piece of Deal being to make the pegs with, plane it on one side and one edge at right angles, then gauge-mark for a width of 3/4 in. and for a thickness of 5/8 in., as illustrated in section by Fig. 4. Saw across into three lengths of 5 in. each. Place them together on their sides, and sketch one side of each as shown from j to k and / in Fig. 3, leaving the space from j to m untouched. With the try square repeat the lines of this sketch on both sides of each. With saw and knife cut each peg to the sketch, finishing the whole, excepting the circular plug. Then at the inner end, find the centre as denoted in Fig. 4, and, using the same centre-bit as for Fig. 1, describe a circle mark as dotted in Fig. 4. Then, with the tenon saw, cut by the "shoulder" to a depth of 1 in., and pare the circle with the knife to the shoulder j, so making" a round plug, a little too large to go into the holes of Fig. 1. Then, with the file, carefully reduce the size of each plug so as to very accurately and tightly fit one hole at a time in Fig 1, where wedging must not be tolerated. The perfection of this part of the work is to be tested by ascertaining that the pegs are precisely in a line, and that each one fits all round to the face of the board into which it is inserted.
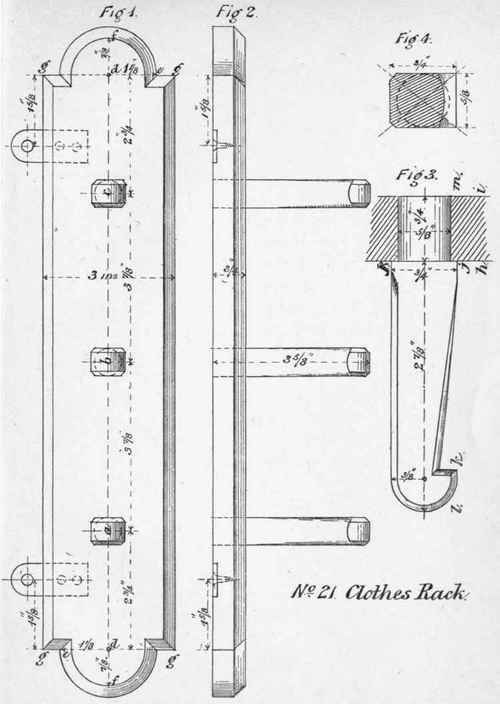
Having thus fitted each plug to its own hole, and marked it for identification, the pegs may be completed. Cut down each one, with the tenon saw, from k to x, and, with the chisel, pare down from j to k, first making it square and afterwards slightly rounding it, as shown in section of Fig. 4. With a sharp chisel cut round to the outside of the semicircle for the top of the peg. File this round and then cut the chamfer with the knife. File as required, and finish with sand-paper.
The pegs being thus made ready for fixing, clean the face of the board (Fig. 1) with the smooth plane, and the edges and chamfers with sand-paper. Then glue in each plug, using the try square to make sure that they project at right angles. Then put the whole away for not less than six hours, to allow the glue to set well. Then, as each plug has been purposely made slightly too long, saw off each projection at the back, and smooth the whole of the back with the plane, so effecting the finishing touches.
To avoid the necessity for nailing to the wall, get two pieces of hoop-iron about 1 1/2 in. long and 1/2 in. wide. To adapt each piece for its purpose, cut one end round and punch in a nail-hole and two smaller screw holes, as shown in Fig. 1. With a chisel cut a neat recess for each iron so that it can be sunk flush with the back, as shown in Fig. 2, and, inserting the screws, the work will be complete.
Continue to:
My Books

