Grate Fixing
Description
This section is from the book "Modern Buildings, Their Planning, Construction And Equipment Vol3", by G. A. T. Middleton. Also available from Amazon: Modern Buildings.
Grate Fixing
It may be said that there are but two things that are essential in grate fixing, one being to fill in all space around the back of the grate solidly, the other to see that the fixing is air-tight. In fixing what is called an "Interior," this being the fire-box and firebricks only (the sides being built up with tiled splay fronts), there is little difficulty about filling in the back solidly, - in fact, it could scarcely be done otherwise; but with grates which have ironwork extending to the mantelpiece on each side (as Fig. 86, for example) the filling is not so easily done, and is consequently often neglected. It must be done, however, even if it necessitates dropping in mortar (lime) concrete a trowelful at the time. When filled, the upper surface is benched-up smoothly so as to afford the least possible lodgment for soot.
In making the fixing air-tight, the filling-in just described serves to do this if properly done; but in any and every case there must not be any openings around the grate by which air can be drawn into the chimney without passing over the fire. This is essential. With the majority of Register grates a very brief examination usually shows an opening along the top edge (under the mantel-frieze), if not up the sides also, and this cannot fail to make the grate work less effectively than it would do. In frequent cases the grate works very badly, due to this.
All grates, whenever possible, should be secured to the side or back walls of their openings by iron cramps. This is a much neglected detail, and, in the case of interiors, the fixing soon gets into a loose and bad condition, the grate itself sometimes working forward as much as an inch on to the hearth Laying Tiled Hearths In ordinary apartments having wooden floors the hearth space is given a wooden border, as in Fig. 97, and it is very desirable, if it can be arranged, that the dimensions of this border be made to agree with the tiles, instead of cutting the outside tiles (or thickening the cemented joints) to suit the border. Supposing, however, that a tiled hearth has to be laid in an existing border, then, for a narrow space (between the tiles and border) probably a wood slip can be used, or a slip tile of the same colour. No work can be worse, or look worse, than that in which thick cement joints are made between the tiles to enable them to fill out a space. In cases where the tiles, when "offerred" down, prove to be a little too wide, then, if a tile cannot be abstracted and narrower slips substituted, the outside tiles must be cut. If a quite narrow strip has to be removed a keen chisel is used, care being taken to make the first cut on the glazed side of the tile; but if a \ inch or more has to be taken off, then a pair of carpenter's pincers may be employed. A very good cut can be made by nipping pieces off a tile, and breakages are reduced to a minimum when tiles are treated in this way. If very smooth edges are required they can be finally rubbed down on stone.
A hearth bed is first laid in cement and sand (one and one), and this is made true with a piece of wood known as a rule. This is illustrated in the lower part of Fig. 97, the ends being rebated so as to rest on the wood border of the hearth space. If it is thought that the cement will set too quickly, it can be killed by allowing it to nearly set, then breaking up the mass and remixing with water.
The hearth bed having been made level and true, at a depth below the wood border which will bring the tiles up level when laid, the tiles, having been previously soaked in water, are next placed in position. No cement is spread on the tiles; it is sufficient if they have their bottom surfaces dipped in some liquid cement. No cement should come on the sides between the tiles, and a visible cement joint is quite wrong. The middle tiles at the front should be laid first, an exact centre being obtained at the start. When all are laid a piece of stout flat board is placed on the tiles, and this is gently beaten so as to make all level. A further effect of the beating is to bring up a little liquid cement between the tiles, which is not objectionable, as it only fills spaces which would otherwise be hollow. A little dry cement can be rubbed over afterwards to fill any remaining spaces. The final task is to clean out any visible cement at the tops of the joints, this being done with a pointed piece of wood and a cloth.
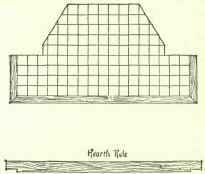
Fig. 97.
Continue to:
My Books

