Netting. Part 2
Description
This section is from the book "American Library Edition Of Workshop Receipts", by Ernest Spon. Also available from Amazon: American Library Edition Of Workshop Receipts.
Netting. Part 2
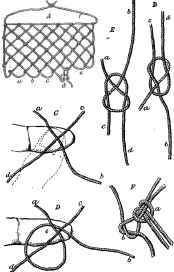
On looking at the knot, it will be seen that it can be securely tightened by pulling the end o, which bites the end a securely; whereas if a is pulled it slips under 6 without biting.
The above explanation shows the formation of the knot as it is used when stout cords or ropes are united by its means; but when it is employed to join threads or string, as in weaving or netting, a much more expeditious mode of making the knot is employed. The ends of the two cords to be united are crossed on the end of the forefinger of the left hand, the cord a b Fig. 345 C, being first placed on the finger, and the other cord c d put across it. The left thumb, the position of which is shown by the dotted line, is then placed over the crossed cords. The cord b is then to be wound round (over the thumb) in a circle and passed between the two ends, behind a and before c, as shown in Fig. 345 D. The knot is completed by turning the end c downwards, passing it through the loop at e, securing it under the left thumb and pulling 6, when the knot is formed as shown in Fig. 345 E. It is also represented in Fig. 345 B, but turned over to show the other side, the letters of reference being the same in both figures.
Facility in making this knot must be acquired, as its use is indispensable to the netter.
A knot which will be found of great use in shortening or lengthening the cords employed in stretching out the different parts of a net whilst it is being mended is shown in Fig. 345 F. A loop of cord a is formed into an eye; through this the two ends of the same, or of a second, cord are passed and twisted, as shown at o; this secures the ends, and prevents them slippingback through the eye. The great advantage of this knot is that, when it is wished to shorten the cord, the eye is pushed farther back, and the twist or half-bend pulled tight down to it. On the other hand, when it is requisite to lengthen the cord, the reverse proceeding is had recourse to.
It is not generally known that there are two perfectly distinct modes of netting; one of these, which is adapted for making small meshes, is the only one usually recognised; the other is employed for strong work and coarse meshes. The former is called the under edge, or little finger knot, or, in general parlance, simply "netting."
To commence a net, tie together the two ends of the cord forming the foundation (/ Fig. 346 G), and secure it firmly in any convenient manner, as by passing it under the foot, letting the part to which the netting is to be attached reach 3-4 in. above the knee when the netter is seated. In making large nets, which are most rapidly executed if the netter works standing, the foundation should be fastened to a hook, or rod in a wall, placed as high as the face of the netter; it then not only bears the weight of the net, but also supports the left hand, which holds the mesh peg. Tie the loose end of the string with which the net is to be made, which has been previously wound on the needle, to the foundation, as shown at d. The mesh peg s is held between the thumb and forefinger of the left hand, and the knot d is pulled up close to its edge. The needle carrying the string is brought back over the mesh peg, then forwards underneath it, the string being caught by the third finger r, which should be kept well away from the mesh peg as shown in the figure; it is then carried forwards under the mesh peg and then to the left, being caught by the thumb as shown at t.
The loose string is then thrown forward on the foundation, and the needle, having been brought backwards, is again passed forwards through the loop of cord that is hitched on the third finger, then under the mesh peg, and lastly through the foundation; this is the position represented in Fig. 346 G. The right hand is now shifted from the back part of the needle to the front end, and it is pulled forwards from under the mesh peg and through the foundation. By this action the loose cord is drawn tight round the little finger, and the knot is completed, but requires tightening. This is done by first loosening the cord under the thumb, then allowing it to slip off the third finger; all the slack cord is then pulled up by the right hand, and when the knot which is thus formed is pulled close to the mesh peg (against which it is held by the forefinger), the loop is allowed to slip off the little finger at /, and the string is pulled tight, thus completing the knot and netting a single loop on to the foundation.
In describing these movements it is necessary to mention them as if they were perfectly distinct from one another, but in the actual practice of an expert netter there is no Dause between them, and they follow each other so rapidly as to seem one continued movement.
Netting.
In Fig. 346 G, the thumb and forefinger are shown away from the knot in order that it may be seen, but quick workers hold the end of the thumb and tip of the forefinger together, and the second finger holds the knot as it is tightened.
The loop first netted is allowed to remain on the mesh peg, and a second, which is a repetition of the first, is then made, and as many more as may be required to complete the first row. When these loops are too numerous to be conveniently held, they are pushed off the left end of the mesh peg. The loops in the first row netted do not form complete meshes, but when the mesh peg is withdrawn appear as in Fig. 346 H, which shows a foundation with three loops netted on it and a fourth not tightened up. If the foundation is pulled out before a second row of loops is netted, the knots become loose, and the string lengthens into a straight cord.
When the required number of loops has been made, the mesh peg is pulled out and the foundation and the row of loops are turned over, so as to bring the under side on top and the right hand end to the left. The netting is then recommenced in the same manner, with this difference, that, instead of passing the needle through the foundation, it is passed through the loops of the row first made; these being taken up in succession one after another. The mode in which a loop is taken up is shown in Fig. 346 J, where two loops of a row are shown on the mesh peg and a third in the process of formation (to avoid confusion, the other parts of the net are not shown).
Continue to:
My Books

