To Baste Sleeves
Description
This section is from the book "A Manual Of Home-Making", by Martha Van Rensselaer. Also available from Amazon: A Manual of Home-Making.
To Baste Sleeves
For a shirt-waist sleeve, make the placket and apply it before basting the sleeve. The placket is generally placed about 1 inch back of the center fold, made by folding the sleeve along the seam. After the placket has been placed and stitched, the seam of the sleeve is basted and stitched, and the cuff is sewed on. In adjusting the gathers at the bottom of the sleeve, leave the sleeve without gathers for a space of about 1 inch on each side of the seam. Gather the sleeve to fit the cuff.
For a simple cuff or a French cuff, place the two right sides of the cuff together, and stitch the cuff across the two ends and the bottom. Then miter the corners to remove the excess material. Turn the cuff right side out, crease it very sharply around the edge, and baste it perfectly flat. Across the top turn in 1/4 inch toward the wrong side along both the right and the wrong side of the cuff, and baste down this allowance. Fold the cuff from end to end, and locate the center. One inch toward the end of the cuff which is to be sewed to the back of the sleeve, place the seam of the sleeve. Insert the gathered sleeve between the upper edges of the cuff, pinning the indicated points together. Pin the gathers toward the front and the back of the cuff, adjusting them as suggested, and allowing the placket of the sleeve to remain perfectly smooth. Baste the right side of the cuff to the sleeve. Turn the sleeve to the wrong side, and baste the inner side of the cuff in place 1/16 inch above the outside basting in order that the. inside will be caught by the stitching from the right side. Stitch entirely around the cuff 1/16 inch from the edge. Stitch again across the top 1/4 inch below the first row of stitching.

Fig. 79. - Designing narrow or full circular skirt pattern. A, Method of placing a six-gore pattern for a slightly circular skirt with gathers at the waist-line. In cutting a skirt of this kind, a seam may be placed in the center front, center back, or over the hips, as desired. B, Method of placing a six-gore pattern to make a circular skirt full at the bottom and fitting smoothly at the waist-line and hips. The gores may be spread apart and uneven amounts of fullness thus thrown in.
For a close-fitting sleeve finished with a facing, baste the sleeve and try it on before stitching and finishing the bottom.
For a shirt sleeve, one similar to the sleeve of a man's shirt without gathers at the top, baste the sleeve into the waist before either the seam of the sleeve or the under-arm seam of the waist is joined. In this case the placket may be applied before the sleeve is set in, but the cuff cannot be placed.
To baste in a shirt-waist or a coat sleeve.
The following scheme of locating the sleeve proves satisfactory for almost any type of sleeve. This is of course only a general rule, since all sleeves must finally be adjusted to the person if they are to be truly artistic.
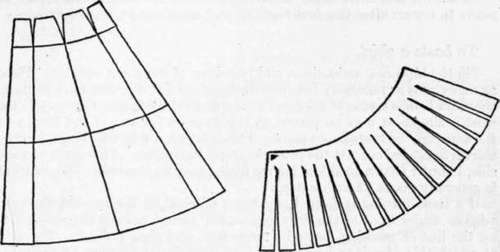
Fig. 80. - Method of cutting a pattern for a circular flounce. Fit together the gores of a six-gore skirt on top of a paper; trace around the lower edge of the skirt, the center front, the center back, and across the skirt where the flounce is. to be attached; remove the pattern and cut along the tracing; from the bottom slash the flounce to within 1/2 inch of the top of the flounce, and spread it apart as desired. This flounce is very circular unless it is divided into sections, and if this is done, they should be so placed that a straight edge falls on a bias edge as in a skirt.
1. Measure 1 inch back of the shoulder seam at the armhole. Using this as the dividing point, fold the armhole in half. The point opposite this first point is the point at which to place the seam of the sleeve.
2. Pin the seam of the sleeve in place.
3. Bring the shoulder seam of the waist down to the under-arm seam of the waist, and fold the armhole flat. The two points thus located on the sides of the armhole are the points between which the gathers of the sleeve should be adjusted.
4. Pin the sleeve in place, working from the seam towards each of the points located. Then pin the remainder of the sleeve, holding the fullness easily between these two points. If there is too much fullness to pin in place, gather it with one thread on the tracing, and a second thread slightly below, or toward the cuff of the sleeve.
5. Adjust the gathers to fit the armhole, making the center of the sleeve fall in a perfectly straight line from the highest point of the shoulder. If the gathers are allowed to fall forward rather than backward, a slight cup is formed in the front of the sleeve to fit over the point of the shoulder.
6. Pin and baste the entire sleeve in place.
To baste a collar or other decorations.
Baste all parts of the waist as far as possible, in order that they may be ready to try on after this first basting, and thus avoid repeated fittings.
Continue to:
My Books

