Copper Tiles
Description
This section is from the book "A Treatise On Architecture And Building Construction Vol3: Stair Building, Ornamental Ironwork, Roofing, Sheet-Metal Work, Electric-Light Wiring And Bellwork", by The Colliery Engineer Co.. Also available from Amazon: A Treatise On Architecture And Building Construction.
Copper Tiles
80. Copper roofing tiles are made in imitation of most of the different forms of terra-cotta tiles. They are extensively used, principally on account of their cheapness and lightness. Like all other tiles, they are generally laid by beginning at the eaves and continuing to the ridge. Great care must be taken in laying the first course, called starters. On this depends the appearance of the entire roof, for if the starters be out of line horizontally, the finishers at the ridge show the same defect; and should there be intercepting roofs, the defect will show at the valleys as well.
81. The most popular form used is the imitation of the Spanish clay tile, as shown in Fig. 6G. This pattern is interlocking, and is secured to the roof with nails driven through the right-hand flange a. The fillet collar b near the upper end forms the horizontal joint with the tile above, and the sides connect with a vertical side lock, as shown at a, Fig. 67, rendering them water-tight. At b, Fig. G7, is the flange, which is nailed to the roof.
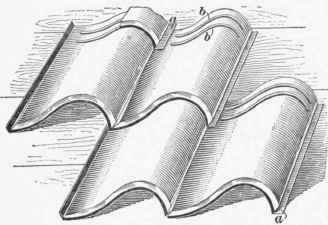
Fig. 66.
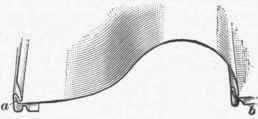
Fig. 67.
82. Ridges and hips are made in different forms to go with the tiles; the most common one is shown at a, Fig. 68.
On the hips the tiles must be cut to the proper angle and fitted to the hip strip b, the roll being placed over them and nailed through its flanges.
The valley tile must be cut in the same way, the open ends of the tile being closed with pieces cut to the shape of the tile and soldered in. Where these tiles are used, the valley flashing should never be less than 20 inches wide, and in nailing the tile over it, the nails must be well driven.
In nailing the gutter tile in place, care must be taken not to drive the nails into the gutter, under the side lock, as it would cause the roof to leak. Flashings should be constructed in the manner shown under the head "Tin Roofing," and of 14 or 16 ounce metal. All valleys and gutters should be 16 or 18 ounce metal.
83. Conical-tower roofs may be covered with two kinds of special tile, graduated to correspond to the pitch; of these, one is made flat and the other round, as shown at (a) and (b), Fig. 69.
The roof is prepared for these tiles by attaching wedge-shaped strips, as a, Fig. 70, to the sheathing, the edges of the flat portion of the tile being nailed to the strips as shown at b. The round tiles are placed over the strips, lapping the upturned edges of the flat tiles. They are nailed through the strips at the upper end c, and the lower, or butt, end d nailed into the end of the strip.

Fig. 68.
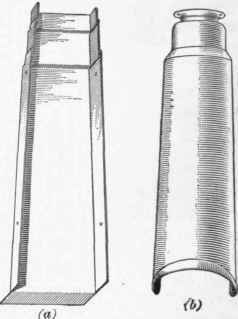
Fig. 69.
84. For straight surfaces the following sizes of tiles are used: 7 in. X 10 in., 10 in. x 14 in., and 14 in. X 20 in. The last is better adapted to large roofs, but for ordinary roofs 10 in. x 14 in. is the size recommended. These tiles may be made of 12, 14, or 16 ounce copper.
A square will require four hundred 7 in. X 10 in. tiles; one hundred and seventy-four 10 in. X 14 in. tiles; or seventy-two 14 in. X20 in. tiles. These quantities allow for laps, waste, cutting, etc.

Fig. 70.
Continue to:
My Books

