Chapter XV. Camper's Correlation With Nature
Description
This section is from the book "Creative Crafts For Campers", by Catherine T. Hammett and Carol M. Horrocks. Also available from Amazon: Creative Crafts For Campers.
Chapter XV. Camper's Correlation With Nature
Living out-of-doors and living with nature are the same. One cannot live happily out-of-doors without knowing the ways of nature, without knowing what resources can be used, and without an awareness of the wonders of the universe. It is impossible to go camping without being a part of nature; it is impossible to "do" nature without going out-of-doors, at least some of the time. Nature and outdoor activities are so closely related that this book, written about arts and crafts in camping, also includes much about nature. Knowledge and enjoyment of the out-of-doors is one of the objectives of camping, and the more one sees, hears, smells, feels, and touches, the more he learns to know and to use the out-of-doors, and the more happily he lives with and in it. With that enjoyment and that living goes a responsibility for the out-of-doors, a responsibility to use materials wisely, to conserve, and to help increase the resources. Appreciation and knowledge help us to understand conservation; good camping practices and good outdoor citizenship ensure camping places for generations to come.
As the chapters of this book have been compiled with these aims in view, activities and projects that are correlated with nature are found in any chapter. This particular chapter fwill serve to point out those arts and crafts activities that may be part of the specific nature program in the camp, that will help campers to know more of the creatures and things of nature and to gain an appreciation of nature's treasures.
Nature study is an activity that may be a special activity area in a camp program. With so much that is fascinating in the world of nature, a whole summer is not enough time to spend on getting acquainted with cardinal flowers or cardinal birds, pine or palm trees, walking sticks or mud dabbers, turtles or tadpoles, pebbles or crystals, clouds or sunsets. Often the way of catching the first interest of campers is to help them make something that will aid in nature study-an animal "tourist home" (for just a nightl); a chart for recording birds seen in the camp; or a place for animals to walk at night, .so casts can be made of the footprints and tracks. Crafts help in this discovery of the world around campers. From the nature angle, they should help campers to know more of the wonder of the out-of-doors; from the craft angle, they should make use of craft fields and techniques to make individual, well-fashioned articles.
Since conservation of natural resources and respect for the woods and the bounty found in them are such important facets of crafts in the nature program, a close tie-in with conservation practices and programs is important. Slogans and pledges may be used to help instill good citizenship practices in campers. One of these is the Conservation Pledge:
I give my pledge as an American to save and faithfully to defend from waste, the natural resources of my country, its soils and minerals, its forests, waters, and wildlife.
Another is the pledge of the Audubon Junior Clubs:
As a good citizen, I pledge myself to try in every way I can to protect my country's soil, water, plants, and xvildlife from harm and waste, and to try to increase their abundance.
Such pledges may be attractively presented on posters and displayed in lashed frames in the camp's gathering places, the nature den, and the craft workshop.
So many activities might be included in this area that it is impossible to list them all, or to give directions for more than a few. Among the many books which give much help in crafts in nature, these will be found basic for the craft library: Group Fun, The Leader's Nature Guide, The Book of Nature Hobbies, and The Nature Program Guide.
In general, in using natural materials for crafts or other activities, it is wise to seek the advice of the nature counselor or local authorities. Materials that are found in abundance in the camp locality may generally be safely used. A good rule is to leave more than one takes, and to be sure that seed plants are left for the future. Service projects to protect or to plant willow groves, brush straw, honeysuckle vines, and similar materials usable in crafts will make fine activities for campers and provide good co-operative ventures for the nature and craft counselors.
Projects
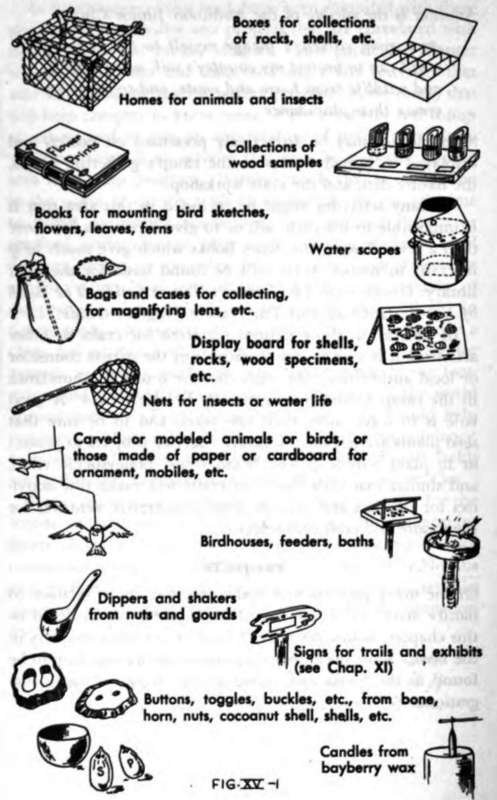
Of the many projects that make use of crafts in relation to nature activities, a few have been worked out in detail in this chapter; many others are found in the other chapters in the book. Some need only suggestions, or perhaps help to be found in the books mentioned above. Here are those suggestions:
Nature Prints
Leaves, grasses, seed pods, and similar nature objects may be used to make a variety of prints. Two such processes, spatter printing and blueprinting are described in Chapter VII (Printing And Stenciling). Some other very simple processes are included here, for use in making nature records. Prints of leaves or flowers may be made for personal nature-lore books, or for a record of trees, ferns, etc., found on the campsite. Such a record would be for the use of the whole camp. Prints may also be used for invitations, end papers, covers, writing paper, and similar craft projects.
Good craftsmanship in tidy work, color combinations, and interesting arrangements will make the project a good craft venture. It is also important for the camper to progress from the making of a print to the identification of and interest in the trees, bushes, and plants from which the leaves are obtained.
In general, it is good to press grasses, ferns, and flowers before printing with them, but most leaves may be used as they are picked. When picking a leaf, do it carefully, so as not to injure next year's leaf bud.
Crayon Prints
Equipment and materials needed: wax or pencil crayons; soft paper, such as mimeograph or typing paper; construction paper for mounting; scissors; rubber cement; newspapers; leaves, etc., as desired.
Steps
1. Press specimen, if necessary.
2. Place a pad of newspapers on working surface. Put leaf on pad, top surface down, and cover with piece of plain paper.
3. Hold paper firm with one hand, and color paper over the leaf with parallel strokes of the crayon, using flattened end or side. The veins and stem of the leaf will stand out darker than the background.

4. Cut out the shape of the leaf from the paper, to eliminate the marks that ran over the edge.
5. Mount cutout leaf on paper of constrasting color, using rubber cement. Make good arrangement of one or several leaves.
6. Press until dry.
Ink Prints
Equipment needed: 2 rollers, one for ink, one for pressing; piece of glass; hard working surface; newspapers; kerosene.
Materials needed: printer's ink; paper-mimeograph or construction; leaves, ferns, etc.
Steps
1. Arrange a work area for efficient use by placing glass and ink on left, inking pad of newspaper next to the right, then newspaper on which is placed the paper to be printed (Fig. XV-3). Cut sheets of newspaper into quarters.
2. Squeeze out about 1/2" of ink on glass, and roll out evenly with ink roller. Use a drop of kerosene to thin, if necessary.
8. Lay leaf or fern vein side up on the inking pad. Roll inked roller over it, covering with ink evenly.
4. Pick up inked leaf by stem and lay it inked side down on the paper to be printed, placing as desired. Mark this spot before beginning inking, so leaf will be placed accurately.
5. Cover the leaf with a piece of paper, and roll with the clean roller, or with the heel of the hand or the bowl of a tablespoon.
6. Remove top paper, then remove the leaf carefully. Print will be on the lower paper (Fig. XV-3). Let dry.
7. Throw away the top piece of paper on the inking pad, so clean sheet is ready for next inking.
8. Same leaf may be used again and again for printing.
9. When finished with one color of ink, clean roller with newspaper, then kerosene. Scrape extra ink from glass with putty knife, and clean it with kerosene and rag.
Ink pad or carbon prints are made in similar fashion, but the leaf is placed vein side down on the ink pad or carbon, a piece of paper is placed over it, and the paper is rubbed with fingers or bowl of a spoon. The inked side of the leaf is placed vein side down on paper to be printed, covered with another paper, and rubbed as above.
Smoke prints are made in a fashion similar to that used for ink pad prints, but the "ink" is made by holding a piece of greased paper (like Kraft wrapping paper) over a candle flame. The paper is moved constantly over the flame, so the smoke of the flame is caught on the greased portion, forming "carbon." The paper is then used as in the carbon or ink pad printing above.

Continue to:
My Books

