Horse
Description
This section is from the book "Handcrafts For The Homebound Handicapped", by Mildred Kroll Rich. Also available from Amazon: Handcrafts For The Homebound Handicapped.
Horse
Materials And Supplies
1/2 yard plastic material, flannel back vinyl coated material, oilcloth, felt, or leather ;
2 sheets paper, 10" x 12"
2 ounces 4 ply knitting worsted cardboard about 81/2" x 11" 2 flat buttons 3/4 " diam. ;scrap material for stuffing
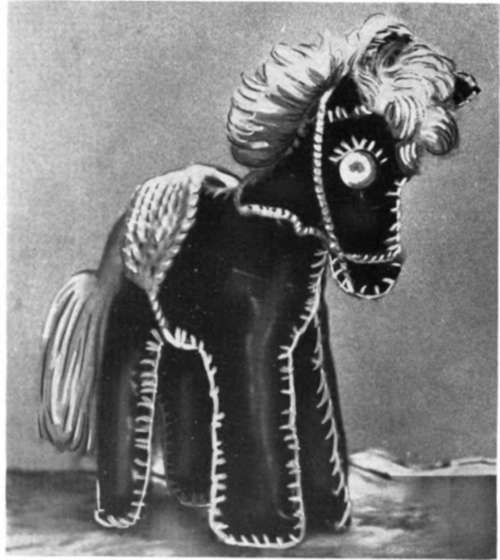
Figure 56. Horse.
Tools
pair of scissors yarn darning needle crochet needle size 0 (optional) pencil ruler straight pins
This soft cuddly horse with its fluffy mane and generous yarn tail, complete with saddle and reins, makes a handsome toy for a child. The horse will be as strong as the original material used and the quality of the workmanship. The horse in the photograph was made of black flannel back vinyl coated material and white yarn.

Figure 57. Pattern for Horse Body.
Procedure
1. Measure and draw one inch squares on both sheets of paper. Using the patterns above and on the following page, draw the four pattern pieces of the horse as accurately as possible. On the body pattern mark the position of the eye, eyebrow, the two dots for the ear placement, and the tail. Copy all the markings on the other pattern pieces, and cut them all out carefully. Pin the body pattern, the inner legs, and the ear to a double thickness of material. Be sure to place the inner legs pattern on the fold of material as directed. Cut out the material accurately. You should have two body pieces, four ears, and one set of inner legs. Transfer all markings to the material.
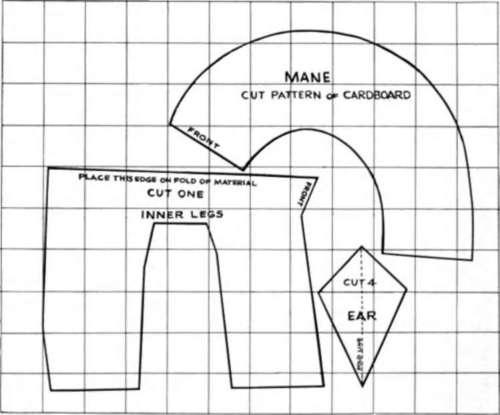
Figure 58. Patterns for Horse Legs, Ear, and Mane.
2. Pin two pieces for an ear together with the right side of the material on the outside. Thread the needle with yarn about 24 inches long and make a knot at the end. If you use a longer piece of yarn it tends to fray and becomes weak through usage. Proceed to make the blanket stitch all around the four sides of the ear. Repeat this process for the second ear. See detail of blanket stitch on following page.
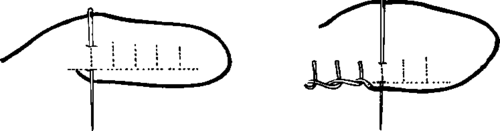
Figure 59. Blanket Stitch Detail for Horse.
Blanket stitch:In order to hide the knot, insert the needle between the two pieces of fabric near the bottom of the first stitch to be taken and bring the needle to the front. Insert the needle through both thicknesses of fabric at the top of the stitch guiding the needle to the bottom, but with the needle coming over the thread or through the loop. Make all the stitches the same way about a quarter of an inch apart and about a quarter of an inch deep. When a new piece of yarn is needed, knot the new thread and the old together close to the fabric, conceal the knot between the two pieces of material, and continue to sew.
Fold the completed ears in half lengthwise and sew them to the sides of the head at the points indicated. Use a small stitch and fasten securely. The ears must face forward.
3. ;Sew the buttons on for the eyes, and using the blanket stitch, embroider the eyebrows. Have the same number of stitches for both eyebrows.
4. ;Pin the inner legs to the legs of the body, wrong sides together. With the outside of the horse facing you, sew the horse together beginning at the top of the inner legs at the front. Use the blanket stitch going down and up each leg until all four are completed. The legs must now be stuffed before continuing sewing.
5. ;Cut the scrap material into small pieces, about one inch square, and pack the stuffing firmly into the four legs. You may use old cotton socks, towels, sheets, and the like, as long as they are clean and dry. It is not advisable to use old nylon stockings to stuff this type of toy because there is not enough body to the nylon to allow the horse to stand.
6. ;Continue closing the horse by sewing the back and top of it first. Stuff that part of the horse before proceeding. Sew the top and the front of the head closed, leaving an opening large enough to complete the stuffing. The final sewing should be under the head and neck.
7. ;Mark the pattern for the mane on cardboard and cut the pattern out. Hold the cardboard mane pattern in place over the horse's head with the front end at the level of the eyes. With two yards of yarn threaded double through the needle, insert the needle at the bottom below the cardboard, go through the horse the same depth as the blanket stitches, and bring the yarn over the top of the cardboard. Make forty stitches over and under the cardboard evenly until you reach the end. Use additional yarn as needed. With scissors cut the yarn at the top of the cardboard and remove the cardboard. You should now have eighty strands of yarn which must be knotted. Prop the horse up with its head facing you. Tug gently at the first strand of yarn so that you can locate the other end of the same strand. Knot the two ends of the same strand together close to the head with a square knot if you know how to make one; otherwise make two simple knots. Repeat this double knot for each strand from front to back. Comb the mane upwards and trim with scissors.
8. ;Cut a rectangular piece of cardboard 3" x 5" as a gauge for the tail. With single yarn, wrap around the five inch length seventy times. Slide a strand of yarn under the yarn at the top and tie firmly. Cut the yarn at the bottom of the cardboard and finish the tail by winding around the tip as shown below. Attach the tail firmly to the body and sew it on with yarn going over the top of the tail in such a way that the finished tail looks as though it grew there.
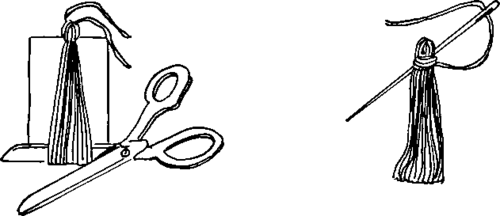
Figure 60. Tail Detail for Horse.
9. If you know how to crochet, or if a member of your family can help you out, the saddle is made oval shaped. Begin with a chain of twelve stitches and work single crochet stitches all around, increasing three stitches at the short ends only. Work five rows on each side of the original twelve stitches and attach with a chain stitch length of about four inches under the horse and tie to the other side of the saddle. The reins are simple chain stitches and must be drawn through the blanket stitches as shown in the photograph.
Continue to:
My Books

